Difference between revisions of "Warmaster Seerus"
From SpiralKnights
m (moved Seerus to Warmaster Seerus) |
|||
| Line 1: | Line 1: | ||
| − | Not | + | __NOTOC__ |
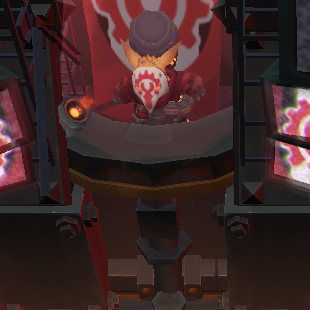
| + | [[Image:Monster-Warmaster_Seerus.png|thumb|right|400px|Warmaster Seerus. Not shown: Warmaster Seerus.]] | ||
| + | __TOC__ | ||
| + | Warmaster Seerus is a member of the [[Crimson Order]]. He owns the [[Grand Arsenal]] and is the mastermind behind countless gremlin war machines, including the [[Roarmulus Twins]]. | ||
| − | + | ==Battle== | |
| − | He is a | + | Warmaster Seerus has five phases. During the first and third phases, Seerus is perched above the area while his minions do battle. Below him are three [[Battlepod]]s. The left and right Battlepods do not have shields and will respawn, while the middle one does have a shield and ends the phase when destroyed. In the second and fourth phases, Seerus joins his minions in the fight, wielding his mighty Rocket Hammer. He dashes around trying to smash the player with his hammer. A charged smash from his hammer will send out lines explosions in multiple directions. Once he takes enough damage, he will retreat and summon another central Battlepod. In the fifth and final phase, Seerus once again joins the fight in addition to the three Battlepods, all of which now have shields. Once Seerus is defeated, he self-destructs the Grand Arsenal, and the player escapes, picking up a tier-dependent mask fragment on the way out. |
| + | |||
| + | ===Strategy=== | ||
| + | |||
| + | ==Video== | ||
| + | |||
| + | ==Notes== | ||
| + | |||
| + | ==See Also== | ||
| + | |||
| + | * [[Gremlin]] | ||
| + | * [[Crimson Order]] | ||
| + | * [[King Tinkinzar]] | ||
| + | * [[Snarbolax]] | ||
| + | * [[Roarmulus Twins]] | ||
| + | * [[Royal Jelly]] | ||
| + | |||
| + | [[Category:Bosses]] | ||
| + | [[Category:Monsters]] | ||
Revision as of 02:45, 3 March 2012
Contents
Warmaster Seerus is a member of the Crimson Order. He owns the Grand Arsenal and is the mastermind behind countless gremlin war machines, including the Roarmulus Twins.
Battle
Warmaster Seerus has five phases. During the first and third phases, Seerus is perched above the area while his minions do battle. Below him are three Battlepods. The left and right Battlepods do not have shields and will respawn, while the middle one does have a shield and ends the phase when destroyed. In the second and fourth phases, Seerus joins his minions in the fight, wielding his mighty Rocket Hammer. He dashes around trying to smash the player with his hammer. A charged smash from his hammer will send out lines explosions in multiple directions. Once he takes enough damage, he will retreat and summon another central Battlepod. In the fifth and final phase, Seerus once again joins the fight in addition to the three Battlepods, all of which now have shields. Once Seerus is defeated, he self-destructs the Grand Arsenal, and the player escapes, picking up a tier-dependent mask fragment on the way out.
