Difference between revisions of "Shieldbearer Guide"
From SpiralKnights
m (→The Basics) |
|||
| Line 73: | Line 73: | ||
One of the most useful techniques, especially with swords. This technique is based on holding your shield as soon as you attack with your sword, this will cause an animation cancellation in your attack, making your attack not only finishing quicker, but also having the chance of shield bumping or blocking an enemy's attack. | One of the most useful techniques, especially with swords. This technique is based on holding your shield as soon as you attack with your sword, this will cause an animation cancellation in your attack, making your attack not only finishing quicker, but also having the chance of shield bumping or blocking an enemy's attack. | ||
| − | In the animation on the right, a knight demonstates shield canceling with his | + | In the animation on the right, a knight demonstates shield canceling with his [[Cold Iron Vanquisher]]. After attacking, he quickly raises his shield; as soon as the attack animation is interrupted, he begins the next attack. If timed perfectly, the shield shouldn't show; despite this, it still causes a shield bump (see above) if an enemy is close enough. |
*''Understand that applying this technique with a proper timing will make you not only attack quicker than your actual sword combo, but you will also shield bump while staying in the same place!'' | *''Understand that applying this technique with a proper timing will make you not only attack quicker than your actual sword combo, but you will also shield bump while staying in the same place!'' | ||
Revision as of 06:21, 17 September 2011
| |
The topic of this article or section is subject to personal opinion, and does not represent any one absolute truth. |
| If you disagree, discuss your concerns on the the talk page before editing. |
| |
|
|
Introduction
No matter what weapons you bring with you into the Clockworks, you can (and should) equip a Shield. Shields are among the most powerful and versatile tools in Spiral Knights, and their proper use is key to survival for all knights. Some knights may be swordmasters, gunslingers, or bombers, but everyone should master their shield.
The Basics
Holding your block button will reduce your movement speed but raise your shield. While raised, your shield negates essentially all damage and status effects that you would otherwise sustain (even weird stuff you wouldn't expect a shield to block, such as spike traps or breath attacks, though it will not block damage from fire once you have started burning).
The direction you are facing is irrelevant; shields are omnidirectional. Shields do not prevent you from being knocked back. You will be momentarily immobilized whenever something impacts your shield, and in the case of melee attacks, the attacker may be pushed away.
Blocking is generally the fastest and most reliable means of avoiding damage when you see an enemy winding up for an attack. Additionally, dodging often requires moving farther away from an enemy, so blocking can be important for penetrating a hail of ranged attacks or staying close enough to an enemy to easily counter-attack. In some cases, you may find yourself without space to dodge, and blocking will be your only option.
But though your shield can save you from perils varied and grave, the shield has its own health rating, which decreases each time it blocks damage or a status. The shield's current health is indicated by the color of the dome of light that appears while the shield is raised:
- Shield Health
Full Health
Slight Damage

Moderate Damage
Heavy Damage


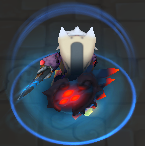
Shields quickly regenerate health if they go a few seconds without blocking anything, but if they take too much damage without a rest, they will break. A broken shield is disabled for approximately 8 seconds, during which time it can still be raised (which will still reduce your movement speed), but shows only a red aura around your feet (see left) instead of the usual light dome, and provides no defense at all!
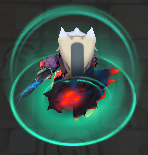
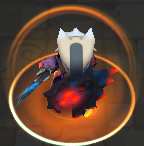
After 8 seconds, your shield turns orange and can once again block damage and statuses, and will quickly regenerate to maximum health if it doesn't immediately take damage again. You will see a brief cyan flash around your feet when your shield recovers, even if you are not blocking at the time (see right).
If your shield breaks, your ability to protect yourself is severely diminished, and it is usually wise to retreat while it recovers (if possible). When fighting monsters that are too fast or too well-positioned for you to avoid them for 8 seconds, extreme care should be taken not to let your shield break in the first place. For example, if you attract the attention of several turrets at once in an Arena or Danger Room, you should try to dodge as many attacks as possible (rather than blocking them) until you have defeated enough turrets in one part of the room to create a relative "safe zone" to which you can retreat if necessary.
Shield Statistics

Shields have several statistics that affect how well they perform. Holding your mouse cursor over a shield in your arsenal will show a window similar to the one at the right.
All shields have a Health stat, which determines the amount of punishment the shield can absorb before breaking. Shields can also have resistance to one or more damage types or status effects; this reduces the amount of health the shield loses when blocking that type of damage or status. Thus, the shield pictured to the right will break more quickly when subjected to piercing or shadow damage, but will hold up longer against normal or elemental damage due to its defense. Naturally, it's helpful to tailor your shield selection to the enemies you will be facing--but this requires that you acquire multiple shields.
As with other equipment, shields can accumulate heat to increase some of their stats.
None of a shield's stats provides any direct benefit to you; the damage you take when your shield is lowered (or broken) is completely unaffected by the type or level of your equipped shield. A shield's stats only protect the shield.
A scant few shields also have abilities, which provide passive bonuses as long as the shield is equipped. At present, the only shields with abilities documented on this wiki are the Bristling Buckler (and its upgrades), the Swiftstrike Buckler, and the Scarlet Shield.
Shield Bumping
An important secondary function of shields is their ability to push opponents around. At the moment you raise your shield, enemies that are very close to you are knocked away (raising your shield and then walking into enemies will not move them).
Since shield bumping only works at the moment your shield is raised, you need to lower your shield before you can bump. Nontheless, shield bumping is a powerful and versatile technique that can be used for:
- Defense (knocking an enemy away before it attacks you)
- Forcing your way through a "wall" of enemies, or escaping when surrounded
- Herding enemies into favorable locations, such as:
- Grouping enemies together for area attacks
- Separating enemies so they cannot support each other
- Trapping enemies in corners, or other locations where you can beat on them more easily
- Moving enemies away from traps or other hazards, so you don't accidentally damage yourself while attacking them
It is important to note that momentum does NOT transfer: bumping one enemy into another will never move the second enemy. Thus, if you ever find yourself trapped in a mob of enemies two layers deep, you will not be able to move them by shield bumping, and will need to rely on the knockback of your regular attacks to escape.
As with all knockback effects, shield bumping can make it harder for your allies to attack an enemy or to avoid its attacks. You should usually avoid bumping enemies towards nearby allies, or bumping enemies that an ally is preparing to attack (though there are always some exceptions). Shield bumping can also separate you from an enemy you were hoping to attack yourself, so you may want to back up a couple steps before blocking if you intend to counter-attack.
Advanced Techniques

Shield Canceling
One of the most useful techniques, especially with swords. This technique is based on holding your shield as soon as you attack with your sword, this will cause an animation cancellation in your attack, making your attack not only finishing quicker, but also having the chance of shield bumping or blocking an enemy's attack.
In the animation on the right, a knight demonstates shield canceling with his Cold Iron Vanquisher. After attacking, he quickly raises his shield; as soon as the attack animation is interrupted, he begins the next attack. If timed perfectly, the shield shouldn't show; despite this, it still causes a shield bump (see above) if an enemy is close enough.
- Understand that applying this technique with a proper timing will make you not only attack quicker than your actual sword combo, but you will also shield bump while staying in the same place!
Though shield canceling does not change the maximum length of your combo, your first attack after blocking will always be your weapon's opening attack. For example, the Brandish normally performs a 3-hit combo where the first attack is made standing still, the second is made with a step forward, and the final attack has a step with increased sweep and damage. If you shield cancel the first attack and then continue attacking, you will perform the first attack twice, followed by the normal finisher--effectively replacing the second attack of the combo with a copy of the first attack.
Notice the animation at the right shows the same attack three times, instead of the normal 3-hit combo. This gives up the extra damage you would normally deal on the finisher and still forces a pause in your combo after the third slash, but it allows you to stay in one place while attacking with a weapon that would normally propel you forward, and may not leave you vulnerable for as long as a normal finisher.
Shield Charge
This technique is basically a way to start your charged attack directly from shielding. Begin holding the attack button (as you would to charge an attack) while your shield is raised, then lower your shield a moment later (not instantly). If you time it correctly, you will begin charging an attack with your weapon as soon as your shield is lowered.
The minimum time you need to hold attack before releasing shield in order for this technique to work seems to be around half a second; there doesn't seem to be a maximum.
This works with all types of weapons, and when performed with a sword or gun allows you to skip the regular attack you would normally make before beginning to charge.
| |
|---|
| Starting Out | New Player Briefing | User interface | Useful Links |
| |
| |
| |