Difference between revisions of "Shroud of the Apocrea (Mission)"
From SpiralKnights
m (→Notes: micro edit) |
m (→Gallery: format (will word these better later)) |
||
| Line 119: | Line 119: | ||
</gallery> | </gallery> | ||
|width = 510px}} | |width = 510px}} | ||
| − | + | ||
| + | {{showhide|Fire + 2 Big Candles|content = | ||
<gallery heights=200px widths=200px perrow=3> | <gallery heights=200px widths=200px perrow=3> | ||
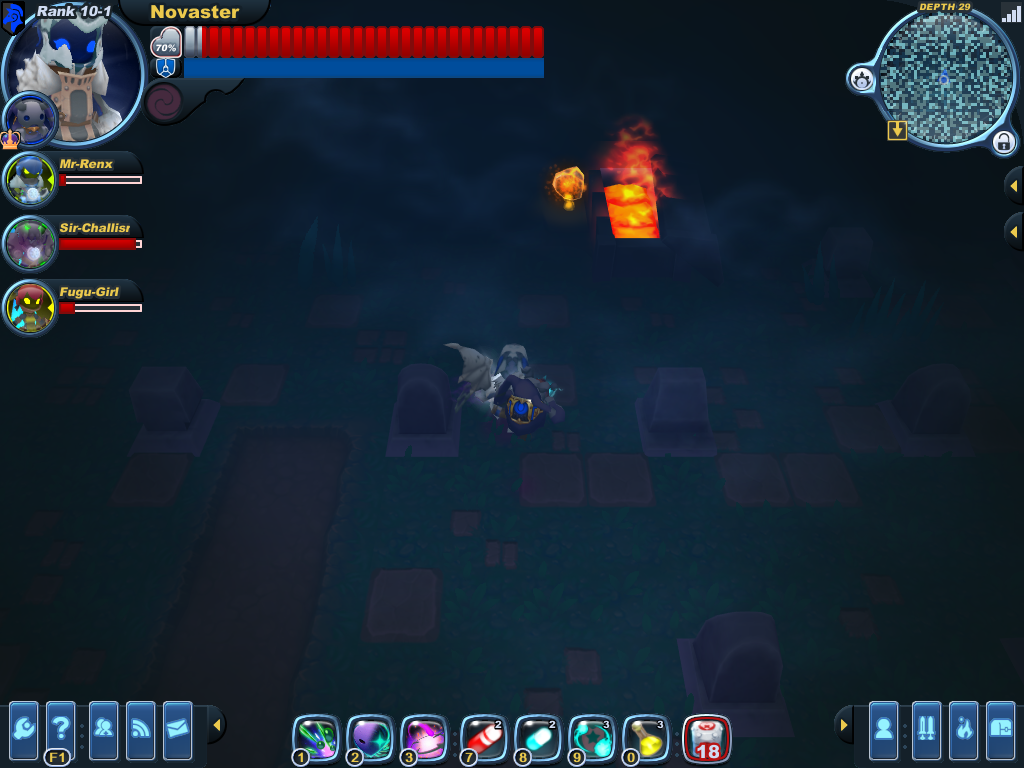
Image:Level_Shroud_of_the_Apocrea_puzzle_fire_emberloader.png|This ball of fire is picked up and used to light an unlit candle somewhere. It might be very far away, or very close! | Image:Level_Shroud_of_the_Apocrea_puzzle_fire_emberloader.png|This ball of fire is picked up and used to light an unlit candle somewhere. It might be very far away, or very close! | ||
Image:Level_Shroud_of_the_Apocrea_puzzle_fire_candlepair.png|'''SOLVE:''' One of these candles is unlit (usually the right-hand side candle). Light it with an ember (a.k.a magmaball, fireball) found elsewhere in the plateau. | Image:Level_Shroud_of_the_Apocrea_puzzle_fire_candlepair.png|'''SOLVE:''' One of these candles is unlit (usually the right-hand side candle). Light it with an ember (a.k.a magmaball, fireball) found elsewhere in the plateau. | ||
</gallery> | </gallery> | ||
| + | }} | ||
| + | |||
| + | {{showhide|Fire + Big Ice Candle|content = | ||
<gallery heights=200px widths=200px perrow=2> | <gallery heights=200px widths=200px perrow=2> | ||
Image:Level_Shroud_of_the_Apocrea_puzzle_fire_emberloader_2.png| This "ember loader" is almost always paired with the "Frozen Deadnaught Candle" elsewhere in the Plateau. | Image:Level_Shroud_of_the_Apocrea_puzzle_fire_emberloader_2.png| This "ember loader" is almost always paired with the "Frozen Deadnaught Candle" elsewhere in the Plateau. | ||
Image:Level_Shroud_of_the_Apocrea_puzzle_fire_frozendeadnaught.png|A [[Deadnaught#Frozen Deadnaught|Frozen Deadnaught]] appears when this candle is lit. Sigils are obtained, even if the deadnaught goes undefeated. | Image:Level_Shroud_of_the_Apocrea_puzzle_fire_frozendeadnaught.png|A [[Deadnaught#Frozen Deadnaught|Frozen Deadnaught]] appears when this candle is lit. Sigils are obtained, even if the deadnaught goes undefeated. | ||
</gallery> | </gallery> | ||
| − | + | }} | |
| + | |||
| + | {{showhide|Statue + Button|content = | ||
<gallery heights=200px widths=200px perrow=3> | <gallery heights=200px widths=200px perrow=3> | ||
Image:Level_Shroud_of_the_Apocrea_puzzle_statue_statue.png| This statue should be carried somewhere and placed on a square button. Find it elsewhere in the Plateau. | Image:Level_Shroud_of_the_Apocrea_puzzle_statue_statue.png| This statue should be carried somewhere and placed on a square button. Find it elsewhere in the Plateau. | ||
Image:Level_Shroud_of_the_Apocrea_puzzle_statue_button.png| This square button could use a statue. Find it elsewhere in the plateau. | Image:Level_Shroud_of_the_Apocrea_puzzle_statue_button.png| This square button could use a statue. Find it elsewhere in the plateau. | ||
</gallery> | </gallery> | ||
| + | }} | ||
| + | |||
| + | {{showhide|Key + Statue|content = | ||
<gallery heights=200px widths=200px perrow=2> | <gallery heights=200px widths=200px perrow=2> | ||
| − | Image:Level_Shroud_of_the_Apocrea_puzzle_statue_simple.png| Find a golden key elsewhere in the Plateau. Then put the statue on the button to get "The Prize." | + | Image:Level_Shroud_of_the_Apocrea_puzzle_statue_simple.png|Find a golden key elsewhere in the Plateau. Then put the statue on the button to get "The Prize." |
Image:Level_Shroud_of_the_Apocrea_puzzle_statue_simple_key.png| This key seems to be here on its own from the start of the level. It should be used to unlock a gate somewhere elsewhere in the Plateau. | Image:Level_Shroud_of_the_Apocrea_puzzle_statue_simple_key.png| This key seems to be here on its own from the start of the level. It should be used to unlock a gate somewhere elsewhere in the Plateau. | ||
</gallery> | </gallery> | ||
| − | + | }} | |
| + | |||
| + | {{showhide|Purple/Yellow-Ringed Towers + Key Gate|content = | ||
<gallery heights=200px widths=200px perrow=2> | <gallery heights=200px widths=200px perrow=2> | ||
Image:Level_Shroud_of_the_Apocrea_puzzle_tower_gold.png|This is where a key might go. This one is almost always paired with a purple ritual tower elsewhere in the Plateau. | Image:Level_Shroud_of_the_Apocrea_puzzle_tower_gold.png|This is where a key might go. This one is almost always paired with a purple ritual tower elsewhere in the Plateau. | ||
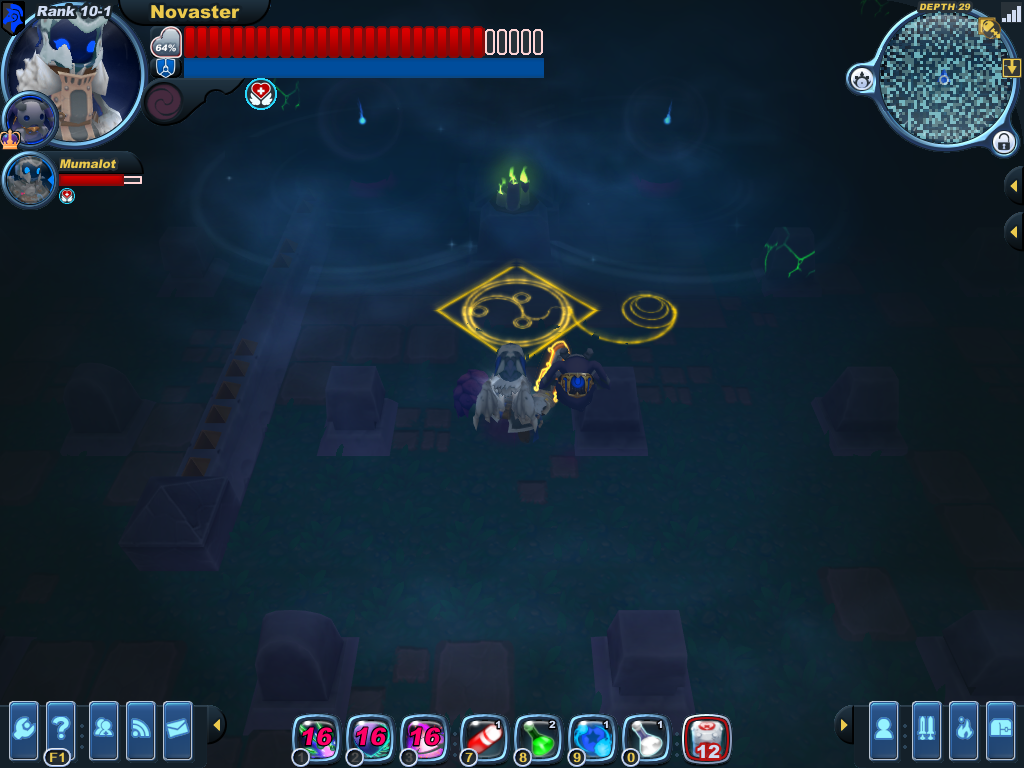
Image:Devilite_Apocrea_Ritual.png|'''SOLVE:''' Walk along the path of purple light. A golden key and [[Devilite|Devilites]] (or more rarely, [[Bombie]]s) will appear at the same time after the path is walked correctly. | Image:Devilite_Apocrea_Ritual.png|'''SOLVE:''' Walk along the path of purple light. A golden key and [[Devilite|Devilites]] (or more rarely, [[Bombie]]s) will appear at the same time after the path is walked correctly. | ||
| + | </gallery> | ||
| + | }} | ||
| + | {{showhide|Skull Pile + Key Gate|content = | ||
| + | <gallery heights=200px widths=200px perrow=2> | ||
Image:Level_Shroud_of_the_Apocrea_puzzle_keygate_swirl4.png|This is where a key might go. This one is almost always paired with a skull pile elsewhere in the Plateau. | Image:Level_Shroud_of_the_Apocrea_puzzle_keygate_swirl4.png|This is where a key might go. This one is almost always paired with a skull pile elsewhere in the Plateau. | ||
Image:Level_Shroud_of_the_Apocrea_puzzle_skullpile.png|Some [[Scarab#Grave Scarab|Grave Scarabs]] (or more rarely, [[Dust Bunny#Blech Bunny|Blech Bunnies]]) appear when the player attacks this pile of skulls. '''SOLVE:''' A golden key will appear when the last enemy (spawned in relation to the skull pile) is vanquished. | Image:Level_Shroud_of_the_Apocrea_puzzle_skullpile.png|Some [[Scarab#Grave Scarab|Grave Scarabs]] (or more rarely, [[Dust Bunny#Blech Bunny|Blech Bunnies]]) appear when the player attacks this pile of skulls. '''SOLVE:''' A golden key will appear when the last enemy (spawned in relation to the skull pile) is vanquished. | ||
| + | </gallery> | ||
| + | }} | ||
| + | {{showhide|Trojan Statues + Key Gate|content = | ||
| + | <gallery heights=200px widths=200px perrow=2> | ||
Image:Level_Shroud_of_the_Apocrea_puzzle_trojan_toxigel_gate.png|Two [[Trojan]] statues watch over this gate. Find the key elsewhere in the Plateau. | Image:Level_Shroud_of_the_Apocrea_puzzle_trojan_toxigel_gate.png|Two [[Trojan]] statues watch over this gate. Find the key elsewhere in the Plateau. | ||
Image:Level_Shroud_of_the_Apocrea_puzzle_trojan_toxigel_key.png| Breaking these will spawn either a [[Trojan]] or a golden key. A [[Polyp#Caustic Polyp|Caustic Polyp]] spawns when the player approaches. Two [[Lichen#Toxigel|Toxigel]]s spawn along with the key after breaking statues. A version without slime can be encountered. | Image:Level_Shroud_of_the_Apocrea_puzzle_trojan_toxigel_key.png| Breaking these will spawn either a [[Trojan]] or a golden key. A [[Polyp#Caustic Polyp|Caustic Polyp]] spawns when the player approaches. Two [[Lichen#Toxigel|Toxigel]]s spawn along with the key after breaking statues. A version without slime can be encountered. | ||
</gallery> | </gallery> | ||
| + | }} | ||
| − | + | {{showhide|Candles + Color Lights (Purple/Red/Yellow)|content = | |
<gallery heights=200px widths=200px perrow=2> | <gallery heights=200px widths=200px perrow=2> | ||
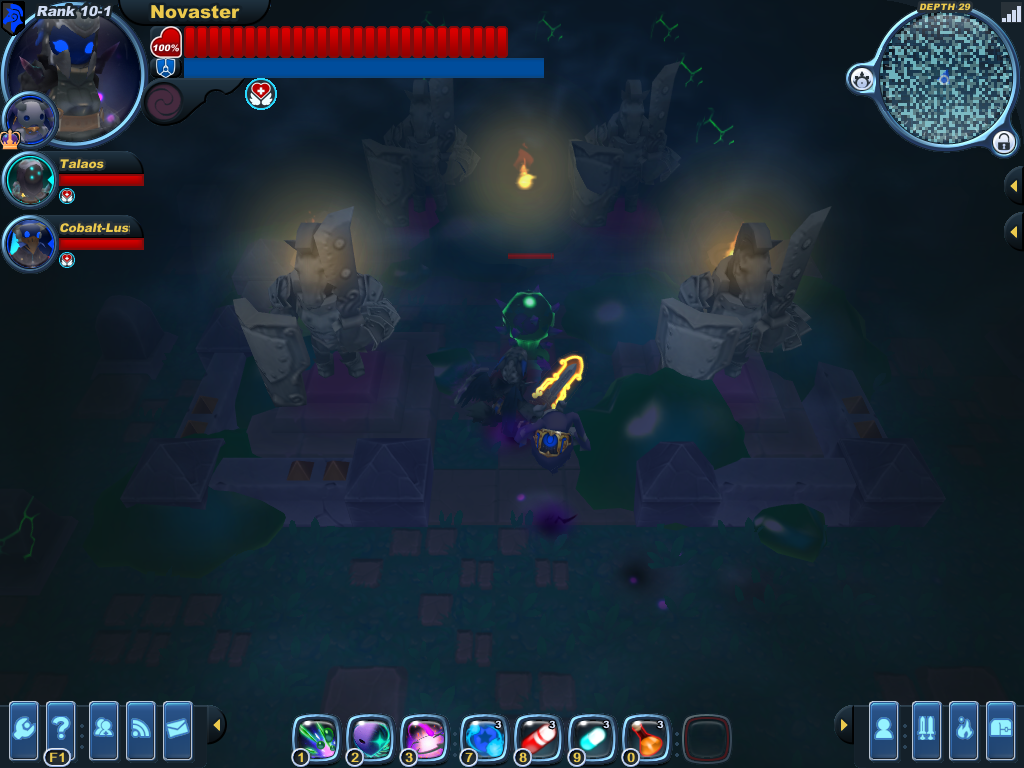
Image:Level_Shroud_of_the_Apocrea_puzzle_colors_candletower.png|This tower simply reveals the order of activation for its partner puzzle. | Image:Level_Shroud_of_the_Apocrea_puzzle_colors_candletower.png|This tower simply reveals the order of activation for its partner puzzle. | ||
Image:Level_Shroud_of_the_Apocrea_puzzle_colors.png|Approach the lights to either light them up or trigger a small explosion. Lighting them up in the correct order will grant "The Prize." Messing up the order only resets the puzzle - reset as many times as needed. (Resetting will not cause it to "lock up" and refuse to reward "The Prize" or anything like that). | Image:Level_Shroud_of_the_Apocrea_puzzle_colors.png|Approach the lights to either light them up or trigger a small explosion. Lighting them up in the correct order will grant "The Prize." Messing up the order only resets the puzzle - reset as many times as needed. (Resetting will not cause it to "lock up" and refuse to reward "The Prize" or anything like that). | ||
</gallery> | </gallery> | ||
| + | }} | ||
[[Category:Missions]] | [[Category:Missions]] | ||
[[Category:Events]] | [[Category:Events]] | ||
Revision as of 07:53, 31 January 2015
| |
The topic of this article or section is part of the Shroud of the Apocrea. |
| As such, the content described below is only available during the event. |
Shroud of the Apocrea is an event-exclusive prestige mission.
Contents
Overview

Prerequisites: The player must be at least Rank 4-1 to start this mission.
Description: Several capable knights have gone missing in a seemingly normal area of the Clockwork Tunnels. Spiral HQ suspects foul play and has assigned you to investigate the level.
Objective: Investigate the area of the Clockworks where several knights have gone missing.
Rewards:
- None
Apocrean Sigils obtained from activities in The Grasping Plateau floors can be exchanged with Lost Soul (Merchant).
Runthrough

Haunted Passage
In this level, you enter a "normal" Haunted Passage. Standing on the party button will bring up the gate behind you (normal), but the gate in front of you will not open (abnormal). The minimap will become static. Tentacles will come up out of the floor and grab you, bringing you down (loading) into the Obsidian Nexus.
Monsters:

The Obsidian Nexus
After getting grabbed, your party will be in a "strange dimension" where knights can prepare (gear up) for the obstacles to come. Don't be afraid to talk with the Lost Souls of the zone, they can give you information about the place and the Lost Soul Merchant will exchange materials for your Apocrean Sigils. A special crafting station is marked on the minimap - this is one of the places players can craft the Obsidian gear.
 ?
?
 ?
?
 Depths are chosen randomly between Haunted or Infernal passages, various Arenas, or the Plateau. The first combat depth is never the Plateau. The last combat depth is always the Plateau:
The Grasping Plateau
The grasping plateau is a large Graveyard-like area that spawns many tombstones in a grid. It features one or more two-part puzzles and difficult enemies. Its dimensions seem to consistently be 50-52 (West/East) x 34-36 (North/South) tombstones. An official map would be difficult to obtain, since the minimap is static for the area, and any bugs revealing this map could be inaccurate.
Players start in different parts of this very large floor. You might spawn together, or very far away from each other.
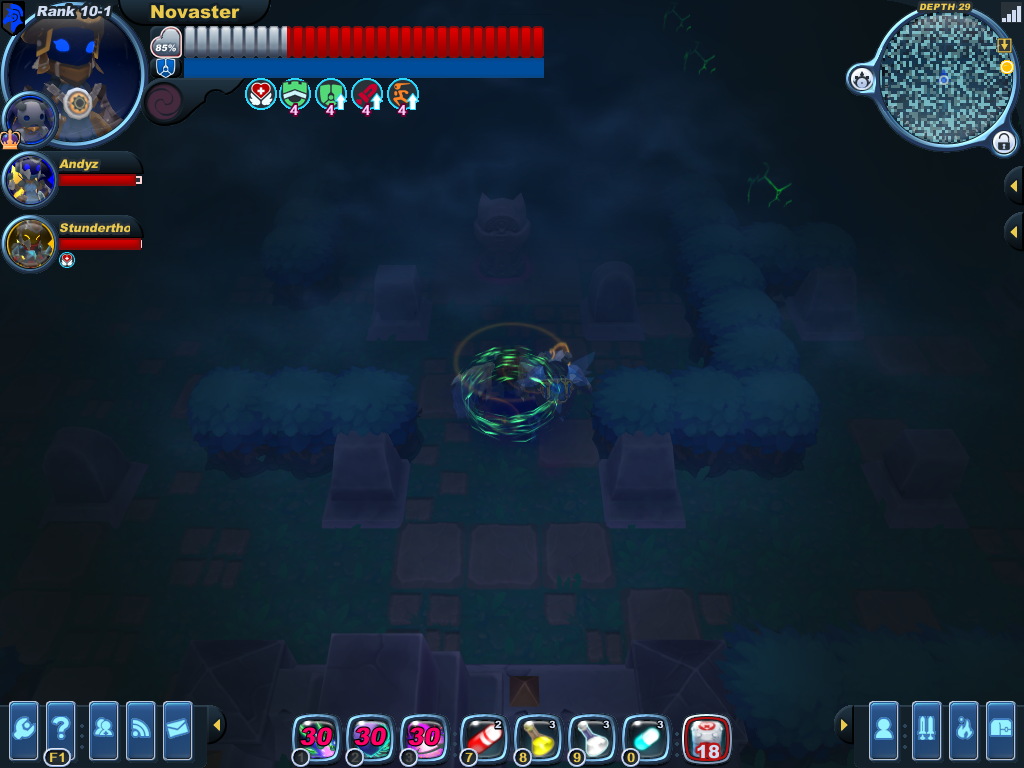
The Apocrean Harvester seems to stalk a random player fairly constantly right when the level begins. This is not a boss and will respawn almost instantly if defeated.
The minimap is static (similar to Unknown Passage), but players can see icons for Elevators, Keys, and Key Gates once at least one player gets close enough to the entity.
- Rarely, the minimap functions normally. This is confirmed to be a bug - please file via F2 if this occurs.
Breaking the tombstones may spawn nothing, Pale Scarabs, Freezing Bombies or Freed Souls.
There might be lone Trojan statues around the level, breaking them currently only spawns either a bit of loot or more rarely a Trojan.
- If there are 2 or 4 trojan statues close to each other, that is a "puzzle" (see gallery below).
There might be many miscellaneous doodads around the level, such as obelisks, glowing purplish-black tiles, and lone "greenish candles" - these are just aesthetics that are not part of any puzzles.
Monsters:
 Grave Scarab
- Bombie
-
 Pale Scarab
- Frozen Deadnaught
- Freezing Bombie

 Blech Bunny
 Toxigel
- Caustic Polyp
 Trojan
- Devilite
 Freed Soul
- Apocrean Harvester
Departure
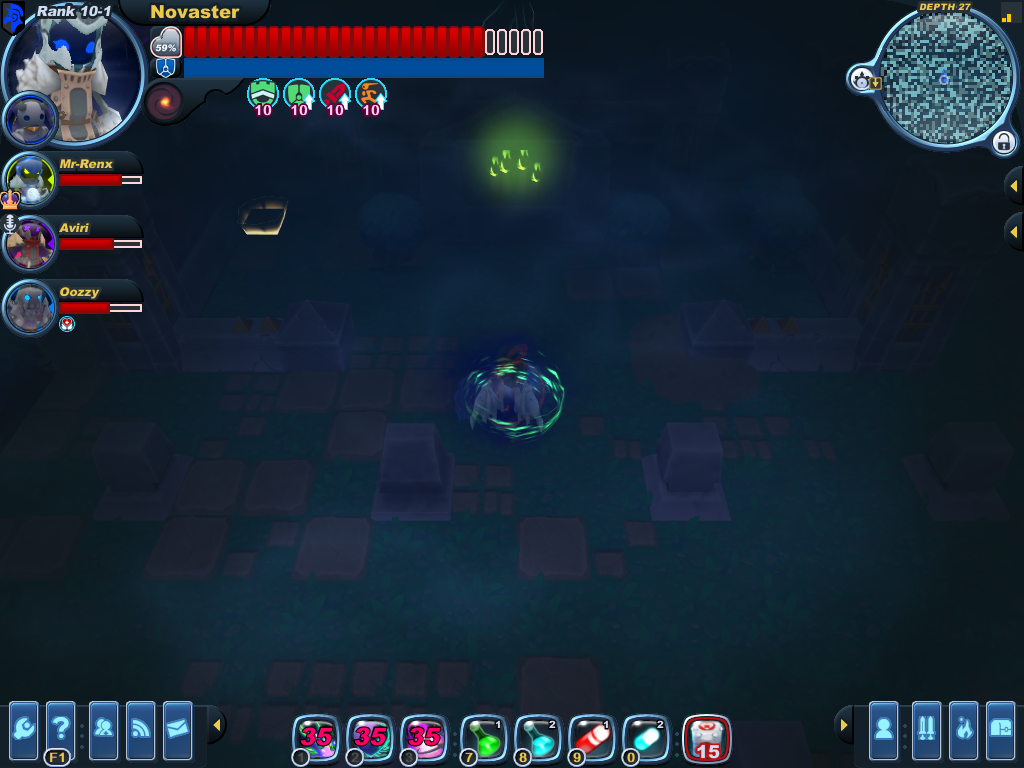
In this last floor, you can see Souls being released. Players can trade their Apocrean Sigils or craft before taking the elevator to finish the mission.
Notes
The general goal of this prestige mission is to collect Apocrean Sigils. This is accomplished by breaking tombstones, randomly releasing purple souls, and breaking the chains off the souls. Breaking their chains by attacking them rewards sigils. Players can also earn sigils by solving puzzles. All this is done in The Grasping Plateau, with the other combat floors offering standard clockworks loot.
Puzzles in the Grasping Plateau reward Apocrean Sigils in bulk. A puzzle is "solved" or "finished" when everyone receives these sigils.
- Sometimes a material will be rewarded (in addition to sigils in bulk) when a puzzle is solved. It appears on the ground and must be picked up. It might not appear for everyone in the party, and it may or may not be the same material for everyone in the party. If one appears, this material is always randomly one of the ones available from the Lost Soul Merchant. You do not have to be nearby for it to have a chance to drop (someone else can solve the puzzle while you are far away).
- Puzzles come in pairs! If you find one, you can predict and mentally prepare for the other. For a list of known puzzles, see the gallery below.
Strategy
| |
The topic of this article or section is subject to personal opinion, and does not represent any one absolute truth. |
| If you disagree, discuss your concerns on the the talk page before editing. |
Overview:
This event is enjoyed by the playerbase for a variety of reasons - it's something different and presents a decent challenge for many players. Not only does it provide tokens required to make Obsidian items, it also brings arenas that are deep enough to have a decent chance of dropping Radiant Fire Crystals from their treasure boxes. As such, there are several "goals" that players may have, so it's important to establish what everyone wants to do before starting this mission.
Successfully completing Shroud of the Apocrea solo can be difficult due to the nature of the plateau and its inhabitants.
Your party will lock after using the elevator in the Mission Lobby, so plan ahead and make sure everyone knows the plan. The Grasping Plateau does not have an arsenal station, so whatever gear you had the previous floor is the gear you will take to the plateau.
Goal:
Usually plans fall into one or a combination of the below:
- Arena Farm
- Sigil Farm
Gallery
Spoiler Alert: solutions to puzzles are in the show/hides below.
- Use the Control+F keyboard function to find things, like "key."
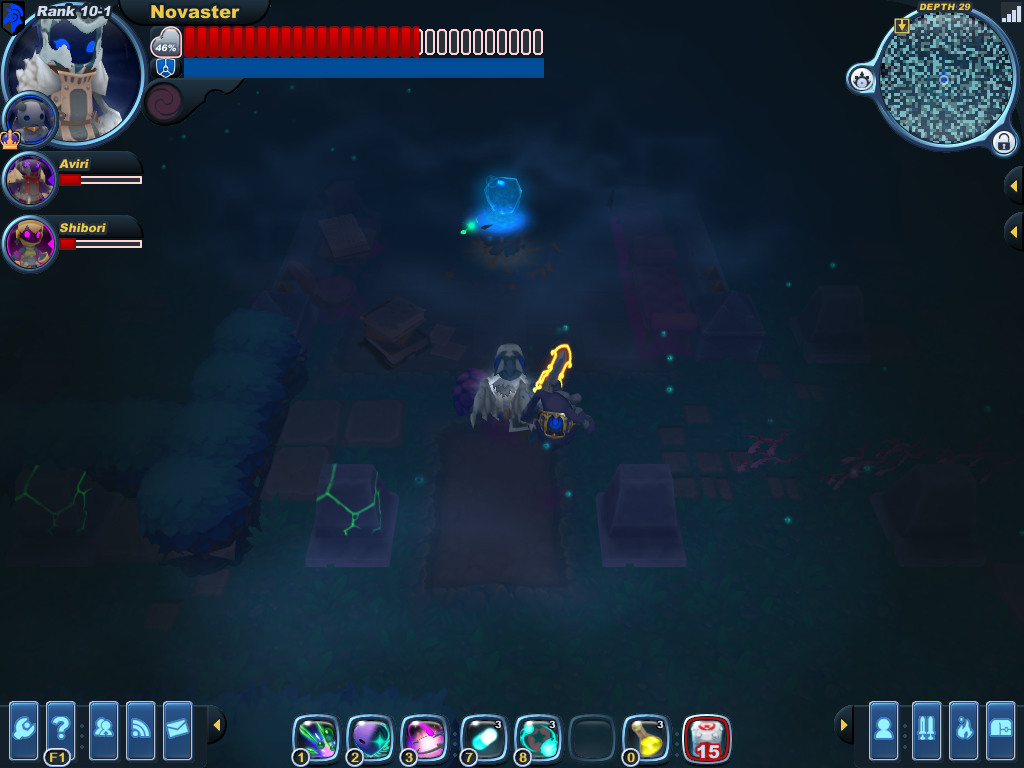
This "water ball" is picked up and used to put out a fire somewhere.
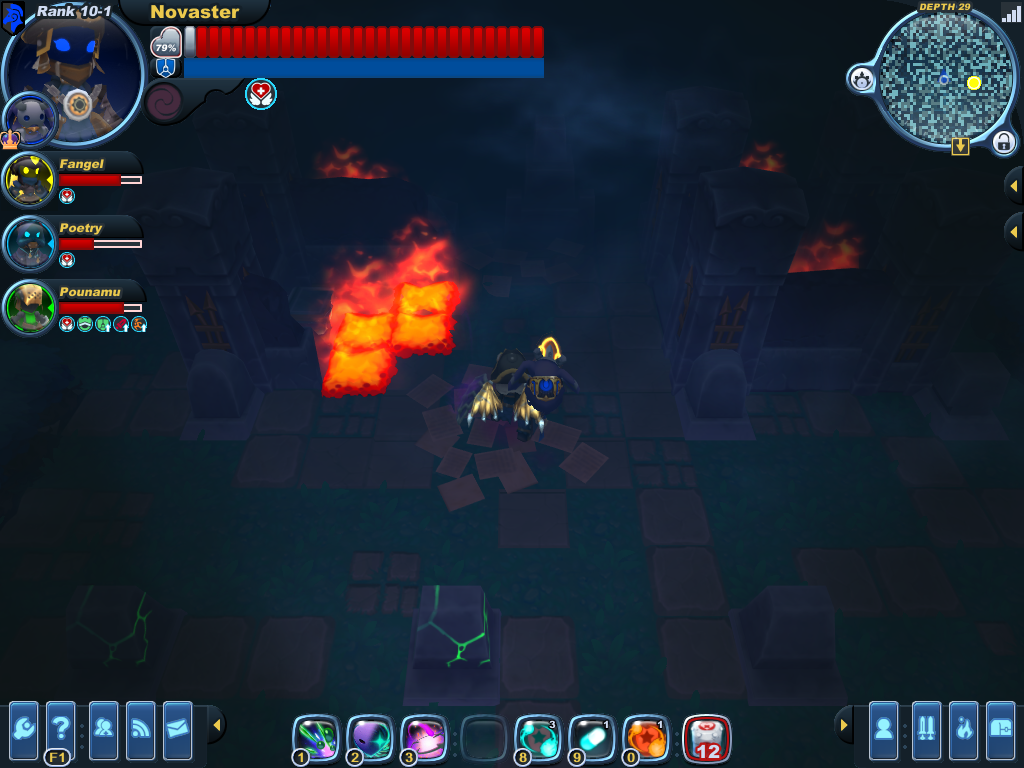
SOLVE: This wall of fire is put out by a "water ball." A red button is hidden under some books, break the books and step on the button to solve this puzzle.


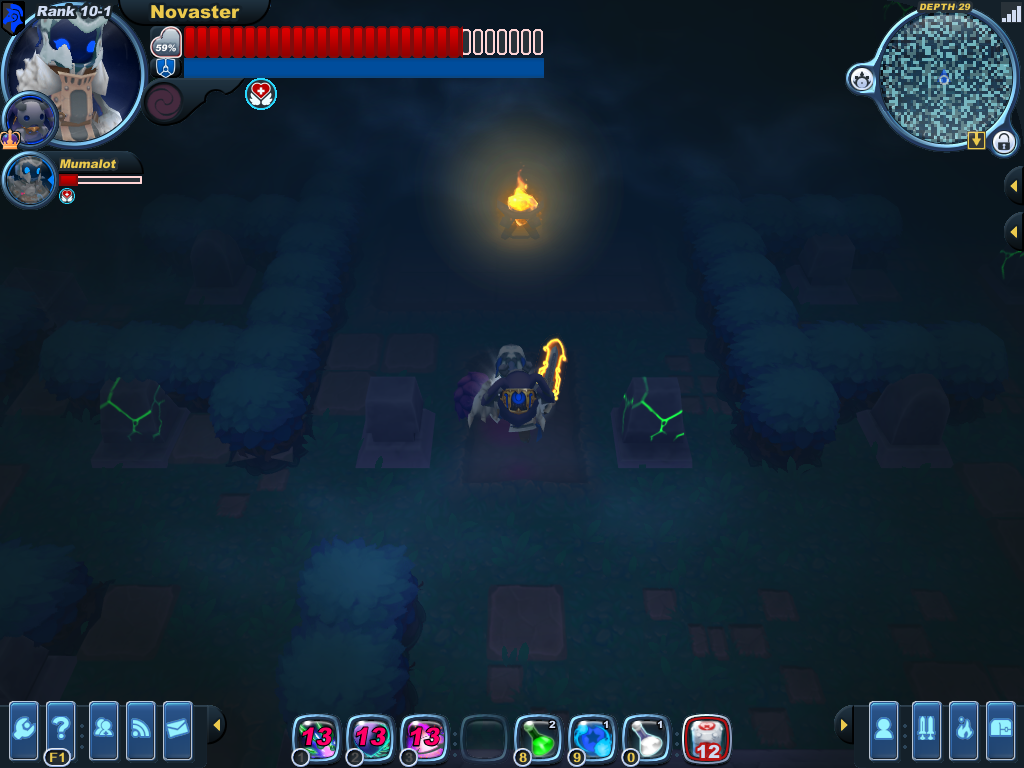
This ball of fire is picked up and used to light an unlit candle somewhere. It might be very far away, or very close!
SOLVE: One of these candles is unlit (usually the right-hand side candle). Light it with an ember (a.k.a magmaball, fireball) found elsewhere in the plateau.


This "ember loader" is almost always paired with the "Frozen Deadnaught Candle" elsewhere in the Plateau.
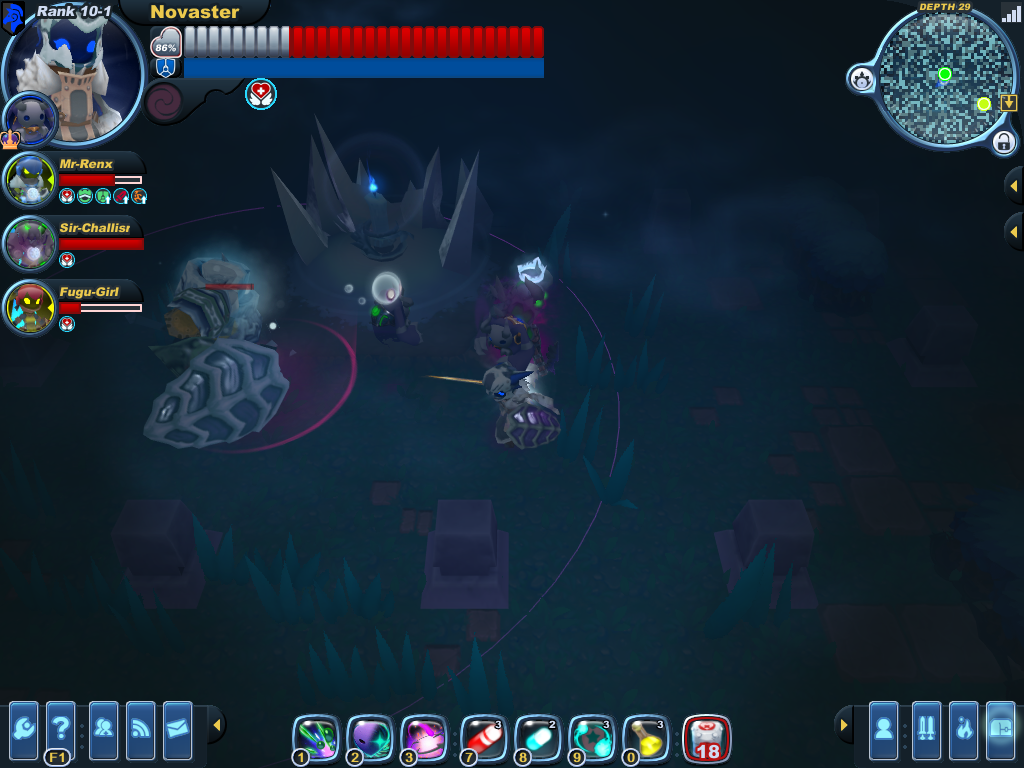
A Frozen Deadnaught appears when this candle is lit. Sigils are obtained, even if the deadnaught goes undefeated.


This statue should be carried somewhere and placed on a square button. Find it elsewhere in the Plateau.
This square button could use a statue. Find it elsewhere in the plateau.


Find a golden key elsewhere in the Plateau. Then put the statue on the button to get "The Prize."
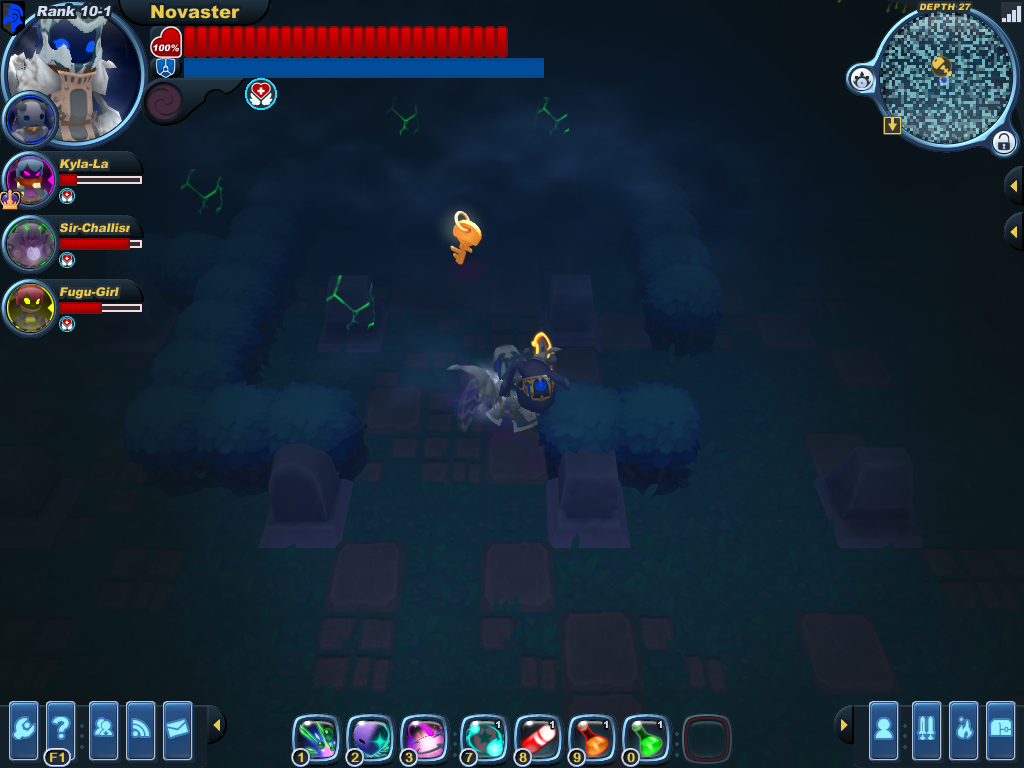
This key seems to be here on its own from the start of the level. It should be used to unlock a gate somewhere elsewhere in the Plateau.


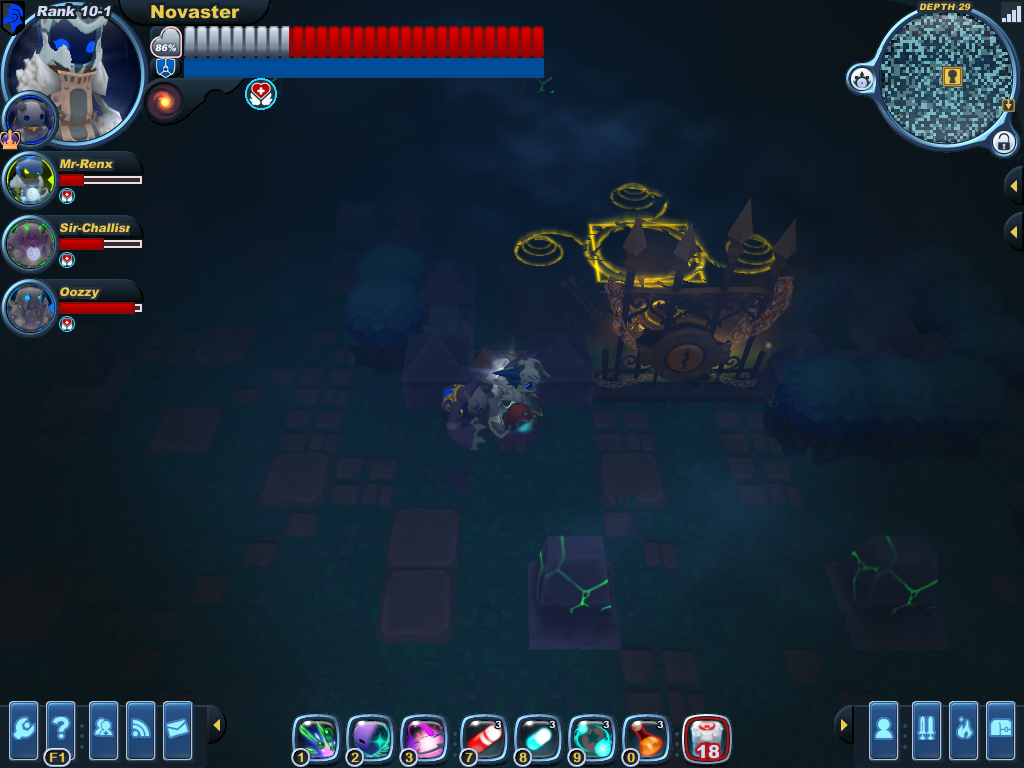
This is where a key might go. This one is almost always paired with a skull pile elsewhere in the Plateau.
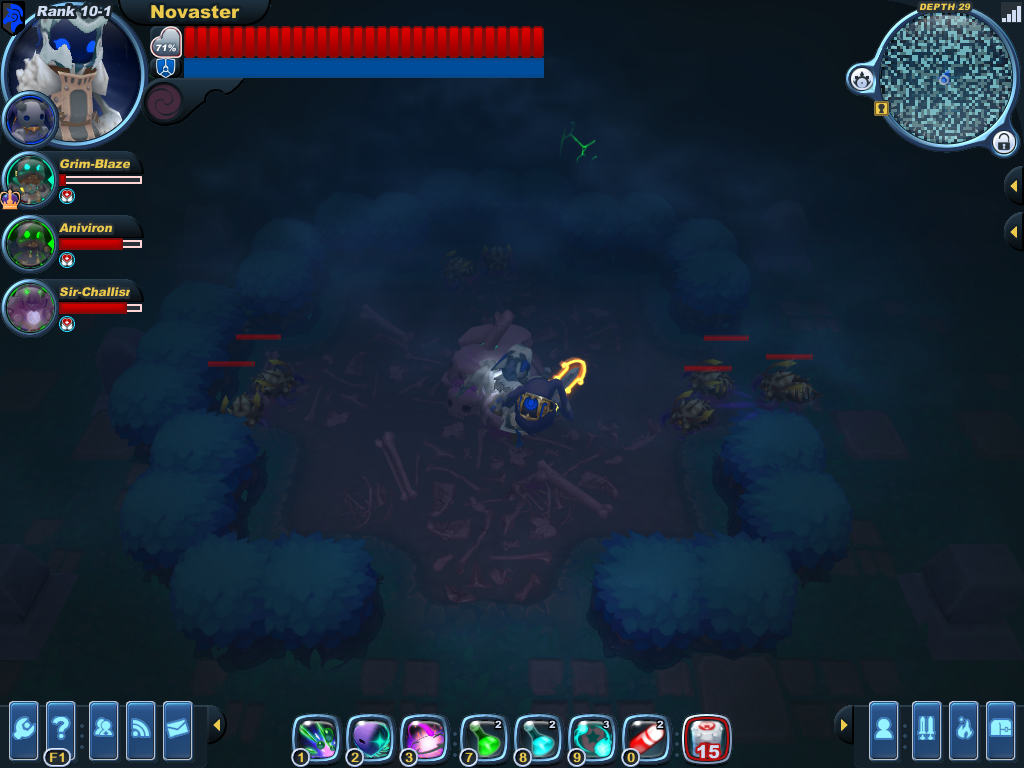
Some Grave Scarabs (or more rarely, Blech Bunnies) appear when the player attacks this pile of skulls. SOLVE: A golden key will appear when the last enemy (spawned in relation to the skull pile) is vanquished.


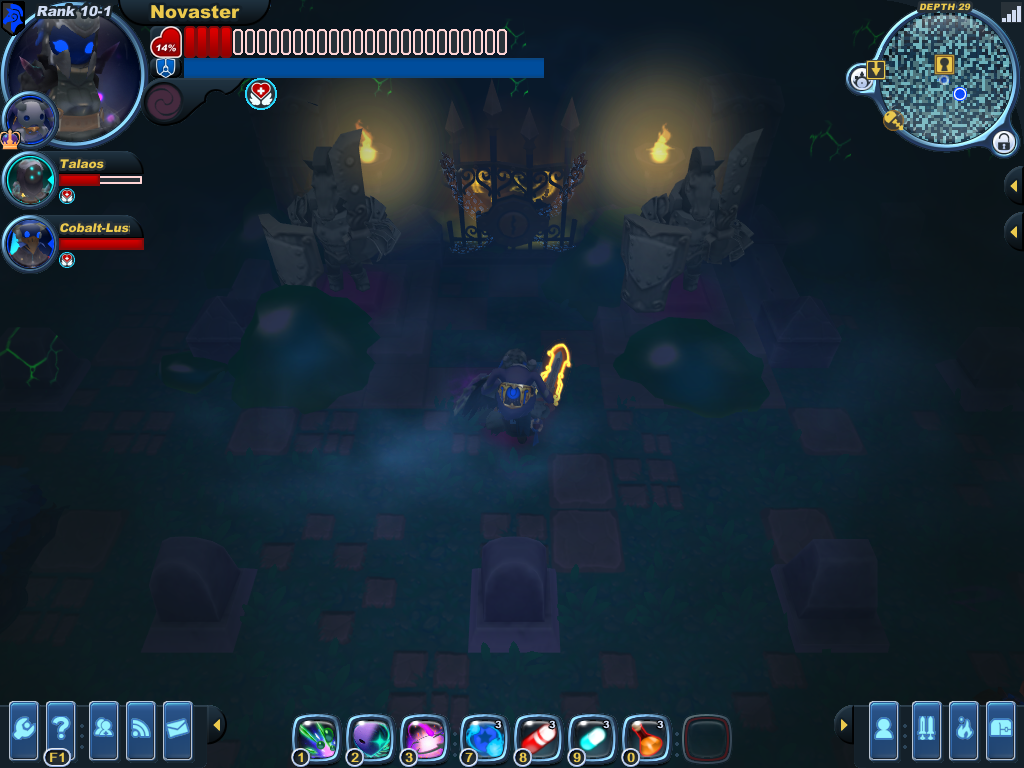
Two Trojan statues watch over this gate. Find the key elsewhere in the Plateau.
Breaking these will spawn either a Trojan or a golden key. A Caustic Polyp spawns when the player approaches. Two Toxigels spawn along with the key after breaking statues. A version without slime can be encountered.


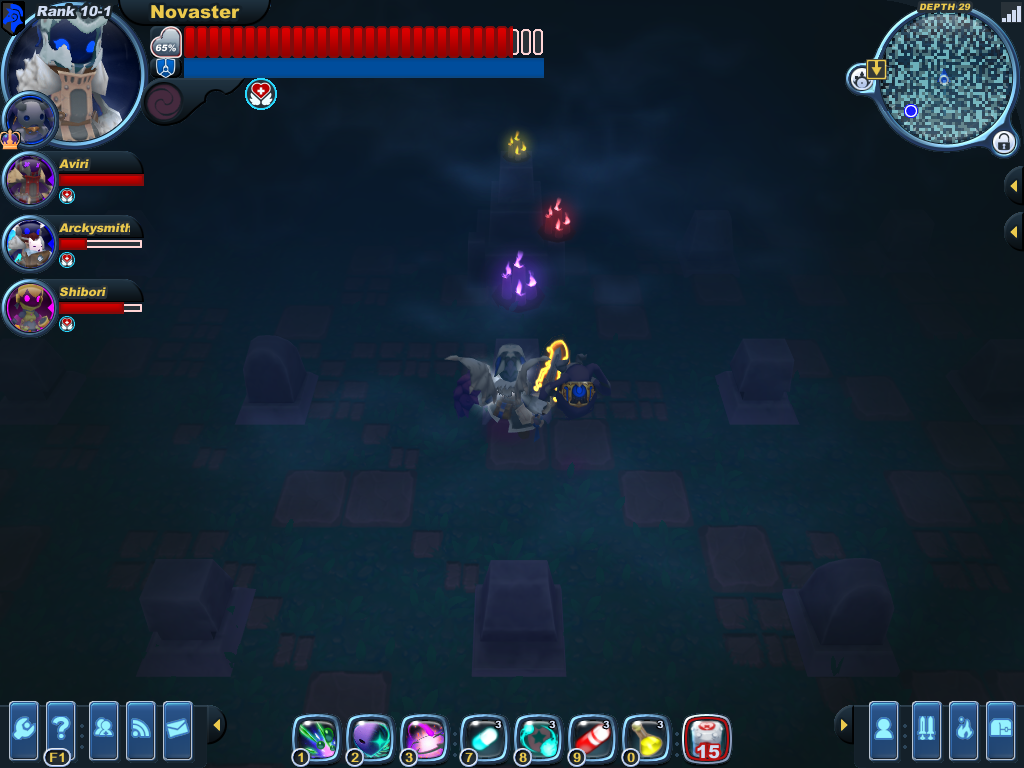
This tower simply reveals the order of activation for its partner puzzle.
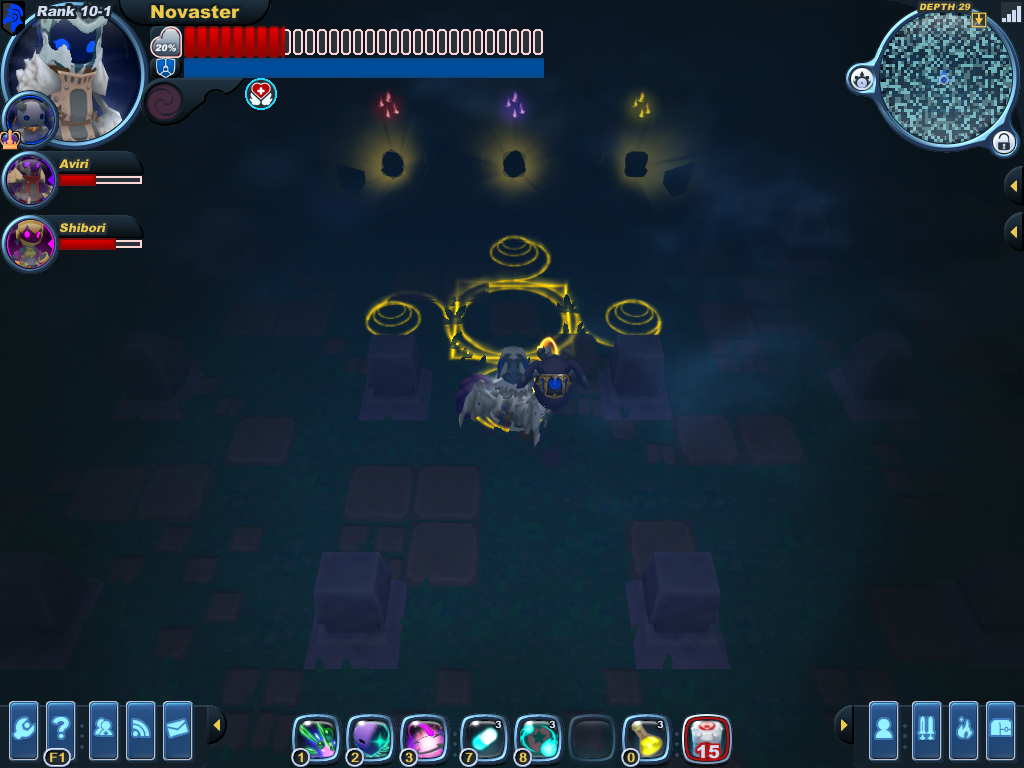
Approach the lights to either light them up or trigger a small explosion. Lighting them up in the correct order will grant "The Prize." Messing up the order only resets the puzzle - reset as many times as needed. (Resetting will not cause it to "lock up" and refuse to reward "The Prize" or anything like that).

