Region: Unique. This level can only be accessed via the 10-2  Mission: Dreams and Nightmares. Mission: Dreams and Nightmares.
Level: Descent into Darkness
Depth: 27
|
Monster waves for the last fight
- Wave 1: A few Gels and Lumbers, a mini wave, there might be black swarm spheres that spawn random monsters
- Wave 2: Wolvers and Zombies
- Wave 3: Gremlins and Lumbers
- Wave 4: Wolvers and Zombies
- Wave 5: Gels and Lumbers
- Wave 6: Thwackers and Zombies
All waves: Void Souls
|
|
Notes
In the final area, six monster gates blocking the exit each count for a wave of The Swarm that must be defeated in order to progress.
|
Gallery
|
|
|
|
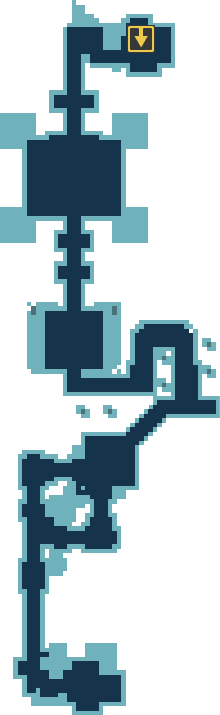
Map of Descent into Darkness.
|
| File:Area-Dreams and Nightmares-Descent into Darkness.png
|
After the behavior of enemies and obstacles in this mission is understood, playing on elite difficulty is ideal to get the best loot at the end of the mission. Replaying Dreams and Nightmares is a very quick way to obtain radiants, but this mission does not have a high crown payout compared to other "end game" areas such as Firestorm Citadel or deep arcade arenas, which have both crowns and radiants, but typically take more time to complete than Dreams and Nightmares.
Void monsters retain certain characteristics of the creature type they seem to be, with a few differences. Check the monster list on this page and read up on their offenses and defenses. Most void monsters in this fight are limited to close-range attacks. The only projectiles in this fight are from Swarm Turrets, certain Void Thwacker swings, and the poisonous spikes of spinning Void Gels.
|
| 2File:Area-Dreams and Nightmares-Descent into Darkness-2.png
|
Run through preceding areas as quickly as possible. Void monsters don't drop anything other than hearts, so only defeat them when necessary.
|
| 3File:Area-Dreams and Nightmares-Descent into Darkness-3.png
|
The final fight consists of six waves of monsters and takes place in a simple arena. It is a large square-shaped platform with several removable obstacles and a few permanents, the most important being four Swarm Turrets in the corners with orbital chains attached. Void Souls constantly spawn.
Victory for the entire mission boils down to success in this final fight. Establish an attack formation. Whether you are alone or in a squad, maintaining this pattern is important. Make sure Void Gels do not focus on Vaelyn (who is stuck to the north of the arena and unable to deal damage during the fight), because you do not want random spikes shooting around unexpectedly.
- Kiting Strategy: Avoid dashing, as this resets aggro. Dash only to save your life. Once you have the attention of the void monsters, walk counter-clockwise around the edge of the arena, firing bullets behind you and setting off bombs as you move. It is important to keep the monsters following you, but not too close. For this strategy, do not use weapons that inflict freeze or knockback, as this breaks the enemy patterns and increases the time it takes to get things done. This strategy is ideal for a quick victory but can be problematic for players who lag. If there are two or more players in the party, try to stay on opposite sides of the arena so you don't walk into enemy attacks triggered by another player. For example, if a player is in the north area of the arena, stay in the south, or if they are in the west, stay in the east. Maintain this as all players circle around the arena.
|
|
|

