Difference between revisions of "Ghosts in the Machine/Iron Hulk"
From SpiralKnights
m (woops, forgot gallery) |
m (add strategy specific to this level (was previously located on the mission page, pending screenshots) |
||
| Line 17: | Line 17: | ||
|exploration = | |exploration = | ||
| + | *{{exploration|Gold Door}} x2 | ||
| + | *{{exploration|Gold Key}} x2 | ||
| + | *{{exploration|Grim Totem}} | ||
*[[Monster Cage]]s (hidden, spawn only constructs) | *[[Monster Cage]]s (hidden, spawn only constructs) | ||
*{{exploration|Orbital Chain}} | *{{exploration|Orbital Chain}} | ||
| Line 29: | Line 32: | ||
|gallery= | |gallery= | ||
| − | + | {{StrategyList/Start}} | |
| − | + | ||
| − | < | + | {{StrategyList |
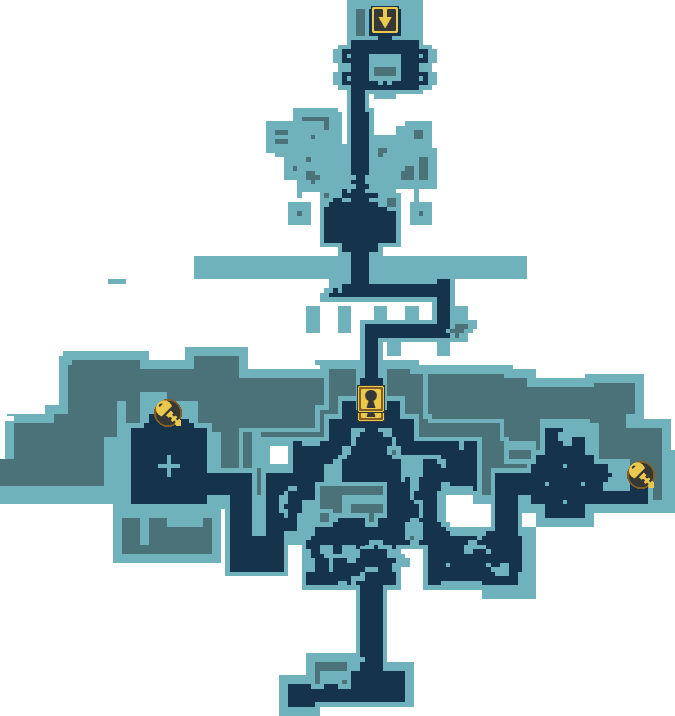
| + | |file = Map-Ghosts in the Machine-Iron Hulk | ||
| + | |size = 175x175px | ||
| + | |notes = Map of ''Iron Hulk''. | ||
| + | }} | ||
| + | |||
| + | {{StrategyList | ||
| + | |location = Ghosts in the Machine | ||
| + | |level = Iron Hulk | ||
| + | |notes = The center area consists of small skirmishes against constructs and Frankenzoms. Avoid shock traps while dispatching enemies. Two keys for the Gold Doors are found in the left and right sides of the level, which may be completed in any order. The paths to either side are clogged with many hazards. It is possible to carry a Gold Key from one side to the other major fight room, placing it to alter the travel path of wisps instead of putting it into the Gold Door right away. | ||
| + | }} | ||
| + | |||
| + | {{StrategyList | ||
| + | |location = Ghosts in the Machine | ||
| + | |level = Iron Hulk | ||
| + | |number = 2 | ||
| + | |notes = The left side's path quickly becomes clogged with a few constructs and many Frankenzoms. After these monsters are defeated several more constructs will spawn before the major fight room. Read the screen cluster next to the door in order to proceed. <br><br> This major fight room has several shock traps and a long orbital chain. Stepping into the upper half the arena causes several Surging Bombies to spawn. To avoid this debacle, it is best to fight only in the lower half of the arena. There are three waves. Each wave begins with several falling rockets. One or two Sparky puppies spawn in the upper half. These should be defeated by using handguns. The final wave features a Static Dreadnaught. After finishing the final wave, a single player can grab the key, then the rest can carefully loot while avoiding bombies. | ||
| + | }} | ||
| + | |||
| + | {{StrategyList | ||
| + | |location = Ghosts in the Machine | ||
| + | |level = Iron Hulk | ||
| + | |number = 3 | ||
| + | |notes = The right path begins with brief skirmishes and is clogged with shock wisp and shock trap hazards. Read the screen cluster next to the door in order to proceed. | ||
| + | <br><br> This major fight room consists of three waves. The floor here is constrained by shock wisps, so blocking one with the Gold Key from the left side is a good idea. Two Grim Totems cause further complications. Each wave includes numerous constructs, Frankenzoms, and Surging Bombies. The final wave also features a Static Dreadnaught. After the battle, a side path opens with some heart boxes. This is the ambush: The heart boxes are disguised monster cages. | ||
| + | }} | ||
| + | |||
| + | {{StrategyList | ||
| + | |location = Ghosts in the Machine | ||
| + | |level = Iron Hulk | ||
| + | |number = 4 | ||
| + | |notes = {{main|The Big Iron}} | ||
| + | |||
| + | Once both gates have been unlocked, a battle against The Big Iron remains. | ||
| + | |||
| + | During this miniboss fight, it is possible to nullify the spawners by exploiting the weakness of the game's artificial intelligence. Defeat any Volt Knights or retrodes that spawn, until only Surgebots remain. Shield-bump these into the nooks immediately north of their spawners. The monsters will be "trapped" by the cables and will not attack. Other tactics for dealing with these monsters include knockback weapons (e.g., Polaris), [[Shivermist Buster]], or simply defeating them repeatedly. | ||
| + | }} | ||
| + | |||
| + | {{Table/End}} | ||
}}<noinclude> | }}<noinclude> | ||
Revision as of 22:58, 30 December 2015
| |||||||||||||||||||||||||||||||||||||||||||||||||||||||||||||||||||||||||||||||||||||||||||||||||||||||||||||||||||||||||||||||||||||||||||||||||||||||||||||||||||||||||||||||||||||||||||||||||||||||||||||||||||||||||||||||||||||||||||||||||||||||||||||||||||||||||||||||||||||||||||||||||||||||||||||||||||||||||||||||||||||||||||||||||||||||

