Difference between revisions of "Legion of Almire"
From SpiralKnights
(Re-doing Legion of Almire article with a similar structure to Ghosts in the Machine article) |
(improved text (I hope), removing some of the less important tactics (in my opinion)) |
||
| Line 7: | Line 7: | ||
[[File:Gate-Graveyard.png|32px]] Cryptic Cache | [[File:Gate-Graveyard.png|32px]] Cryptic Cache | ||
}} | }} | ||
| − | + | ||
==Description== | ==Description== | ||
Warning: This is a Dangerous Mission! | Warning: This is a Dangerous Mission! | ||
Desna and her Recon Rangers are an elite team tasked with recovering intel from some of the most dangerous levels of the Clockworks. Joining them could lead to great rewards, but it is guaranteed to be a perilous journey! | Desna and her Recon Rangers are an elite team tasked with recovering intel from some of the most dangerous levels of the Clockworks. Joining them could lead to great rewards, but it is guaranteed to be a perilous journey! | ||
Spiral HQ believes that an ancient codex originating from the cursed kingdom of Almire is located somewhere in a dark and terrifying necropolis. This necropolis is believed to be teeming with all manners of undead monstrosities and only the Recon Rangers have what it takes to get in, acquire the intel and get out alive! | Spiral HQ believes that an ancient codex originating from the cursed kingdom of Almire is located somewhere in a dark and terrifying necropolis. This necropolis is believed to be teeming with all manners of undead monstrosities and only the Recon Rangers have what it takes to get in, acquire the intel and get out alive! | ||
| + | {{clear}} | ||
==Monsters== | ==Monsters== | ||
| Line 38: | Line 39: | ||
==Recommended Equipment== | ==Recommended Equipment== | ||
| − | + | In short, the monsters are undead with an inconsistent stun theme. The ideal armor would protect against normal and shadow damage. Elemental weapons are highly effective against these monsters. Many players bring [[Blitz Needle]] for killing Crusaders, Dreadnaughts, and Shadow Guards; a single charge can wake and kill a Crusader, depending on party size and damage bonus. In some tight fights, crowd-control weapons can also be useful. | |
==First Level: Necropolis Grounds== | ==First Level: Necropolis Grounds== | ||
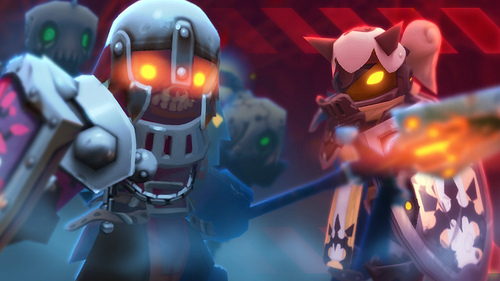
[[file:Almire Mission.jpg||250px|thumb|Promo Propaganda. Desna looking an Almirian Crusader with a Zombie and a Bombie behind.]] | [[file:Almire Mission.jpg||250px|thumb|Promo Propaganda. Desna looking an Almirian Crusader with a Zombie and a Bombie behind.]] | ||
| − | + | The Necropolis Grounds are essentially a [[graveyard]] with no [[phantom]]s. Like other graveyards, there is no set layout. The level is randomly generated by piecing together various rooms. Some of the rooms are identical to those found in other graveyards — for example, hallways filled with graves that spew zombies. However, some of the rooms are unique to Legion of Almire. Many of these special rooms feature bombies, Dreadnaughts, and Almirian Crusaders. Totems and silkwings further complicate the tactical situation. The final fight of the level is always one of these special rooms. | |
==Second Level: Inner Sanctum== | ==Second Level: Inner Sanctum== | ||
[[Image:Mission-Legion of Almire.png|thumb|120px|Legion of Almire on the Mission Interface.|left]] | [[Image:Mission-Legion of Almire.png|thumb|120px|Legion of Almire on the Mission Interface.|left]] | ||
| − | The second | + | The second level of the mission resembles a graveyard in its look and feel. However, this level is entirely pre-designed and non-random. After a brief initial fight, the party must complete an enormous loop of battles. The party may choose to complete the loop clockwise (by heading east initially) or counter-clockwise (by heading west initially). When the loop is complete, the party finds itself again at the scene of the initial battle. The party then proceeds to the grueling final battle of the mission. |
| − | + | ||
| − | + | ||
| − | + | ||
| − | + | ||
| − | + | ||
| − | + | ||
| − | The | + | The east side of the level begins with three small rooms containing Almirian Crusader statues and a few other undead. The party then enters a difficult multi-wave fight. The first wave contains two Crusaders and two kats in close fighting. After the first wave, a line of gates drops, giving the party access to the rest of the room, which contains four Crusader statues. As soon as the party crosses the gate line, the statues awake and numerous kats, howlitzers, and silkwings spawn. Many experienced players strongly prefer to kill the Crusaders, then cross the gate line, let the other monsters spawn, and kill those monsters. Indeed, knights who cross the gate line prematurely are sometimes kicked out of the party. |
| − | + | Between the east and west sides of the level is a passageway containing a small fight, a room of bombies, a party button, another room of bombies, and another small fight. | |
| − | The | + | The west side of the level begins with a maze filled with kats and respawning bombies. The party must retrieve four totems from the maze and place them on four pads. The party then proceeds to a difficult multi-wave fight including Dreadnaughts, Almirian Crusaders, lumbers, silkwings, respawning bombies, and numerous undead. The bombies can be held in check by frequently hitting switches to shut them behind gates. A common tactic is to kill the Crusader statues before the end of the first wave, so that they do not have a chance to wake. |
| − | The | + | The final battle of the mission consists of five waves, complicated by totems, respawning Almirian Crusaders, and respawning silkwings. |
| + | * The first wave contains basic undead monsters, and is easily completed. One knight may want to be positioned at the center of the level, when this wave finishes. | ||
| + | * At the start of the second wave, two gates drop, enlarging the room and releasing Crusaders. A totem appears in the center of the room; a common tactic is to move this totem immediately to a corner. Numerous bombies appear around the totem. The wave ends when the bombies are dead. | ||
| + | * The third wave features a Dreadnaught, some lumbers, and numerous undead. Two knights may want to be positioned in the center of the room, when this wave finishes. | ||
| + | * The fourth wave begins with two totems appearing in the center of the room; these can be moved to the same corner as the first totem. The attendant bombies must be destroyed. | ||
| + | * The fifth and final wave features a terrible new threat — two [[Almirian Shadow Guard]]s — along with Crusaders, howlitzers, etc. Silkwings respawn, Crusaders respawn, and the Shadow Guards reanimate bombies and zombies. A common tactic is to kill the Shadow Guards with Blitz Needle charges to the back. The fight ends when all non-respawning monsters have been killed. | ||
==Third Level: Cryptic Cache== | ==Third Level: Cryptic Cache== | ||
The third level is purely a treasure level, with numerous treasure boxes and no monsters. Knights can change their equipment anywhere in this level, so that the heat earned can be applied to any item at the elevator. | The third level is purely a treasure level, with numerous treasure boxes and no monsters. Knights can change their equipment anywhere in this level, so that the heat earned can be applied to any item at the elevator. | ||
| − | |||
| − | |||
| − | |||
== See Also == | == See Also == | ||
Revision as of 08:25, 6 February 2014
- moved to better umbrella name (so "area" vs. "level" isn't as confusing)Contents
Description
Warning: This is a Dangerous Mission! Desna and her Recon Rangers are an elite team tasked with recovering intel from some of the most dangerous levels of the Clockworks. Joining them could lead to great rewards, but it is guaranteed to be a perilous journey! Spiral HQ believes that an ancient codex originating from the cursed kingdom of Almire is located somewhere in a dark and terrifying necropolis. This necropolis is believed to be teeming with all manners of undead monstrosities and only the Recon Rangers have what it takes to get in, acquire the intel and get out alive!
Monsters
This section gives a comprehensive list of monsters that appear. Specific monster strategies can be found on the monsters' pages.
Necropolis Grounds
Inner Sanctum
-
 Howlitzer
-
 Spookat
-

 Dust Zombie
-
 Almirian Crusader
-

 Bombie
-

 Lumber
-
 Silkwing
-
 Deadnaught
-

 Almirian Shadow Guard
Recommended Equipment
In short, the monsters are undead with an inconsistent stun theme. The ideal armor would protect against normal and shadow damage. Elemental weapons are highly effective against these monsters. Many players bring Blitz Needle for killing Crusaders, Dreadnaughts, and Shadow Guards; a single charge can wake and kill a Crusader, depending on party size and damage bonus. In some tight fights, crowd-control weapons can also be useful.
First Level: Necropolis Grounds
The Necropolis Grounds are essentially a graveyard with no phantoms. Like other graveyards, there is no set layout. The level is randomly generated by piecing together various rooms. Some of the rooms are identical to those found in other graveyards — for example, hallways filled with graves that spew zombies. However, some of the rooms are unique to Legion of Almire. Many of these special rooms feature bombies, Dreadnaughts, and Almirian Crusaders. Totems and silkwings further complicate the tactical situation. The final fight of the level is always one of these special rooms.
Second Level: Inner Sanctum
The second level of the mission resembles a graveyard in its look and feel. However, this level is entirely pre-designed and non-random. After a brief initial fight, the party must complete an enormous loop of battles. The party may choose to complete the loop clockwise (by heading east initially) or counter-clockwise (by heading west initially). When the loop is complete, the party finds itself again at the scene of the initial battle. The party then proceeds to the grueling final battle of the mission.
The east side of the level begins with three small rooms containing Almirian Crusader statues and a few other undead. The party then enters a difficult multi-wave fight. The first wave contains two Crusaders and two kats in close fighting. After the first wave, a line of gates drops, giving the party access to the rest of the room, which contains four Crusader statues. As soon as the party crosses the gate line, the statues awake and numerous kats, howlitzers, and silkwings spawn. Many experienced players strongly prefer to kill the Crusaders, then cross the gate line, let the other monsters spawn, and kill those monsters. Indeed, knights who cross the gate line prematurely are sometimes kicked out of the party.
Between the east and west sides of the level is a passageway containing a small fight, a room of bombies, a party button, another room of bombies, and another small fight.
The west side of the level begins with a maze filled with kats and respawning bombies. The party must retrieve four totems from the maze and place them on four pads. The party then proceeds to a difficult multi-wave fight including Dreadnaughts, Almirian Crusaders, lumbers, silkwings, respawning bombies, and numerous undead. The bombies can be held in check by frequently hitting switches to shut them behind gates. A common tactic is to kill the Crusader statues before the end of the first wave, so that they do not have a chance to wake.
The final battle of the mission consists of five waves, complicated by totems, respawning Almirian Crusaders, and respawning silkwings.
- The first wave contains basic undead monsters, and is easily completed. One knight may want to be positioned at the center of the level, when this wave finishes.
- At the start of the second wave, two gates drop, enlarging the room and releasing Crusaders. A totem appears in the center of the room; a common tactic is to move this totem immediately to a corner. Numerous bombies appear around the totem. The wave ends when the bombies are dead.
- The third wave features a Dreadnaught, some lumbers, and numerous undead. Two knights may want to be positioned in the center of the room, when this wave finishes.
- The fourth wave begins with two totems appearing in the center of the room; these can be moved to the same corner as the first totem. The attendant bombies must be destroyed.
- The fifth and final wave features a terrible new threat — two Almirian Shadow Guards — along with Crusaders, howlitzers, etc. Silkwings respawn, Crusaders respawn, and the Shadow Guards reanimate bombies and zombies. A common tactic is to kill the Shadow Guards with Blitz Needle charges to the back. The fight ends when all non-respawning monsters have been killed.
Third Level: Cryptic Cache
The third level is purely a treasure level, with numerous treasure boxes and no monsters. Knights can change their equipment anywhere in this level, so that the heat earned can be applied to any item at the elevator.

