Difference between revisions of "Clockworks Tier"
From SpiralKnights
(→Clockworks Tiers) |
m (Update) |
||
| Line 1: | Line 1: | ||
| − | + | The Clockworks is broken up into 3 tiers whose boundaries are represented by the Sub-Towns. These '''Clockworks Tiers''' represent the different zones of difficulty and monster strength in the world of [[Cradle]]. Access to the various tiers is granted by the [[Spiral Warden]] when a knight has the correct level of equipment and number of tokens. Any knight can explore a tier that has not been unlocked yet by being invited to join a [[party]] started by a knight with access. | |
| − | The Clockworks is broken up into 3 | + | |
| − | ==Clockwork Tier Clearance== | + | == Clockwork Tier Clearance == |
| − | The overarching Clockworks Tier | + | [[Image:Progress-window.png|thumb|right|The Progress tab.]] |
| + | {{main|Spiral Warden}} | ||
| + | The overarching Clockworks Tier Clearance in the progress tab of the Character window shows the overall progress of a knight in gaining access to all the tiers. Once a tier is unlocked, it will stay unlocked for that knight. | ||
| − | + | == Tier 1 == | |
| + | This is the first zone of the game, all knights who have left the [[Rescue Camp]] have immediate access to it. It extends downwards from the town of Haven, through 7 levels down to [[Moorcroft Manor]]. | ||
| − | + | It is designed to be playable using 0-1 star equipment. | |
| − | + | ||
| − | + | == Tier 2 == | |
| − | The second zone in the game exists down from Moorcroft Manor to | + | The second zone in the game exists down from Moorcroft Manor, through 9 levels down to [[Emberlight]], the town of Gremlin Outcasts. The monsters in Tier 2 are generally more difficult than those found in Tier 1. |
| − | + | It is designed to be playable using 2-3 star equipment. | |
| − | + | ||
| − | + | ||
| − | + | ||
| − | + | ||
| − | + | == Tier 3 == | |
| − | The final | + | The final tier is where the only the most experienced knights should go. This tier encompasses the area from Emberlight down to the [[Core]]. Here a knight will want to have the best equipment available on Cradle, most of which is only available via crafting. Powerful beings such as [[Lord Vanaduke]] can be found dwelling within this tier. The monsters in Tier 3 are generally more difficult than those found in Tier 2. |
| − | + | It is designed to be playable using 4-5 star equipment. | |
| − | + | ||
| − | * | + | == See Also == |
| − | * | + | * [[Exploration]] |
| − | * | + | * [[Gate]] |
| + | * [[Party]] | ||
| + | * [[Spiral Warden]] | ||
| + | |||
| + | [[Category:Terminology]] | ||
Revision as of 02:26, 1 April 2011
The Clockworks is broken up into 3 tiers whose boundaries are represented by the Sub-Towns. These Clockworks Tiers represent the different zones of difficulty and monster strength in the world of Cradle. Access to the various tiers is granted by the Spiral Warden when a knight has the correct level of equipment and number of tokens. Any knight can explore a tier that has not been unlocked yet by being invited to join a party started by a knight with access.
Clockwork Tier Clearance
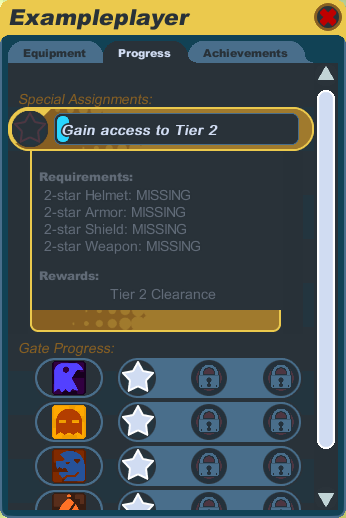
The overarching Clockworks Tier Clearance in the progress tab of the Character window shows the overall progress of a knight in gaining access to all the tiers. Once a tier is unlocked, it will stay unlocked for that knight.
Tier 1
This is the first zone of the game, all knights who have left the Rescue Camp have immediate access to it. It extends downwards from the town of Haven, through 7 levels down to Moorcroft Manor.
It is designed to be playable using 0-1 star equipment.
Tier 2
The second zone in the game exists down from Moorcroft Manor, through 9 levels down to Emberlight, the town of Gremlin Outcasts. The monsters in Tier 2 are generally more difficult than those found in Tier 1.
It is designed to be playable using 2-3 star equipment.
Tier 3
The final tier is where the only the most experienced knights should go. This tier encompasses the area from Emberlight down to the Core. Here a knight will want to have the best equipment available on Cradle, most of which is only available via crafting. Powerful beings such as Lord Vanaduke can be found dwelling within this tier. The monsters in Tier 3 are generally more difficult than those found in Tier 2.
It is designed to be playable using 4-5 star equipment.
