Difference between revisions of "Rabid Snarbolax"
From SpiralKnights
m |
Kgarrett1969 (Talk | contribs) (→Strategy: - changing reference to stun color to be consistant troughout the article as well as cleaning up grammar and removing redundant comments.) |
||
| Line 16: | Line 16: | ||
== Strategy == | == Strategy == | ||
| − | While one Snarbolax of this nature would not be too bad, Three Rings decided it would be fun to add two! You | + | While one Snarbolax of this nature would not be too bad, Three Rings decided it would be fun to add two! You will face two rabid, snarling, vicious beasts in this boss battle! Like all beasts, the Rabid Snarbolax are weak to piercing, so bringing a [[Barbarous Thorn Blade]] or another weapon that deals piercing damage is a good idea. Contrarily, they are resistant to elemental, so even popular and powerful weapons like the [[Divine Avenger]] won't help here. Unlike the [[Roarmulus Twins]], red or otherwise, these guys are two separate creatures and they must be killed individually! A respawning little [[Silkwing]] heals the two at a rate of 63 health points per second, when present and it is therefore highly recommended that it be slain as quickly as possible whenever it appears. The [[Exploration#Beast_Bells|Beast Bell]] remains, and like the normal Snarbolax, is the only way to defeat them. They are immune to all damage while black/green and are vulnerable when stunned. When stunned, they will change color to tan/orange. To stun them, the Beast Bell must be struck while one or both of them are near it. Like the original Snarbolax, the Rabid Snarbolax can still attack while they are stunned. |
| − | + | ||
| − | + | ||
=== Tactics === | === Tactics === | ||
| − | Shielding is important in this fight, as | + | Shielding is important in this boss fight, as the Snarbolax like to burrow underground creating long trails of spikes across the battlefield. This should be very familiar to knights that have fought the original Snarbolax. The only difference here is that they also inflict poison status when they damage knights. It is advisable to assign a knight in your team to "take care of", (''mercilessly kill''), the Silkwing. You may also want to assign a different knight to be the Beast Bell basher, who should slam the bell when a Snarbolax is within range of the stun effect. When tan/orange, everyone should attack stunned Snarbolax until they return to impervious black/green or die. Repeat this process until they are both dead and you're home free! You should also take care not to over extend attacks as the battlefield is surrounded by hedge of poisonous thorn bushes. |
| − | + | ||
| − | + | ||
==Videos== | ==Videos== | ||
Revision as of 13:01, 30 May 2012
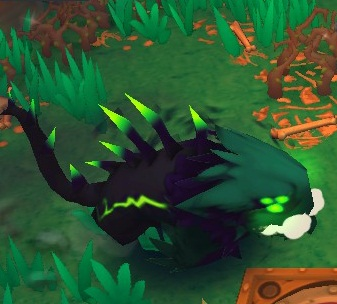
The Gloaming Wildwoods has been infected with a poisonous miasma and the Snarbolax is said to have gone rabid! It is a poison-themed version of the Tier 1 boss, Snarbolax. Though there's a catch, now there's TWO of them! It is one of the four bosses released with the Shadow Lair patch.
Contents
Access
First you must reach Depth 23, easily done by accessing Emberlight.
Once at Depth 23, just walk forward and reach the access to the Shadow Lairs.
Now you will need one Shadow Key in order to access the Shadow Lair of your choice, in this case; Rabid Snarbolax Shadow Lair.
(Only one Key is needed to give your entire party access to the Shadow Lair)
Once opened the Terminal your party will be locked / closed and you will be unable to have new members join during the rest of your journey through the Shadow Lair.
Strategy
While one Snarbolax of this nature would not be too bad, Three Rings decided it would be fun to add two! You will face two rabid, snarling, vicious beasts in this boss battle! Like all beasts, the Rabid Snarbolax are weak to piercing, so bringing a Barbarous Thorn Blade or another weapon that deals piercing damage is a good idea. Contrarily, they are resistant to elemental, so even popular and powerful weapons like the Divine Avenger won't help here. Unlike the Roarmulus Twins, red or otherwise, these guys are two separate creatures and they must be killed individually! A respawning little Silkwing heals the two at a rate of 63 health points per second, when present and it is therefore highly recommended that it be slain as quickly as possible whenever it appears. The Beast Bell remains, and like the normal Snarbolax, is the only way to defeat them. They are immune to all damage while black/green and are vulnerable when stunned. When stunned, they will change color to tan/orange. To stun them, the Beast Bell must be struck while one or both of them are near it. Like the original Snarbolax, the Rabid Snarbolax can still attack while they are stunned.
Tactics
Shielding is important in this boss fight, as the Snarbolax like to burrow underground creating long trails of spikes across the battlefield. This should be very familiar to knights that have fought the original Snarbolax. The only difference here is that they also inflict poison status when they damage knights. It is advisable to assign a knight in your team to "take care of", (mercilessly kill), the Silkwing. You may also want to assign a different knight to be the Beast Bell basher, who should slam the bell when a Snarbolax is within range of the stun effect. When tan/orange, everyone should attack stunned Snarbolax until they return to impervious black/green or die. Repeat this process until they are both dead and you're home free! You should also take care not to over extend attacks as the battlefield is surrounded by hedge of poisonous thorn bushes.
Videos
Spiral Knights - Rabid Snarbolaxes
Spiral Knights - Shadow Lair (Gate 1) Rabid Snarbolax (Part 3/4)
Drops
 Frumious Fang 6-8
Notes
Just like the regular Snarbolax, this Snarbolax is sometimes randomly immune to the Bell.
Trivia
- Compared to the Original Snarbolax, this one has quadruple the number of Boxes and Rewards waiting next to the elevator!
See Also
Clockworks Bosses
Shadow Lair Bosses
- Rabid Snarbolax
- Ice Queen
- Red Roarmulus Twins
- Darkfire Vanaduke

