Difference between revisions of "The Phantom Mask"
From SpiralKnights
m (→Runthrough: add information about Lab floor, unique per sprite mission) |
Knishtra52 (Talk | contribs) |
||
| (6 intermediate revisions by one other user not shown) | |||
| Line 22: | Line 22: | ||
|objective = Secure a cache of battle sprites and return them to the Lab. | |objective = Secure a cache of battle sprites and return them to the Lab. | ||
}} | }} | ||
| + | |||
| + | ==Gate Map== | ||
| + | {{:{{PAGENAME}}/Gate Map}} | ||
==Notes== | ==Notes== | ||
| Line 27: | Line 30: | ||
A Tier 2 level 15 Maskeraith will temporarily accompany the player. This sprite replaces the player's current sprite. Not to worry, this has no lasting effects on any sprites the player might own already - feel free to replay this mission. | A Tier 2 level 15 Maskeraith will temporarily accompany the player. This sprite replaces the player's current sprite. Not to worry, this has no lasting effects on any sprites the player might own already - feel free to replay this mission. | ||
| + | |||
| + | Assuming the player has not crafted any on their own or sold the [[Cyclops Cap]] from the {{mission|First Contact}}, receiving the [[Spiral Scale Helm]] reward for completing this mission will be the third helmet the player has in their arsenal, thus granting the [[File:Achievement-Hatter.png|20px]] [[Achievement|Hatter Achievement]]. | ||
===History=== | ===History=== | ||
*{{release|2013-07-30}}: Mission introduced | *{{release|2013-07-30}}: Mission introduced | ||
| − | + | ==See Also== | |
| − | + | {{mission see also|loadout=yes}} | |
| − | + | ||
| − | + | ||
| − | + | ||
| − | + | ||
| − | + | ||
| − | + | ||
| − | + | ||
| − | + | ||
| − | + | ||
| − | + | ||
| − | + | ||
| − | + | ||
| − | + | ||
| − | + | ||
| − | + | ||
| − | + | ||
| − | + | ||
| − | + | ||
| − | + | ||
| − | + | ||
| − | + | ||
| − | + | ||
| − | + | ||
| − | + | ||
| − | + | ||
| − | + | ||
| − | + | ||
| − | + | ||
| − | + | ||
| − | + | ||
| − | + | ||
| − | + | ||
| − | + | ||
| − | + | ||
| − | + | ||
| − | + | ||
| − | + | ||
| − | + | ||
| − | + | ||
| − | + | ||
| − | + | ||
| − | + | ||
| − | + | ||
| − | + | ||
| − | + | ||
| − | + | ||
| − | + | ||
| − | + | ||
| − | + | ||
| − | + | ||
| − | + | ||
| − | + | ||
| − | + | ||
| − | + | ||
| − | + | ||
| − | + | ||
| − | + | ||
| − | + | ||
| − | + | ||
| − | + | ||
| − | + | ||
| − | + | ||
| − | + | ||
| − | + | ||
| − | + | ||
| − | + | ||
| − | + | ||
| − | + | ||
| − | + | ||
| − | + | ||
| − | + | ||
| − | + | ||
| − | + | ||
| − | + | ||
| − | + | ||
| − | + | ||
| − | + | ||
| − | + | ||
| − | + | ||
| − | + | ||
| − | + | ||
| − | + | ||
| − | + | ||
| − | + | ||
| − | + | ||
| − | + | ||
| − | + | ||
| − | + | ||
| − | + | ||
| − | + | ||
| − | + | ||
| − | == See | + | |
| − | {{mission see also}} | + | |
Latest revision as of 05:17, 28 October 2016
| ||||||||||||||||||||||||||||||||||||||||||||||||||||||||||||||||||||||||||||||||||||||||||||||||||||||||||||||||||||||||||||||||||||||||||||||||||||||||||||||||||||||||||||||||||||||||||||||||||||||||||||||||||||||||||||||||||||||||||||||||||||||||||||||||||||||||||||||||||||||||||||||||||||||||||||||||||||||||||||||||||||||||||||||||||||||||||||||||||||||||||||||||||||||||||||||||||||||||||||||
| ||||||||||||||||||||||||||||||||||||||||||||||||||||||||||||||||||||||||||||||||||||||||||||||||||||||||||||||||||||||||||||||||||||||||||||||||||||||||||||||||||||||||||||||||||||||||||||||||||||||||||||||||||||||||||||||||||||||||||||||||||||||||||||||||||||||||||||||||||||||||||||||||||||||||||||||||||||||||||||||||||||||||||||||||||||||||||||||||||||||||||||||||||||||||||||||||||||||||||||||
The Phantom Mask is a 2-2 rank mission.
Contents
Overview
Description:
Rhendon is waiting for you in an abandoned gremlin chemical plant where reconnaissance has located a cache of missing battle sprites. Secure the sprites and clear the area of hostiles. You are authorized to use any sprites you secure in order to complete the mission.
Objective:
Secure a cache of battle sprites and return them to the Lab.
Gate Map
Depth: 0
Level Link: This mission's lobby is standard.
Depth: 1
Level Link: Creeping Cavern is unique to this mission.
Depth: 2
Level Link: Emergency Outflow is unique to this mission.
Depth: 0
Level Link: While not actually listed in the mission's gate map, The Lab is always loaded upon completion and it has a special layout related to this mission.
Notes
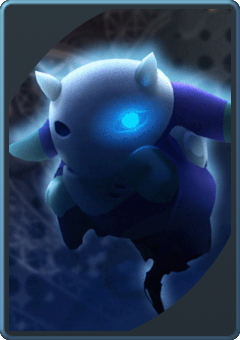
This mission features the Maskeraith battle sprite.
A Tier 2 level 15 Maskeraith will temporarily accompany the player. This sprite replaces the player's current sprite. Not to worry, this has no lasting effects on any sprites the player might own already - feel free to replay this mission.
Assuming the player has not crafted any on their own or sold the Cyclops Cap from the 1-3 ![]() Mission: First Contact, receiving the Spiral Scale Helm reward for completing this mission will be the third helmet the player has in their arsenal, thus granting the
Mission: First Contact, receiving the Spiral Scale Helm reward for completing this mission will be the third helmet the player has in their arsenal, thus granting the ![]() Hatter Achievement.
Hatter Achievement.
History
- release 2013-07-30: Mission introduced


