Help:Style guide
From SpiralKnights
Defer unanswered questions about style to The Wikipedia Manual of Style. Because we are a gaming wiki, we will have a few exceptions to these rules, most of which involve naming convention.
You can check the index of namespace 12 (the Help namespace) for useful links.
If something seems to be a pattern on this wiki, follow it.
If you have more questions, ask editors on the wiki editor forums.
Wiki Format
There are a few different kinds of pages used around this wiki, such as "lists" and pages about individual items. Below is a list of page formats for easy copypasting to make sure you get all relevant information in the same places in articles consistently:
Redirects
SpiralKnights:Redirect - list of reasons to redirect, and how to tag them.
Categories
Whenever fitting, articles should be categorized. See Special:Categories for a list of categories.
Naming Convention
Articles
Here are some guidelines for general pages:
As a game, Spiral Knights has its own special names, so the Wikipedia guidelines will not always be appropriate.
Files (Images)
Uploaded files should be named clearly and plainly. All images should have the appropriate image tag included in the file description. The preferred image format is PNG. For images created by the Spiral Knights community, please follow the following naming conventions:
- Crafting-Item_Name.png - Used for crafting item icons
- Equipment-Item_Name_icon.png - Used for equipment item icons (armor, helmets, shields, weapons, etc)
- Equipment-Item_Name_Stats.png- Used for equipment stats (armor, helmets, shields, weapons)
- Equipment-Item_Name_Abilities.png- Used for equipment abilities (armor, helmets, shields, weapons)
- Item_Name-Equipped.png - Used for equipped items (armor, helmets, shields, weapons, etc)
- Item_Name-Equipped 2.png - Used for alternate angles (armor, helmets)
- Item_Name-Attack.png - Used for swords and handguns overworld display of their basic attack
- Item_Name-Charge_Attack.png - Used for bombs, swords, and handguns overworld display of their change attack
- Item_Name-Overworld.png - Used for images taken of an overworld view of certain items (accessories, costume, furniture, etc.)
- Item_Name-tooltip animation.png - Used for tooltip's animations of certain items (accessories, costume, weapons, furniture, etc.)
- Item_Name-Preview.png - Used for full inspect windows of certain items (accessories, costume, battle sprites, swords, etc.)
- Monster-Monster_Name.png - Used for monsters (128x128px)
- NPC_Name-Mugshot.png - Used for NPCs, this include vendors.
Templates
Infoboxes
- Gear:
- {{ArmorInfo}} (Usage) - For Armor and Helmet items
- {{ShieldInfo}} (Usage) - For Shield items
- {{TrinketInfo}} (Usage) - For Trinkets
- {{WeaponInfo}} (Usage) - For weapons including Bombs, Handguns, and Swords
- {{SpriteInfo}} (Usage) - For Battle Sprites
- Aesthetics:
- {{CostumeInfo}} (Usage) - For Costume items
- {{FurnitureInfo}} (Usage) - For Furniture items
Table of Contents
- {{TOCright}} (Usage) - For moving the TOC to the right
- {{CompactTOC}} (Usage) - For an ABC type TOC to replace the standard type. Used for alphabetical lists.
Other
- {{SKLink}} (Usage) - For making links visible in tables with dark backgrounds
- {{Star}} (Usage) - For showing the star rating graphically
- {{Main}} (Usage) - Links to a main article
- {{exploration}} (Usage) - Display text that links to a visual of an exploration entity.
- {{color link}} (Usage) - For easy linking to color pattern's categories
- {{SFX link}} (Usage) - For easy linking to SFX's categories
- {{release}} (Usage) - For easy linking to any release notes
- {{pc}} (Usage) - To only add the personal color on visuals with prismatic aspect
Linking with icon
- {{mission}} (Usage) - Used for linking to mission pages with its correct rank and type.
- {{Link+Icon}} (Usage) - Shows the icon and link of certain things like energy, crowns, etc
- {{attack}} (Usage) - Shows the icon and link of any damage type
- {{status}} (Usage) - Shows the icon and link of any status effect
- {{monster}} (Usage) - Shows the icon of the family and damage type of any monster with a link.
- {{Monster Icons}} (Usage) - Shows the icon of any monster family.
- {{equip}} (Usage) - Shows the icon and a link of an equipment, costumes, weapons, etc
- {{accessory}} (Usage) - Shows the icon and a link of any accessory
- {{mat}} (Usage) - Shows the icon and a link of a material
- {{key}} (Usage) - Shows the icon and link of a key
- {{recipe}} (Usage) - Shows the icon of any recipe type and a link to the item
- {{sprite}} (Usage) - Shows the icon and link of any battle sprite
- {{SpritePod}} (Usage) - Shows the icon and link of any battle sprite's pod
- {{Link+Icon/Skill}} (Usage) - Shows the icon and link of any battle sprite's skills
- {{location}} (Usage) - To either link to an area that has different levels, and/or to link to an area with a specific phrase. Can include icon if necessary.
- {{module}} (Usage) - Shows the icon and a link of any module.
- {{Prismatic Aspect}} (Usage) - To describe the prismatic parts of a equipment, costume, accessory, etc, have prismatic aspect.
- {{lockbox}} (Usage) - Shows the icon and link of any lockbox
- {{PrizeBox}} (Usage) - Shows the icon and link of any prize box
Visuals
Spiral Spy files (and files created in relation to Spiral Spy) should never be uploaded to this wiki, no matter the circumstances. This is due to a variety of reasons, the most important of which is considered to be proof of existence and authenticity. In short, staff wants pictures on this wiki to be captured strictly from in-game. The decision was communicated here and seems to be final, considering multiple discussions with staff on the matter after the forum post.
Avoid using gifs. They should never be used as a representative image under any circumstances, or "main" images such as those displayed in infoboxes.[1]
Images
Tooltips
An "Item equipped" image in an infobox represents an item as it appears in the tool-tip rotation in-game. Images should generally be the first clear frame of the tool-tip unless the item is obscured or at a terrible angle (as with certain accessories). Alternate angles should be shown in a gallery elsewhere on the page.
- Due to how the game has changed overtime, filenames might seem to be...inaccurate. Images were uploaded (for quite a long time) to file destinations that had "equipped" in the name, because being "worn" or "equipped" was the only consistent view available at the time. Later on, tool-tip rotations were introduced. Since it would require a large chunk of time to change existing filenames (either by moving or reuploading), and nobody actually sees these filenames on published pages, the "inaccurate" naming convention remains.
Battle Sprites
Use example images on the Maskeraith (Spiralhorn) page. Details to come - basically, the inspect window shows the size comparison between T1/2/3 sprites and keeps dimensions consistent, compared to cropped images.
Animations
We want high quality animations! No .gifs! Boooo! We prefer to use APNG.
Tooltips
Tooltip animations for an item should be 201px (width) by 222px (height) and feature a full 360° rotation. The animation should be captured from the tool-tip rotation in-game and not from spiral spy. When capturing costumes (or helmets, armor, etc.), make sure they dont have any accessories attached. Compare the angle of the tooltip with similar items already uploaded to maintain consistency around this wiki.
- You may use the following guide to create Animated PNG pictures:
Required Programs
- Screen capture program like Fraps (free version of Fraps is sufficient)
- VirtualDub
- ImageMagick ("Portable Win32 static" will be required for this guide)
- APNG Anime Maker
- Thepc's batch script for easy conversion (you don't need Dropbox to download this file)
Make sure to scan all files for malicious software.
Setup
- Download and install Fraps (or any other screen capture program that produces high quality files that you are comfortable using).
- Export all content from "Spiral Knights APNG-Batch.zip" to a directory of your choice. (this path will be referenced as chosen_path in this guide)
- Download the portable version of ImageMagick and copy it's content into the "ImageMagick" directory.
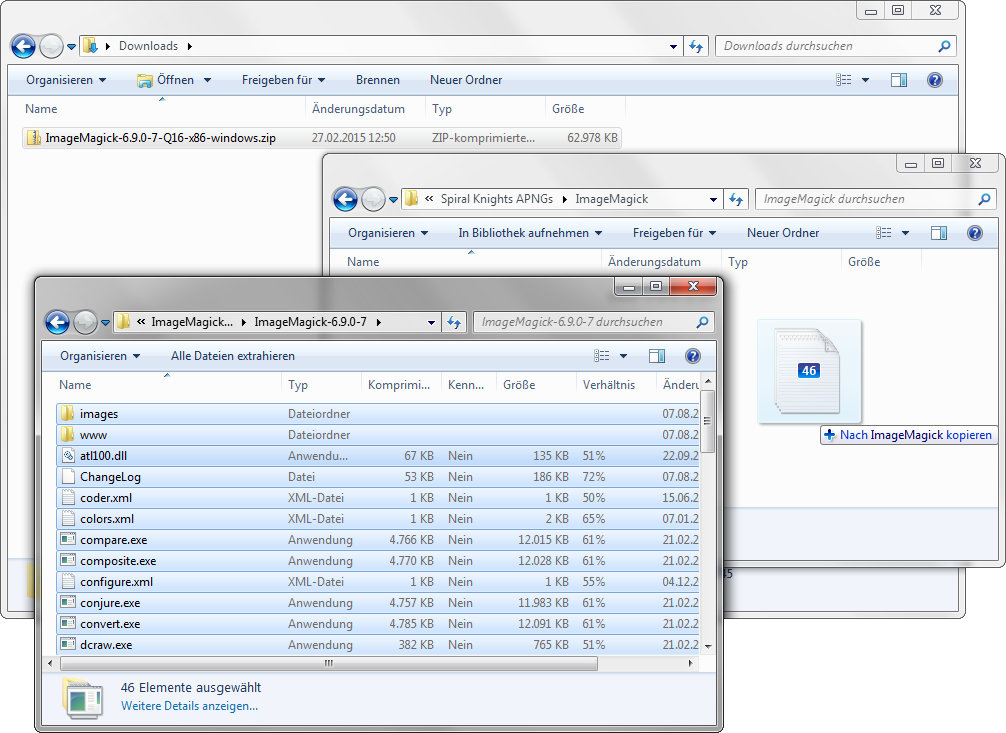
- Download and move the "APNG Anime Maker" into the same directory as the "ConvertImage.bat". (should be chosen_path)

- Done.
- you should now have this files in place:
- chosen_path\ConvertImage.bat
- chosen_path\APNG Anime Maker.exe
- chosen_path\ImageMagick\convert.exe
Converting Video to APNG
- Start Spiral Knights and record some tooltip rotation footage. Open this File in VirtualDub and export it as "Image Sequence".
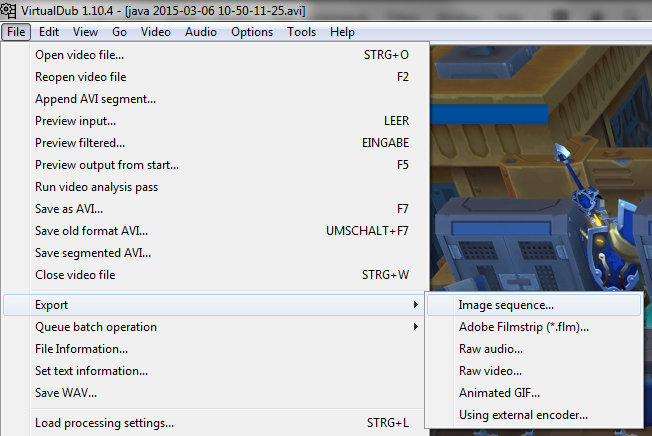
Select PNG-Format and export to chosen_path\WorkingDir.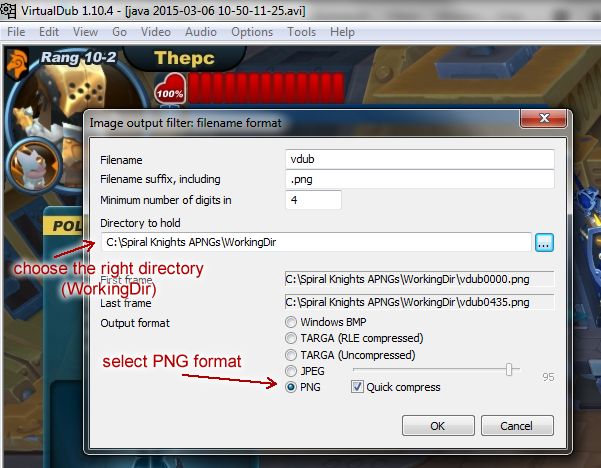
- Open the chosen_path\WorkingDir and open one image in paint (or any other similar software) and select the bottom right corner of the tooltip animation.
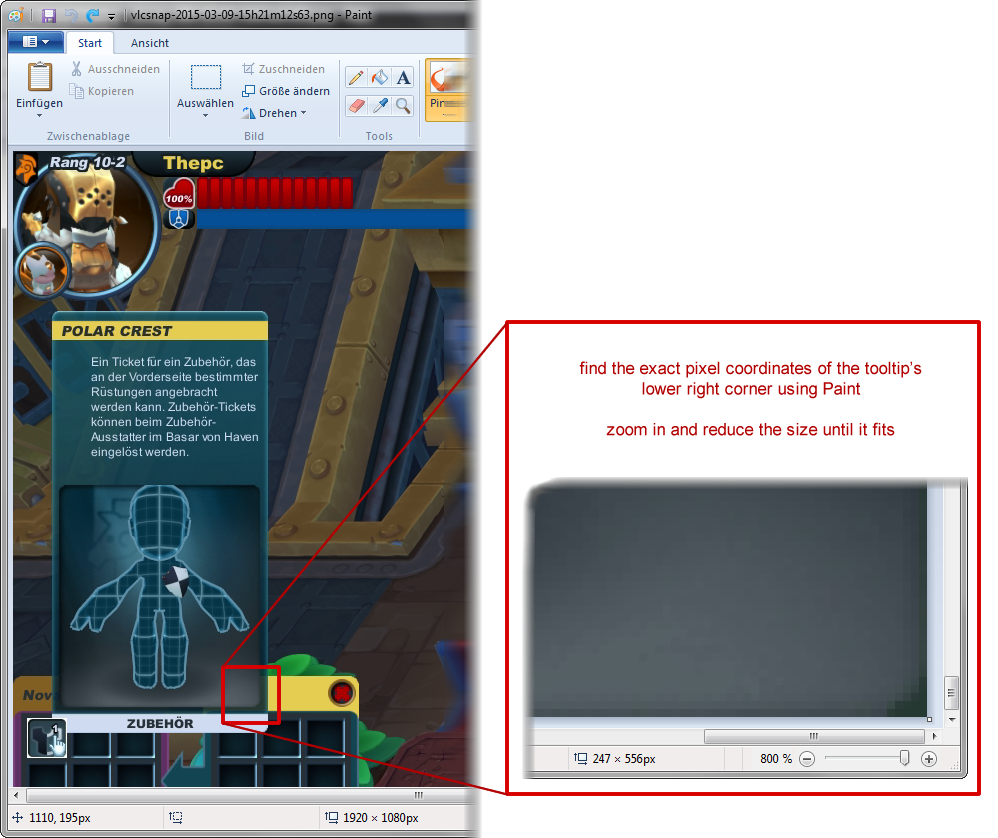
You will need the pixel position for the batch script.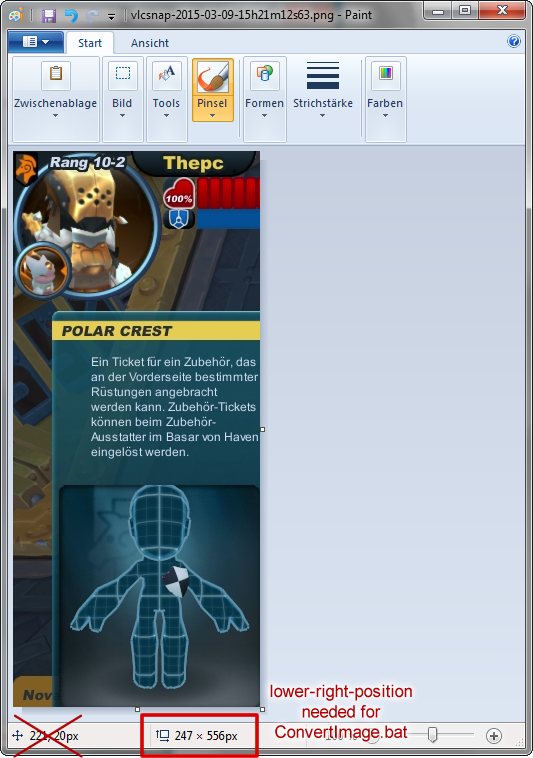
- Wait for VirtualDub to complete the conversion, then start the "ConvertImage.bat" from the chosen_path.
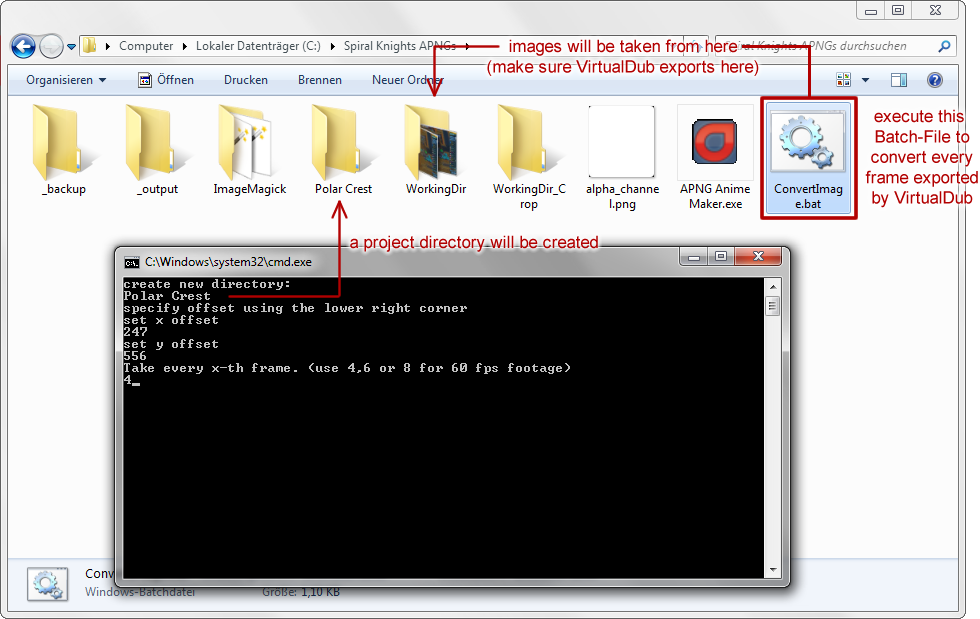
You will first have to enter the item name to create a new project directory.
Then enter the pixel coordinates from step 2.
Finally input how many frames should be skipped. When recording with 60 fps use a value between 4 and 8 depending SK-Item's size.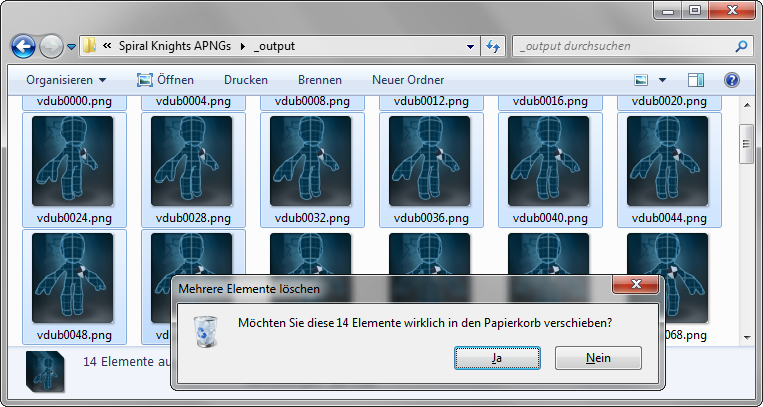
- After the script has completed conversion, the _output directory as well as "APNG Anime Maker" will be opened for you.
Delete unwanted frames from the _output directory. If you skipped every 4th frame, use 80 frames total. If you skipped every 6th frame use 53 frames in total. For every 8th frame use 40 frames for a complete rotation.
- Create the APNG animation from single frames. Switch to the open "APNG Anime Maker" and input all the remaining frames from the _output directory. Select 62ms delay for 80 frames, 93ms delay for 53 frames or 124ms delay for 40 frames. Play around with lossy compression, but don't set it above 15. Use the maximum of 9 for lossless compression. Save your APNG image and enjoy it rotation (using your browser)
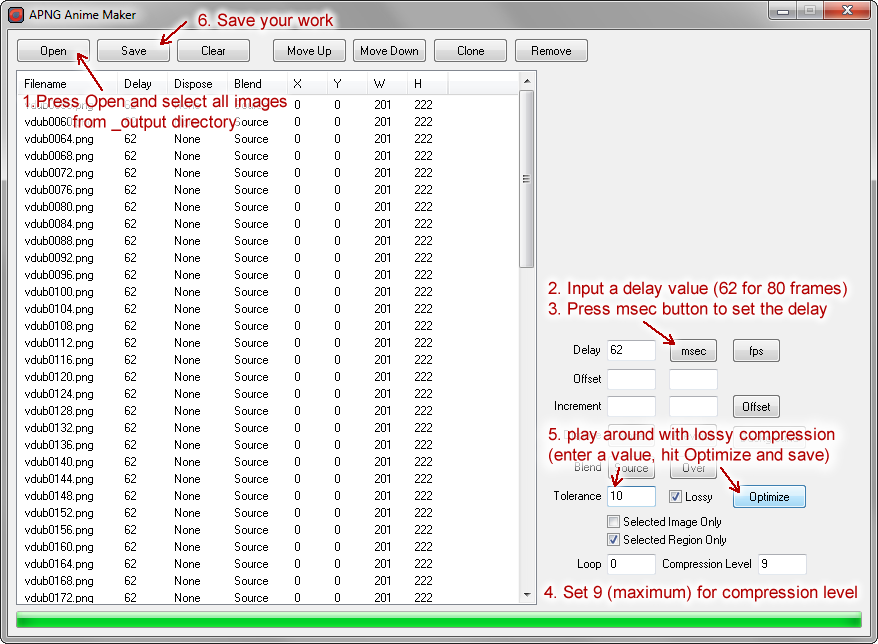
- After closing "APNG Anime Maker" the batch-script will offer you to restart with a new image, restart with skipping an other amount of frames or close the script.
If you have any questions or suggestions regarding this guide, feel free to ask Thepc ingame or on the wiki. -Thepc 16:12, 21 March 2015 (UTC)
Overworld
Compare your item with existing files on this wiki. A picture is worth 1000 words, an animation is worth 1000x more. Then use this guide in junction with the one above, where relevant:
Use Fraps or a screen capture program that produces high quality files that you are comfortable using.
Establish a "cameraman." This cameraman can be you, or another knight that you control. Whatever the case, you must not film yourself with yourself, because the screen moves with you. We don't want that! Only film other people, or film yourself with an alt, etc.
Have the cameraman uncheck "show rank" and select "on hover" for show names in the chat tab of the Options interface.
Find someone (might be you) that has the item you wish to film. It is very much preferred to find outfits that are not heavily accessorized so that the focus can be on the item you are filming.
- Ask the target politely to pose in a way that shows the item in a consistent manner with other similar animations on this wiki. Do not offer to pay them, or demand payment, etc. Wiki work is volunteer.
- Ask them if they wish to be credited on the wiki - only give credit in the upload comment (file page) because the wiki is about game content, not users, but files should have source information in general. It also makes people more willing to help, haha - but many people like to remain anonymous, especially for rare items so people don't bother them about selling their precious shinies and for various other personal reasons.
- Make sure the person you're filming has time - including yourself!
Find a clean area that has very visually obvious tiles that is not likely to have people join in. Empty guild hall rooms or the Private Training Hall are excellent choices, since these are not affected by weather changes during events.
- Spend as much time as it takes to get a good visual that's relatively easy to loop. Users will have to do different things for different items. In general:
Aesthetics:
(accessory, costume, helmet, armor, shield): compare to animations already uploaded on wiki. Have them wiggle, turn, and walk around a 3x3 area twice before returning to the same spot.
Gear:
Link to external videos (like youtube) in the "external links" section to really help users get an idea of the weapon in action, whenever possible. See #Videos below for details about posting videos on this wiki.
- Bombs: charge up, plop down, detonate. Loop that. The first frame should show the effective radius of the bomb, with a focus on visuals - some explosions are very interesting/pretty/don't reflect the white ring. You should always state the detonation time (not ctr) and (true) radius in the charge attack section of the bomb page. Detonation time and charge time are very different things after all. If you can, have them stand in the center of the area with the knight symbol in the Private Training Hall. That being said...the current filesize limit of the wiki (2 MB) prevents most bombs from being uploaded, so just upload an image that clearly shows the radius on an obviously tiled area.
- Handguns:
- regular: shoot the full clip. Loop that. Make sure the first frame shows the tile range of the bullet.
- charge: charge up, and set charge off. Make sure the first frame of the charge shows the range and any awesome effects (like the birds of light in the antigua line).
- Swords:
- regular: swing once. Then immediately swing once AND until the knight no longer swings - this is a "combo" of sorts. Some swords swing twice, three times, or many times.
- charge: charge up, set off charge. Make sure the first frame of the charge shows the range and any awesome effects, like the Obsidian Edge. If the charge is radial, have them stand in the center of the area in the private training hall - example on Fang of Vog page. Note: many swords have charge attacks that produce animations larger than 2MB, so just upload an image of the range of the charge attack on an obviously tiled area.
Videos
"You may post videos in the "external links" section of a wiki page, or on your own user page, provided that the video does not contain material that violates our Terms of Service. It's fine if the video you're linking is monetized, but the YouTube description must credit SEGA and Three Rings, and must provide a link back to our game." - Spiral Knights Support, 09 March 2015
Wikipedia MoS regarding "external links." Importantly:
- Do not include the external link in the body of the article.
- Keep the list short (on this wiki, it will usually be one demonstrative video).
Embedding videos seems to currently have technical issues.