|
|
| (24 intermediate revisions by 6 users not shown) |
| Line 1: |
Line 1: |
| − | {{Area | + | {{MissionInfo |
| − | |Theme={{Monster_Icons|Undead}} {{status|stun}} | + | |name = Legion of Almire |
| − | |Level=[[File:Gate-Graveyard.png|32px]] Necropolis Grounds
| + | |event = no |
| | + | |type = danger |
| | + | |host rank = 4-1 |
| | + | |combat floors = 2 |
| | + | |stratum = |
| | + | *Monsters: {{Monster_Icons|Undead}} |
| | + | *Status: |
| | + | |soundtrack= |
| | + | *Phantom Dirge (Beware) |
| | + | *Sombre Reflection |
| | + | }} |
| | | | |
| − | [[File:Gate-Graveyard.png|32px]] Inner Sanctum
| + | ==Overview== |
| | + | {{MissionOverview |
| | + | |description = Warning: This is a Dangerous Mission!<br><br>Desna and her Recon Rangers are an elite team tasked with recovering intel from some of the most dangerous levels of the Clockworks. Joining them could lead to great rewards, but it is guaranteed to be a perilous journey!<br><br>Spiral HQ believes that an ancient codex originating from the cursed kingdom of Almire is located somewhere in a dark and terrifying necropolis. This necropolis is believed to be teeming with all manners of undead monstrosities and only the Recon Rangers have what it takes to get in, acquire the intel and get out alive! |
| | | | |
| − | [[File:Gate-Graveyard.png|32px]] Cryptic Cache
| + | |objective = Recover an ancient Almirian codex |
| | }} | | }} |
| − | <br>
| |
| − | ==Description==
| |
| − | Warning: This is a Dangerous Mission!
| |
| − | Desna and her Recon Rangers are an elite team tasked with recovering intel from some of the most dangerous levels of the Clockworks. Joining them could lead to great rewards, but it is guaranteed to be a perilous journey!
| |
| − | Spiral HQ believes that an ancient codex originating from the cursed kingdom of Almire is located somewhere in a dark and terrifying necropolis. This necropolis is believed to be teeming with all manners of undead monstrosities and only the Recon Rangers have what it takes to get in, acquire the intel and get out alive!
| |
| − |
| |
| − | ==Monsters==
| |
| − | This section gives a comprehensive list of monsters that appear. Specific monster strategies can be found on the monsters' pages.
| |
| − |
| |
| − | ===Necropolis Grounds===
| |
| − | * {{Monster_Icons|Undead}} [[Howlitzer]]
| |
| − | * {{Monster_Icons|Undead}} [[Kat#Spookat|Spookat]]
| |
| − | * {{Monster_Icons|Undead}} {{status|stun}} [[Zombie#Dust_Zombie|Dust Zombie]]
| |
| − | * {{Monster_Icons|Undead}} [[Almirian Crusader]]
| |
| − | * {{Monster_Icons|Undead}} {{status|stun}} [[Bombie]]
| |
| − | * {{Monster_Icons|Construct}} {{status|stun}} [[Lumber]]
| |
| − | * {{Monster_Icons|Fiend}} [[Wing#Silkwing|Silkwing]]
| |
| − | * {{Monster_Icons|Undead}} [[Deadnaught#Deadnaught|Deadnaught]]
| |
| − |
| |
| − | ===Inner Sanctum===
| |
| − | * {{Monster_Icons|Undead}} [[Howlitzer]]
| |
| − | * {{Monster_Icons|Undead}} [[Kat#Spookat|Spookat]]
| |
| − | * {{Monster_Icons|Undead}} {{status|stun}} [[Zombie#Dust_Zombie|Dust Zombie]]
| |
| − | * {{Monster_Icons|Undead}} [[Almirian Crusader]]
| |
| − | * {{Monster_Icons|Undead}} {{status|stun}} [[Bombie]]
| |
| − | * {{Monster_Icons|Construct}} {{status|stun}} [[Lumber]]
| |
| − | * {{Monster_Icons|Fiend}} [[Wing#Silkwing|Silkwing]]
| |
| − | * {{Monster_Icons|Undead}} [[Deadnaught#Deadnaught|Deadnaught]]
| |
| − | * {{Monster_Icons|Undead}} {{status|curse}} [[Deadnaught#Almirian Shadow Guard|Almirian Shadow Guard]]
| |
| − |
| |
| − | ==Recommended Equipment==
| |
| − | It is highly suggested that you equip a shadow resistant [[:Category:Helmets_providing_Shadow_defense|helmet]] and [[:Category:Armors_providing_Shadow_defense|armor]]. It is also recommended that you equip a shield from either the [[Dread_Skelly_Shield#Alchemy_Path|Skelly Shield]] alchemy path or the [[Crest_of_Almire#Alchemy_Path|Crest of Almire]] alchemy path. Your weapons should deal [[Damage#Elemental_Damage|elemental damage]] as all of the enemies you face will be weak or neutral to it.
| |
| | | | |
| − | ==First Level: Necropolis Grounds== | + | ==Gate Map== |
| − | [[file:Almire Mission.jpg||250px|thumb|Promo Propaganda. Desna looking an Almirian Crusader with a Zombie and a Bombie behind.]]
| + | {{:{{PAGENAME}}/Gate Map}} |
| − | There are many versions of the Almirian graveyard and they are all different. The graveyard first depth has an amazing amount of zombies, as well as [[Bombie]]s. The real trouble of the graveyard is the population of the [[Zombie]]s, the [[Deadnaught]]s and the [[Almirian Crusader]]s. The Deadnaughts and the Zombies make a deadly force. Every time a zombie is defeated, if in range of the deadnaught's area of effect (which is big), the zombies will "arise". Plus, the deadnaughts themselves are a force to be reckoned with. They have a shield in the front that is impenetrable and their rushing attack is devastating, for their rush does a significant amount of damage as well as the spear thrust at the end of each rush. At the end of each rush, you will have a window of time to get to the back of the deadnaught and attack it. However, when you are "backstabbing", you must watch out for the large number of zombies trying to attack you, for this is when having another player with you is useful. Once the deadnaught is dead, you can effectively attack the zombies. The Almirian Crusaders are the third threat. They can deal a big amount of damage, can reduce the shield a lot, and they use their shield often. For the cautious, it is suggested that when the Almirian Crusaders charge their attack, you stay out of the way and use that small window of time after their attack to hit them, or use the gun that unleashes their shield and then go to the side or behind them and attack them. For the risky knights that want to kill them fast, from the moment they start charging their attack, the knights would want to use a charged attack from a elemental weapon or a successful elemental weapon combo, which cancels their attack and makes them stumble. If there is a healer anywhere, you should always kill them first! The bombies are simple, either you use the shield, or you get close to them, they prepare to blow up and you simply move away. When in a sticky super crowded condition, bombies can damage other enemies. However, when there is a [[Silkwing]], the bombies does not damage the enemies fast enough to kill them, so ALWAYS THE HEALERS FIRST.
| + | |
| | | | |
| − | ==Second Level: Inner Sanctum== | + | ==Notes== |
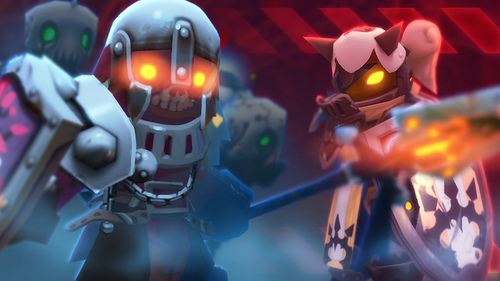
| − | [[Image:Mission-Legion of Almire.png|thumb|120px|Legion of Almire on the Mission Interface.|left]] | + | [[File:SpiralKnights News 54-big.png|thumb|200x200px|right|[[News]] art for this mission.]] |
| − | The second floor has the same perils, but only more dangerous. This time, all the monsters on the second floor become harder, with more HP and more attack. After the first battle arena, there are 2 paths. You must beat both of the paths to unlock the final Almirian arena.
| + | |
| − | ====The right path====
| + | |
| − | The right path leads to a room of dormant Crusaders and zombies, as well as a totem in the middle, reviving zombies. You must seperate the zombies from the totem to defeat them. Be wary of the dormant crusaders, for bombies disturb their rest. The arena of the right path leads to a arena full of dormant Crusaders, kats, and ghost turrets (howlwitzers). When the party button is pressed, 2 Kats and 2 Crusaders are summoned. Once the Crusaders are defeated and the Kats too, the gates will open further to reveal a nasty amount of dormant Crusaders. DO NOT MOVE FORWARD PAST THE FALLEN GATES!!!!!!! Doing that will awaken all the Crusaders, summon a considerable amount of [[Spookat]]s, 2 Silkwings and 3 Howlitzers. Instead of doing that suicidal motive, you need a vial, gun bullet to awaken the Crusaders and lure them to your side so you can kill them. Do these for each of the Crusaders until they are finished, then you move forward and summon the kate, healers and howlwitzers. NOTE THAT ANOTHER PLAYER IN YOUR PARTY CAN RUIN EVERYTHING AND RESULT IN THE PARTY'S DEATH!
| + | |
| − | ====The left path====
| + | |
| − | The path leads to a arena with 4 bombie spawners. There is a gate in front of each of them and a trigger. There are dormant Crusaders next to the trigger. When the arena begins, monsters will normally spawn like any other arena. However, the bombies will be a problem, will constantly spawn and attack you. You can hit the switch to close the spawner, but that will awaken a Crusader. The best strategy is to spare one weak monster on the first wave, awaken the Crusaders one by one and pick them off, for on the last wave all of them will awaken! The bombies are easily dodged, but when crowded, they pose a problem. It is also a excellent strategy to keep on blowing up bombies and hurt the monsters while running around, however the healers would heal the monster right back. This brings back the original strategy: KILL THE HEALERS FIRST!!! But do so cautiously!
| + | |
| − | ====The Final Arena (The Last Line of the Legion)====
| + | |
| − | The First Wave: Regular monsters appear and they can be picked off easily. Be sure to remove the totem so the undead won't respawn. (Be wary of the [[Howlitzer]]s!)
| + | |
| | | | |
| − | The Second Wave: A load of Bombies spawn and 2 Crusaders awaken. Plus another totem spawns in the middle. Keep the totem to revive the bombies and constantly damage the Crusaders. But if you are a player that wants to kill of the Crusaders faster, you should remove the totem, kill off the Bombies and carefully finish off the crusaders.
| + | It is the first Danger Mission incorporated into the daily [[Prestige Mission Rotation]]. |
| | | | |
| − | The Third Wave: This is just like the first wave, but with a Deadnaught and 2 [[Lumber]]s. The Deadnaught will constantly revive the zombies and bombies. Remove the totem first, then kill the Howlitzers. Then very carefully kill the Deadnaught, and be aware of the zombies constantly trying to kill you. | + | The player must be at least [[Player Rank|ranked Soldier (4-1)]] to host this mission. |
| | | | |
| − | The Fourth Wave: Exactly the same with the Second Wave. See the Second Wave.
| + | As with all danger missions, the party locks for the second combat floor and onward. Participants will only receive the prestige reward if they were present in the mission lobby. |
| | | | |
| − | The Final and Fifth wave: Just like the first and third waves, except major perils appear. 2-4 Crusaders spawn, along with 2 [[Almirian Shadow Guard]]s. These will be the bane of the party, causing many deaths. First kill the howlitzers, then move on to remove the totem. Then move on to kill (very carefully. Use shield a lot!) the Crusaders. Then with some carefulness, you can eliminate the Almirian Shadow Guards! (The Almirian Shadow Guards are just like Deadnaughts, except they can inflict [[Curse]] status!) Finally, you can finish off the remaining monsters. | + | The "[[Almirian codex text Dialogue/Inner Sanctum|ancient codex]]" is displayed on a tome stand. It can be read after the last fight. |
| | | | |
| − | ==Third Level: Cryptic Cache==
| + | Even though the first floor uses several ''[[Graveyard]]'' segments, no [[Phantom]]s ever spawn. |
| − | The third level is purely a treasure level, with numerous treasure boxes and no monsters. Knights can change their equipment anywhere in this level, so that the heat earned can be applied to any item at the elevator.
| + | |
| | | | |
| − | == Trivia == | + | ===History=== |
| − | * Although Legion of Almire presents a [[Graveyard]] design, there aren't [[Phantom]]s in the whole mission. | + | *{{release|2012-06-28}}: Mission introduced. |
| | | | |
| − | == See Also == | + | ==See Also== |
| − | *[[Danger Mission]]
| + | {{mission see also|loadout=yes}} |
| − | *[[Compound 42]]
| + | |
| − | *[[Heart of Ice]]
| + | |
| − | *[[Ghosts in the Machine]]
| + | |
is a danger mission lobby.
.
is unique to this mission.
is unique to this mission.
As with all danger missions, the party locks for the second combat floor and onward. Participants will only receive the prestige reward if they were present in the mission lobby.


