Difference between revisions of "Talk:Heart of Ice"
From SpiralKnights
m (building) |
m (better ToC format (easier to understand edit history and navigate using ToC, not including depth because that is not consistent enough for all areas)) |
||
| Line 14: | Line 14: | ||
==Overview== | ==Overview== | ||
'''Description:''' | '''Description:''' | ||
| + | |||
''Warning: This is a Dangerous Mission! | ''Warning: This is a Dangerous Mission! | ||
| Line 25: | Line 26: | ||
==Runthrough== | ==Runthrough== | ||
| − | ===[[File:Gate-Danger Mission.png|left|45px]] Mission Lobby | + | ===First Floor=== |
| + | [[File:Gate-Danger Mission.png|left|45px]] Mission Lobby | ||
'''Depth:''' 0 {{clearleft}} | '''Depth:''' 0 {{clearleft}} | ||
| Line 37: | Line 39: | ||
</gallery> | </gallery> | ||
| − | ===[[File:Gate-Devilish Drudgery-Freeze.png|left|45px]] Frozen Highway | + | ===Second Floor=== |
| + | ---- | ||
| + | [[File:Gate-Devilish Drudgery-Freeze.png|left|45px]] Frozen Highway | ||
'''Depth:''' Depends on [[Player Rank|rank]]. {{clearleft}} | '''Depth:''' Depends on [[Player Rank|rank]]. {{clearleft}} | ||
| Line 78: | Line 82: | ||
|notes = | |notes = | ||
| − | This area only appears in the [[Heart of Ice]] Danger Mission. | + | This area only appears in the [[Heart of Ice]] Danger Mission. Encountering it is not guaranteed. |
{{Opinion/Small}} The left spawner constantly regenerates a [[Pearl Greaver]]. Before activating the party button, lure this monster away from the area and leave it alone (do not defeat it). It will remain outside the gate and not cause the squad problems during the fight. | {{Opinion/Small}} The left spawner constantly regenerates a [[Pearl Greaver]]. Before activating the party button, lure this monster away from the area and leave it alone (do not defeat it). It will remain outside the gate and not cause the squad problems during the fight. | ||
| Line 85: | Line 89: | ||
{{Table/End}} | {{Table/End}} | ||
| − | ===[[File:Gate-Heart of Ice.png|left|45px]] Amu-Sol | + | ===Third Floor=== |
| + | ---- | ||
| + | [[File:Gate-Heart of Ice.png|left|45px]] Amu-Sol | ||
'''Depth:''' Depends on [[Player Rank|rank]]. {{clearleft}} | '''Depth:''' Depends on [[Player Rank|rank]]. {{clearleft}} | ||
| Line 110: | Line 116: | ||
</gallery> | </gallery> | ||
| − | ===[[File:Gate-Heart of Ice.png|left|45px]] Everfrost Tower | + | ===Fourth Floor=== |
| + | ---- | ||
| + | [[File:Gate-Heart of Ice.png|left|45px]] Everfrost Tower | ||
'''Depth:''' Depends on [[Player Rank|rank]]. {{clearleft}} | '''Depth:''' Depends on [[Player Rank|rank]]. {{clearleft}} | ||
| − | This area is | + | This area is stocked with # [[Treasure Box]]es. |
Note: Players can change gear here. This is useful for heating. | Note: Players can change gear here. This is useful for heating. | ||
Revision as of 16:08, 15 March 2015
| ||||||||||||||||||||||||||||||||||||||||||||||||||||||||||||||||||||||||||||||||||||||||||||||||||||||||||||||||||||||||||||||||||||||||||||||||||||||||||||||||||||||||||||||||||||||||||||||||||||||||||||||||||||||||||||||||||||||||||||||||||||||||||||||||||||||||||||||||||||||||||||||||||||||||||||||||||||||||||||||||||||||||||||||||||||||||||||||||||||||||||||||||||||||||||||||||||||||||||||
| ||||||||||||||||||||||||||||||||||||||||||||||||||||||||||||||||||||||||||||||||||||||||||||||||||||||||||||||||||||||||||||||||||||||||||||||||||||||||||||||||||||||||||||||||||||||||||||||||||||||||||||||||||||||||||||||||||||||||||||||||||||||||||||||||||||||||||||||||||||||||||||||||||||||||||||||||||||||||||||||||||||||||||||||||||||||||||||||||||||||||||||||||||||||||||||||||||||||||||||

Heart of Ice is a dangerous prestige mission.
Overview
Description:
Warning: This is a Dangerous Mission!
Desna and her Recon Rangers are an elite team tasked with recovering intel from some of the most dangerous levels of the Clockworks. Joining them could lead to great rewards, but it is guaranteed to be a perilous journey!
Spiral HQ has detected a sudden climate shift emanating from deep within the Clockworks. Freak snowstorms and blizzards have begun surging through the depths seeming to originate from an inhospitable, fiendish city known as 'Amu-Sol.' The Recon Rangers have been dispatched to infiltrate Amu-Sol and discover the source of these freezing storms.
Objective:
Discover the source of the terrible blizzards emanating from Amu-Sol.
Runthrough
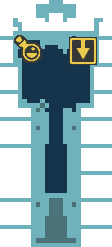
First Floor
Depth: 0
A place to gear up. Desna seems to have a plan. Basil is located top left.
Your squad is not actually accompanied by the Recon Rangers.
Map of the lobby.

Desna encourages Rangers to do their best.


Second Floor
Depth: Depends on rank.
- Pending
Monsters:
 Howlitzer (Rarely)
-
 Chilling Howlitzer
 Devilite
- Layoafer
- Pit Boss
- Yesman
- Pearl Greaver
- Silkwing
 Tundralisk
- Frostifur
- Alpha Frostifur
- Trojan
| Map | Visual | Mission or Area | Level or Segment | Notes |

|

|
Frozen Highway | Start | Notes:
This area only appears in the Heart of Ice Danger Mission. Arsenal station is available. |

|

|
Frozen Highway | I | Notes:
This area only appears in the Heart of Ice Danger Mission. Encountering it is not guaranteed.
|
Third Floor
Depth: Depends on rank.
- pending, mention memos
Monsters:
- Howlitzer (Rarely)
- Chilling Howlitzer
- Devilite
- Layoafer
- Pit Boss
- Yesman
- Pearl Greaver
- Silkwing
- Tundralisk
- Frostifur
- Alpha Frostifur
- Perma-Frostifur
- Trojan
- Maulos (Boss)
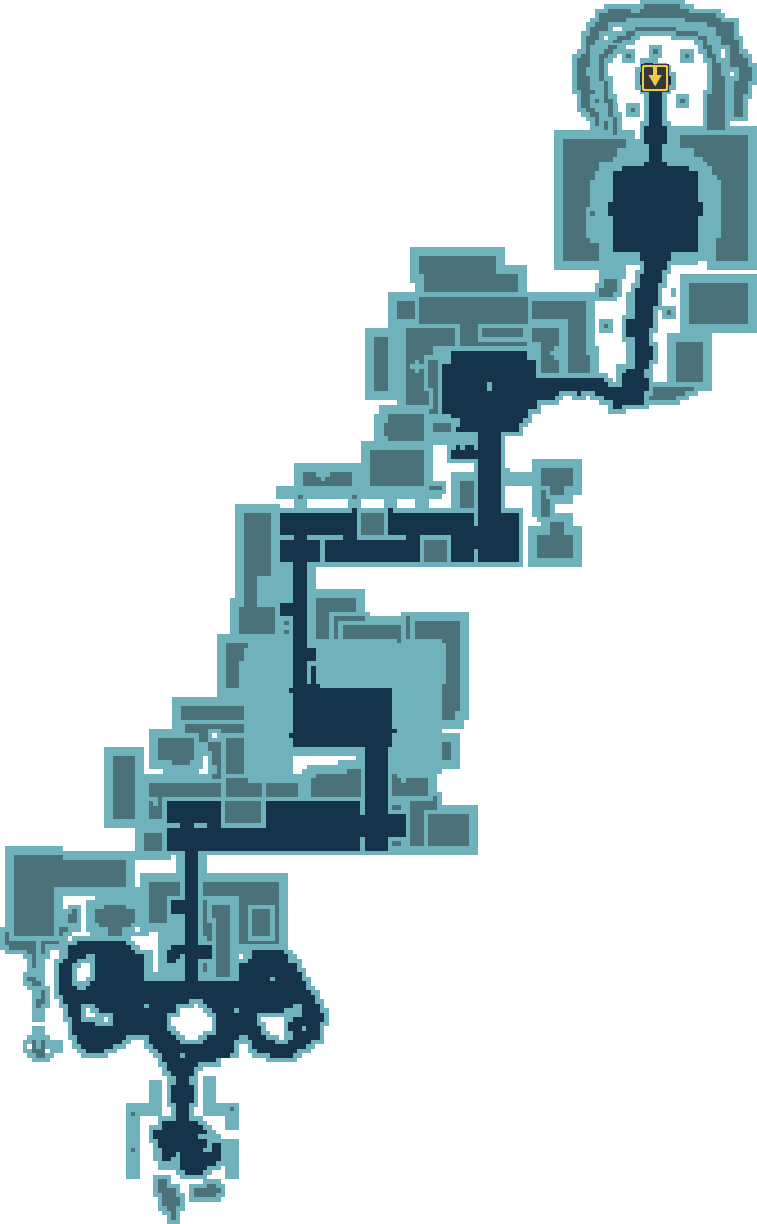
Map of Amu-Sol.

Fourth Floor
Depth: Depends on rank.
This area is stocked with # Treasure Boxes.
Note: Players can change gear here. This is useful for heating.

Map of Everfrost Tower.

Notes
This mission was introduced with release 2012-08-01.
It is the third Danger Mission made available in Spiral Knights.
Frozen Souls spawn continuously in many areas of the mission when there are two members or fewer in the party.
Chilling Howlitzers are rarely replaced by normal Howlitzers in both depths.
There are a few computers in this mission where you can read about how Devilites had planned to freeze the Clockworks with the support of Maulos. They contacted a mysterious character called Morgral'm. It is unknown if Morgral'm is a Devilite or some other type of monster.
Strategy
Recommended Equipment:
The recommended armor set for this mission is a Piercing/Shadow Hybrid. One popular choice is the Skolver/Snarbolax, considering they both give the corresponding defenses and freeze resistance. Any additional resistance from UVs, trinkets, or perks can potentially make you immune to the wisps and souls throughout the mission. Nearly all the monsters in this mission are weak to piercing. The Flourish and Snarble sets are incredibly useful. The Autogun, Antigua (just the 3* Antigua itself), and Magnus sets of guns are the most useful, although the Magnus is not recommended because it is slow. The ultimate gun by far is either the Plague Needle or the Blitz Needle because their charged attacks can instantly kill most monsters in the mission. However, it is also suggested to bring an elemental gun to get rid of the howlwitzers in the gate arena (See below in the Strategies section for a better explanation).
Gallery

See Also
External Links
- Pending