Danger Room
From SpiralKnights

A Danger Room is an optional area that can be encountered in any Clockwork Tunnels in arcade gates.
Contents
Notes
To enter this area you need to pay 3 ![]() Energy.
Energy.
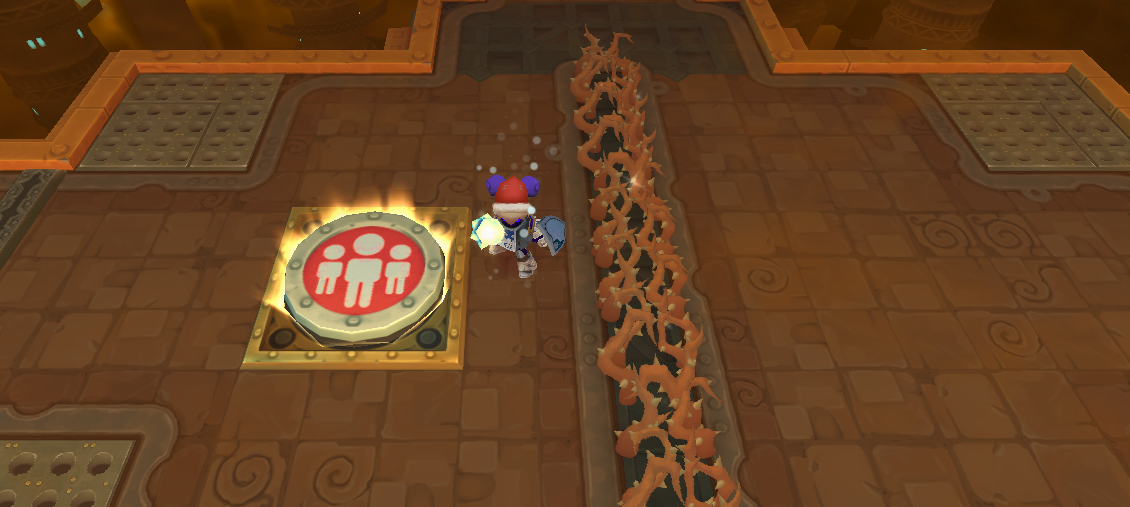
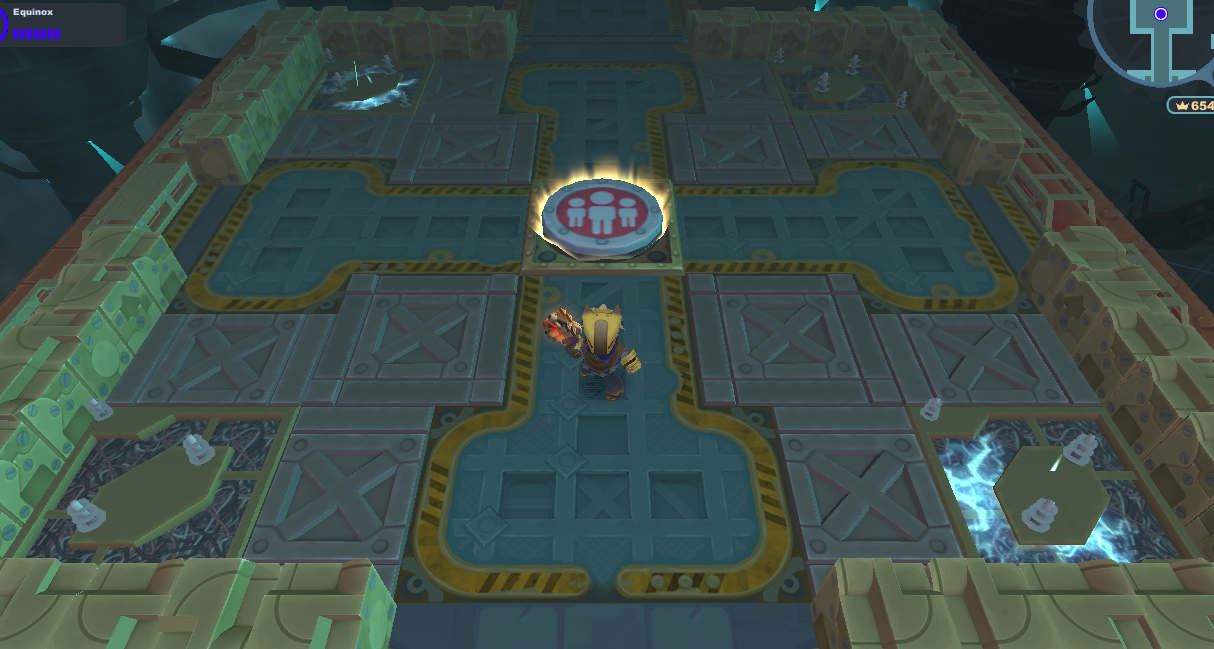
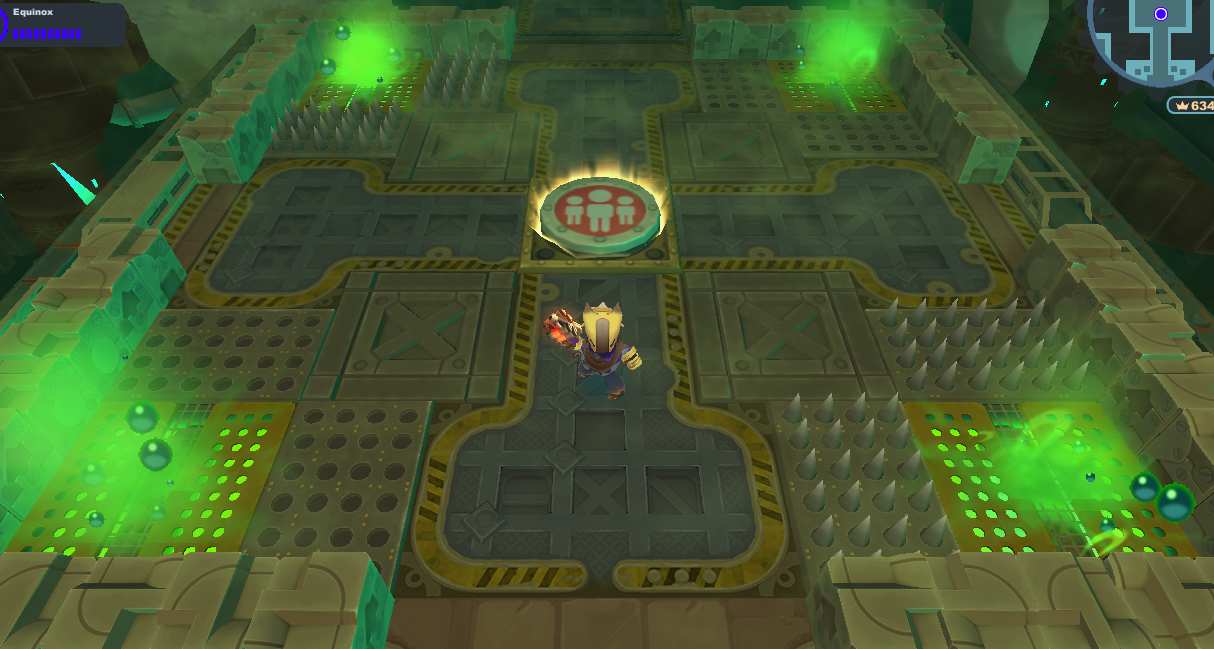
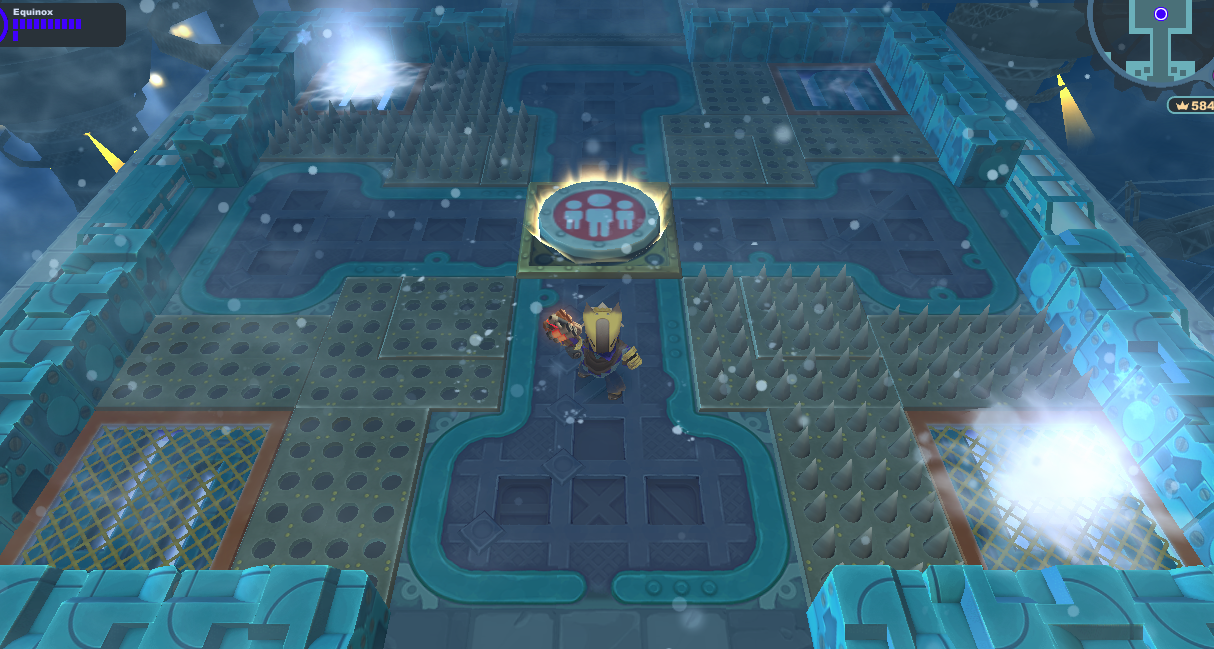
Inside the gate, the Danger Room is a single room with a party button where the gates will not open until all the monsters are defeated, similar to Battle Arenas.
There are several danger room layouts, with a variety of gimmicks and traps.
At the entrance, there are two columns on each side of the gate. These columns indicate the possible theme of the danger room:
- Fire Traps:
 Fire monsters.
- Freeze Traps:
 Freeze monsters.
- Poison Traps:
 Poison monsters.
- Shock Traps:
 Shock monsters.
However, themed monsters may not appear despite the entrance columns displaying otherwise. It may be based on the actual level's theme.
Each Danger Room spawns 3 consecutive waves of monsters. Some monsters will have the stats and appearance of monsters that usually spawn one stratum deeper; for example, Darkfang Thwackers normally only appear in Tier 3 but can be found inside Tier 2 Danger Rooms in the lower stratum. In addition, Danger Room's monsters are usually strong against the weakness of the stage's normal monster population, potentially forcing an ill-prepared party to use weapons that do very little damage to the monsters: hence, one should always either use normal damage weapons or have two weapons with different damage types equipped in order to sufficiently damage the danger room monsters.
If you successfully defeat the enemies past the Danger Room is a treasure room with twelve treasure boxes (8 red, 4 green), four heart boxes, and some scattered crowns and heat.
Danger Rooms are distinguished by an informative Danger Module at the entrance:
Danger Room! Warning! The path beyond this point is far more dangerous than what you would expect on this level. By entering you will not be able to turn back until you complete the challenges within. However, should you manage to come out victorious you will be rewarded for your bravery. Enter at your own risk! |
History
- release 2011-04-04: Danger Room has been in the game since the game officially launched.
- release 2019-06-27: A number of new danger rooms have been added to the Clockworks.
List
This list is ordered by encounter, meaning they are added as they are found.
| Map | Visual | Location | Level &/or Segment | Notes |

|

|
Clockwork Tunnels | Danger Room "Reward Area" segment |
Notes:
A reward area accessible after defeating all the enemies, it have 12 treasure boxes (eight red and four green), and 4 heart boxes with some scattered crowns and heat in the middle. The visual's example feature |

|

|
Clockwork Tunnels | Danger Room "Entrance" Segment |
Notes:
Common entrance for the area with a danger module at the side. The two columns at each side show status traps to make the player know the theme of the room. The visual's example feature |

|

|
Clockwork Tunnels | Danger Room "Circular" Segment |
Notes:
A circular area with respawning explosive blocks in the corners. The visual's example feature |
| Circular1B | 
|
Clockwork Tunnels | Danger Room "Circular" Segment |
Notes:
A circular area with 9 stone blocks forming three walls around the center. The visual's example feature |
| Circular1C | 
|
Clockwork Tunnels | Danger Room "Circular" Segment |
Notes:
A circular area further divided into five quadrants by four angles of crystal blocks. The visual's example feature |
| Square2A | 
|
Clockwork Tunnels | Danger Room "Square" Segment |
Notes:
A square area with one or more respawning block rings containing a mixture of regular, explosive, and ghost blocks. It also has a spike traps in each corner. The visual's example feature |
| Square2B | 
|
Clockwork Tunnels | Danger Room "Square" Segment |
Notes:
A square area with one or more respawning block rings containing a mixture of regular, explosive, and ghost blocks. It also has a spike traps in each corner. The visual's example feature |
| Square2C | 
|
Clockwork Tunnels | Danger Room "Square" Segment |
Notes:
A square area with spike traps in each corner and respawning explosive blocks in the middle. The visual's example feature |
| Square2D | 250x250px | Clockwork Tunnels | Danger Room "Square" Segment |
Notes:
A square area subdivided into four sections by spike traps cross-crossing it. The horizontal and vertical traps are perfectly out of phase, but the trap in the center isn't on the same timer as either of them. It includes a status trap in the middle of three of the four sections. This variant includes stone blocks. The visual's example feature |
| Square2E | 250x250px | Clockwork Tunnels | Danger Room "Square" Segment |
Notes:
A square area subdivided into four sections by spike traps cross-crossing it. The horizontal and vertical traps are perfectly out of phase, but the trap in the center isn't on the same timer as either of them. It includes a status trap in the middle of three of the four sections. The visual's example feature |
| Square2F | 
|
Clockwork Tunnels | Danger Room "Square" Segment |
Notes:
The monsters in this variation are the same as the current clockwork tunnel. These also have more than three waves. The dynamic is like with battle arenas. A square area with spike traps and one busted floor in each corner. This variant includes regular blocks. The visual's example feature |
| Square2G | 
|
Clockwork Tunnels | Danger Room "Square" Segment |
Notes:
The monsters in this variation are the same as the current clockwork tunnel. These also have more than three waves. The dynamic is like with battle arenas. A square area with spike traps and one busted floor in each corner. This variant includes unbreakable blocks. The visual's example feature |
| Square (Irregular)3A | 
|
Clockwork Tunnels | Danger Room "Square (Irregular)" Segment |
Notes:
An irregular square area with 8 stone blocks around the party button.
The visual's example feature |
| Square (Small)4A | 
|
Clockwork Tunnels | Danger Room "Square (Small)" Segment |
Notes:
A small square area with three lines of respawning explosive and ghost blocks arranged in an inverse T shape. There is an orbital chain in the center that will whip in an anti-clockwise direction. The chain can be easily rendered harmless by blocking with the shield. The visual's example feature |
| Square (Small)4B | 
|
Clockwork Tunnels | Danger Room "Square (Small)" Segment |
Notes:
A small square area with 3 lines of respawning explosive and ghost blocks with a few monster cages, arranged in an inverse T shape. There is an orbital chain in the center that will whip in an anti-clockwise direction. The chain can be easily rendered harmless by blocking with the shield. The visual's example feature |
| Rectangular5A | 
|
Clockwork Tunnels | Danger Room "Rectangular" Segment |
Notes:
The monsters in this variation are the same as the current clockwork tunnel. These also have more than three waves. The dynamic is like with battle arenas. A rectangular area with rocket block on both sides of the map. The gates in front of the rocket blocks drop once all members in the party step in the party button. It have 4 small lines of spike traps and 9 stone blocks at each side of the map. The visual's example feature |
| Rectangular5B | 
|
Clockwork Tunnels | Danger Room "Rectangular" Segment |
Notes:
The monsters in this variation are the same as the current clockwork tunnel. These also have more than three waves. The dynamic is like with battle arenas. A rectangular area with rocket block on both sides of the map. The gates in front of the rocket blocks drop once all members in the party step in the party button. It have 4 small lines of spike traps with 4 regular blocks and a timed explosive block at each side of the map. The visual's example feature |
| Rectangular (Double)6A | 
|
Clockwork Tunnels | Danger Room "Rectangular (Double)" Segment |
Notes:
The monsters in this variation are the same as the current clockwork tunnel. These also have more than three waves. The dynamic is like with battle arenas. A double rectangular area with spike traps and respawning The visual's example feature |
| Rectangular (Double)6B | 
|
Clockwork Tunnels | Danger Room "Rectangular (Double)" Segment |
Notes:
The monsters in this variation are the same as the current clockwork tunnel. These also have more than three waves. The dynamic is like with battle arenas. A double rectangular area with spike traps and respawning The visual's example feature |
| Rectangular (Special)7A | 
|
Clockwork Tunnels | Danger Room "Rectangular (Special)" Segment |
Notes:
The monsters in this variation are the same as the current clockwork tunnel. These also have more than three waves. The dynamic is like with battle arenas. A special rectangular area with a The visual's example feature |
| Rectangular (Eight Shape)8A | 
|
Clockwork Tunnels | Danger Room "Rectangular (Eight Shape)" Segment |
Notes:
A rectangular eight-shaped area with two large spike traps that makes the floor look like an eight. This variant have two respawning lines of explosive blocks completely spanning the passages above the traps. The visual's example feature |
| Rectangular (Eight Shape)8B | 250x250px | Clockwork Tunnels | Danger Room "Rectangular (Eight Shape)" Segment |
Notes:
A rectangular eight-shaped area with two large spike traps that makes the floor look like an eight. It have 6 respawn pad at the top, three at each side, that produce Jelly Green Minis. The switch by the respawn pads close the door to trap the minis in their spawn area, but the gates reopen after a period of time. The visual's example feature |
| Rectangular (Eight Shape)8C | 
|
Clockwork Tunnels | Danger Room "Rectangular (Eight Shape)" Segment |
Notes:
A rectangular eight-shaped area with two large spike traps surrounded by four respawning lines of ghost blocks. On each trap there are 4 respawning The visual's example feature |
| Misc9A | 
|
Clockwork Tunnels | Danger Room "Misc" Segment |
Notes:
An irregular shaped area wider on the edges, with status traps at the bottlenecks. The traps may initially be covered by crystal blocks. The visual's example feature |
Obsolete Rooms
The following Danger Rooms have been removed from the game, but may return at a later date [1].
Center Brambles
A square area with some spike trapss and a line of brambles down the center. Gremlins have a bad habit of hiding in the spikes when low on health.
Center Brambles

Corner Traps
A square area with a status trap at each corner and a single block width passage around the outside. In Tier 1, there are no spike traps; in Tier 2, there are two spike traps along the status traps; and in Tier 3, three spike traps. The type of trap depends on the danger room's theme; for example, a poison room will have poison mist grates. All traps will deactivate when the room has been fully cleared. The perimeter is filled in with breakable blocks at the start; it is advisable to take the time to break these first to increase the amount of safe ground.
It is worth noting that the extermination of the primary monster type appears to trigger when the next wave of monsters is spawned. For example, in a Gremlin and Wolver room, disposing of all of the gremlins will spawn the next wave of monsters regardless of the number of Wolvers still remaining. The same can be said of killing all of the Jellies before getting rid of the Lichens. Extra care must be taken by players to not allow the monsters to stack up or they may be quickly overwhelmed (especially in the case of Lichens since you can easily have multiple Lichen Colonies attack your party at the same time if you do not get rid of them in their earlier stages of development).
Shocking Corner Traps on Tier 1.
Poison Corner Traps on Tier 2.
Freezing Corner Traps on Tier 3.


3A.png)
4A.png)
4B.png)
6A.png)
6B.png)
7A.png)
8A.png)
8B.png)
8B.png)
8C.png)