Difference between revisions of "Scenario Room"
From SpiralKnights
Snarbylord (Talk | contribs) (adding possible location) |
(updating format of the page, still need to add the last 4 types but im saving just in case) |
||
| Line 1: | Line 1: | ||
| − | + | A {{PAGENAME}} is a special room in the [[Clockworks]] that offer a little story and atmosphere, hints of a larger story, or a special bonus to those that discover them. Note that certain ones can also be found in [[missions]] as well, though they tend to be a bit different than those encountered in the [[arcade]]. Some scenario rooms are rarer than others. | |
| − | + | == List == | |
| − | + | {{GeographyList/Start}} | |
| − | + | ||
| − | + | ||
| − | + | ||
| − | + | ||
| − | + | ||
| − | {{ | + | {{GeographyList |
| − | | | + | |area file = Scenario_Room-Candlestick_Keep_1 |
| − | | | + | |parent = Candlestick Keep |
| − | + | |segment = Scenario Room | |
| − | + | |number = 1 | |
| − | | | + | |notes = This room has been encountered in tier 2 and 3. |
| − | | | + | |
| − | + | There are two fallen Knights in a gated room with a [[Carnavon]]. | |
| − | + | ||
| − | + | ||
| − | + | ||
| − | + | ||
| − | + | ||
| − | {{ | + | {{Exploration/Showhide |
| − | | | + | |title = {{module|Recon}} |
| − | | | + | |content = |
| − | | | + | {{InfoBubble |
| − | | | + | |intro = |
| − | | | + | |content = The candle's going out! They are coming! Curse Kalem for going after that treasure. |
| + | }} | ||
| + | }} | ||
| + | }} | ||
| − | {{ | + | {{GeographyList |
| − | | | + | |area file = Library |
| − | | | + | |parent = Candlestick Keep |
| − | | | + | |segment = Scenario Room |
| − | | | + | |5 = {{location|Candlestick Keep|Cold Shadows|1.3}} |
| − | | | + | |number = 2 |
| + | |notes = This room can always be encountered in {{mission|An Occurrence at Owlite Keep}}: ''The Forgotten Library'' | ||
| − | {{ | + | {{Dialogue/Showhide |
| − | | | + | |title = Owlite Tome Text |
| − | | | + | |content = {{:Owlite tome text Dialogue/The Forgotten Library}} |
| − | + | }} | |
| − | + | }} | |
| − | + | ||
| − | {{Scenario Room | + | {{GeographyList |
| − | | | + | |area file = Scenario Room-Clockworks_1 |
| − | | | + | |parent = Clockwork Tunnels |
| − | | | + | |segment = Scenario Room |
| − | | | + | |number = 1 |
| − | | | + | |letter = A |
| + | |notes = This room can be encountered at any tier. | ||
| + | A [[Geo Knight]] with a monitor is studying the affects of minerals have that attract certain types of monsters. There is also an [[Ice Cube]] whose name is Hubert. The monsters that the Geo Knight studies are [[Wolver]]s, [[Jelly|Jelly Cubes]], [[Scuttlebot]]s, [[Mender#Ironclaw_Mender|Ironclaw Menders]], [[Devilite#Yesman|Yesmen]] and [[Spookat]]s. | ||
| − | {{ | + | {{Dialogue/Showhide |
| − | | | + | |title = Geo Knight |
| − | | | + | |content = Don't mind Hubert, he's been de-spiked. |
| − | + | }} | |
| − | + | ||
| − | + | ||
| − | {{ | + | {{Exploration/Showhide |
| − | | | + | |title = {{module|Information}} |
| − | | | + | |content = |
| − | | | + | {{InfoBubble |
| − | | | + | |intro = Minerals |
| − | | | + | |content = Certain types of monsters seem to be attracted to different combinations of minerals found down here in the Clockworks |
| + | }} | ||
| + | }} | ||
| − | + | }} | |
| − | + | ||
| − | + | ||
| − | + | ||
| − | + | ||
| − | + | ||
| − | {{Scenario Room | + | {{GeographyList |
| − | | | + | |area file = Scenario Room-Clockworks 2 |
| − | | | + | |parent = Clockwork Tunnels |
| − | | | + | |segment = Scenario Room |
| − | | | + | |number = 2 |
| − | | | + | |letter = A |
| + | |5 = {{location|Blast Furnace||1.2}}<br>and<br>{{location|Cooling Chamber|Wild Path}} | ||
| + | |notes = This room can be encountered at any tier. | ||
| − | + | Three [[Geo Knight]]s from [[Spiral HQ]] set up a campsite around a mineral room. | |
| − | + | ||
| − | + | ||
| − | + | ||
| − | + | ||
| − | + | ||
| − | {{ | + | {{Dialogue/Showhide |
| − | | | + | |title = Geo Knights |
| − | | | + | |content = |
| − | + | *Spiral HQ wants us to have these minerals back to Haven. | |
| − | + | *Just a few more tests... | |
| − | + | }} | |
| − | + | }} | |
| − | + | ||
| − | + | ||
| − | + | ||
| − | + | ||
| − | + | ||
| − | {{Scenario Room | + | {{GeographyList |
| − | | | + | |area file = Scenario Room-Clockworks_4 |
| − | | | + | |parent = Clockwork Tunnels |
| − | | | + | |segment = Scenario Room |
| − | | | + | |5 = {{location|Cooling Chamber||1.2}} |
| − | | | + | |number = 3 |
| + | |letter = A | ||
| + | |notes = This room has been encountered in tier 2. | ||
| − | + | A campfire with 4 knights. It looks like the knights are on their first expedition in the [[Clockworks]]. | |
| − | + | }} | |
| − | + | ||
| − | + | {{GeographyList | |
| − | | | + | |area file = Scenario Room-Clockworks_5 |
| − | | | + | |parent = Clockwork Tunnels |
| − | | | + | |segment = Scenario Room |
| + | |5 = {{location|Wasteworks|Wild Path}},<br>and<br>{{location|Blast Furnace||1.2}} | ||
| + | |number = 4 | ||
| + | |letter = A | ||
| + | |notes = This room has been encountered in tier 2 and 3. | ||
| − | + | A campfire with a frightened knight in a corner. The containers are empty and one of them have been overturned. It is possible some monsters have attacked the place. | |
| − | + | ||
| − | + | ||
| − | + | ||
| − | + | ||
| − | + | ||
| − | {{ | + | {{Dialogue/Showhide |
| − | | | + | |title = Knight |
| − | | | + | |content = They... They got everyone except me. I just hid in the corner |
| − | + | }} | |
| − | + | ||
| − | + | ||
| − | + | }} | |
| − | + | ||
| − | + | ||
| − | + | ||
| − | + | ||
| − | + | ||
| + | {{GeographyList | ||
| + | |area file = Scenario Room-Clockworks_14 | ||
| + | |map file = Map-Clockwork Tunnels-Scenario Room4A | ||
| + | |parent = Clockwork Tunnels | ||
| + | |segment = Scenario Room | ||
| + | |number = 4 | ||
| + | |letter = B | ||
| + | |notes = This room has been encountered in tier 3. | ||
| − | + | A campfire with a frightened knight in a corner. The containers are empty and one of them have been overturned. It is possible some monsters have attacked the place. | |
| − | + | ||
| − | + | ||
| − | + | ||
| − | + | ||
| − | + | ||
| − | {{ | + | {{Dialogue/Showhide |
| − | | | + | |title = Knight |
| − | | | + | |content = They... They got everyone except me. I just hid in the corner |
| − | + | }} | |
| − | + | ||
| − | + | ||
| − | + | }} | |
| − | + | ||
| − | + | ||
| − | + | ||
| − | + | ||
| − | + | ||
| − | {{Scenario Room | + | {{GeographyList |
| − | | | + | |area file = Scenario Room-Clockworks_10 |
| − | | | + | |parent = Clockwork Tunnels |
| − | | | + | |segment = Scenario Room |
| − | | | + | |5 = {{location|Cooling Chamber||1.2}} |
| − | | | + | |number = 5 |
| + | |letter = A | ||
| + | |notes = This room has been encountered in tier 1 and 2. | ||
| − | + | A campfire with a resting knight between two party buttons. Standing in the area will refill your knight's [[health]]. | |
| − | + | }} | |
| − | + | ||
| − | + | ||
| − | + | ||
| − | + | ||
| − | {{Scenario Room | + | {{GeographyList |
| − | | | + | |area file = Scenario Room-Clockworks 3 |
| − | | | + | |parent = Clockwork Tunnels |
| − | | | + | |segment = Scenario Room |
| − | | | + | |5 = {{location|Cooling Chamber|Wild Path}},<br><br>{{location|Wasteworks|Infernal Passage}},<br><br>and {{location|Power Complex||1.2}} |
| − | | | + | |number = 6 |
| + | |letter = A | ||
| + | |notes = This room has been encountered in tier 3. | ||
| − | + | A bridge that is or is not being repaired - or destroyed. Some [[Knocker]]s, [[Thwacker]]s and [[Mender]]s will spawn as the player passes through the room. | |
| − | + | }} | |
| − | + | ||
| − | + | ||
| − | + | ||
| − | + | ||
| − | {{Scenario Room | + | {{GeographyList |
| − | | | + | |area file = Scenario Room-Clockworks_6 |
| − | | | + | |parent = Clockwork Tunnels |
| − | | | + | |segment = Scenario Room |
| − | | | + | |5 = {{location|Blast Furnace||1.2}},<br><br>{{location|Cooling Chamber||1.2}},<br><br>and {{location|Power Complex||1.2}} |
| − | | | + | |number = 7 |
| + | |letter = A | ||
| + | |notes = This room has been encountered in tier 1 and 3. | ||
| − | + | A giant metal beam that's been driven down the path. | |
| − | + | }} | |
| − | + | ||
| − | + | ||
| − | + | ||
| − | + | ||
| − | {{Scenario Room | + | {{GeographyList |
| − | | | + | |area file = Scenario Room-Clockworks_13 |
| − | | | + | |parent = Clockwork Tunnels |
| − | | | + | |segment = Scenario Room |
| − | | | + | |5 = {{location|Wasteworks||1.2}}<br>and<br>{{location|Power Complex||1.2}} |
| − | | | + | |number = 8 |
| + | |letter = A | ||
| + | |notes = This room has been encountered in tier 3. | ||
| − | + | A broken bridge or hallway. It doesn't look like work will continue on that section. | |
| − | + | }} | |
| − | + | ||
| − | + | ||
| − | + | ||
| − | + | ||
| − | {{Scenario Room | + | {{GeographyList |
| − | | | + | |area file = Scenario Room-Clockworks_7 |
| − | | | + | |parent = Clockwork Tunnels |
| − | | | + | |segment = Scenario Room |
| − | | | + | |5 = {{location|Power Complex|Infernal Passage}} |
| − | | | + | |number = 9 |
| + | |letter = A | ||
| + | |notes = This room has been encountered in tier 2. | ||
| − | + | A possible [[Gremlin]] workshop of some sort. A [[Thwacker]] spawns at the corner table in the top right, and hitting the switch in the middle spawns 2 friendly [[Mecha Knight]]s from the empty areas in the top of the room. [[Scuttlebot]]s will also spawn from the destroyed grey blocks. | |
| − | + | }} | |
| − | + | ||
| − | + | {{GeographyList | |
| − | | | + | |area file = Scenario Room-Clockworks_8 |
| − | | | + | |parent = Clockwork Tunnels |
| − | | | + | |segment = Scenario Room |
| + | |5 = {{location|Wasteworks|Slimeway}} | ||
| + | |number = 10 | ||
| + | |letter = A | ||
| + | |notes = This room has been encountered in tier 2. | ||
| − | + | A slimy area with some tubes and poison traps. [[Toxigel]]s may appear in the area. | |
| − | + | }} | |
| − | + | ||
| − | + | ||
| − | + | ||
| − | + | ||
| − | {{Scenario Room | + | {{GeographyList |
| − | | | + | |area file = Scenario Room-Clockworks_9 |
| − | | | + | |parent = Clockwork Tunnels |
| − | | | + | |segment = Scenario Room |
| − | | | + | |5 = {{location|Cooling Chamber||1.2}} |
| − | | | + | |number = 11 |
| + | |letter = A | ||
| + | |notes = This room has been encountered in tier 3. | ||
| − | + | A possible storage area of some sort. The grey blocks reveal hidden [[Scuttlebot]]s and [[Treasure Box]]es can be found at the end of the room. | |
| − | + | }} | |
| − | + | ||
| − | + | ||
| − | + | ||
| − | + | ||
| − | {{Scenario Room | + | {{GeographyList |
| − | | | + | |area file = Scenario Room-Clockworks_12 |
| − | | | + | |parent = Clockwork Tunnels |
| − | | | + | |segment = Scenario Room |
| − | | | + | |5 = {{location|Cooling Chamber||1.2}} |
| − | | | + | |number = 12 |
| + | |letter = A | ||
| + | |notes = This room has been encountered in tier 2. | ||
| − | + | A room with a large cooling fan in the center surrounded by [[Crystal Block]]s. Breaking some of the blocks will spawn [[Ice Cube]]s. When cleaning some space, two dead [[Gremlin]] bodies can be found lying on the ground. | |
| − | + | }} | |
| − | + | ||
| − | + | ||
| − | + | ||
| − | + | ||
| − | {{Scenario Room | + | {{GeographyList |
| − | | | + | |area file = Scenario Room-Clockworks_19 |
| − | | | + | |parent = Clockwork Tunnels |
| − | | | + | |segment = Scenario Room |
| − | | | + | |5 = {{location|Cooling Chamber|Mechanized Mile}} |
| − | | | + | |number = 13 |
| + | |letter = A | ||
| + | |notes = This room has been encountered in tier 3. | ||
| − | + | A storage room of some kind. [[Gremlin]]s hang around the area. Some of the blocks are hidden [[Monster Cage|monster cages]], which seem to only spawn [[Scuttlebot]]s here. | |
| − | + | }} | |
| − | + | ||
| − | + | ||
| − | + | ||
| − | + | ||
| − | {{Scenario Room | + | {{GeographyList |
| − | | | + | |area file = Scenario Room-Clockworks_16 |
| − | | | + | |parent = Clockwork Tunnels |
| − | | | + | |segment = Scenario Room |
| − | | | + | |5 = {{location|Wasteworks|Infernal Passage}},<br>and<br>{{location|Blast Furnace||1.2}} |
| − | | | + | |number = 14 |
| + | |letter = A | ||
| + | |notes = This room has been encountered in tier 3. | ||
| − | + | An unmoving [[Tortodrone]] can be seen on a lower platform, next to some ruined constructs. | |
| − | + | }} | |
| − | + | ||
| − | + | ||
| − | + | ||
| − | + | ||
| − | {{ | + | {{GeographyList |
| − | | | + | |area file = Scenario Room-Clockworks_18 |
| − | | | + | |map file = Map-Clockwork Tunnels-Scenario Room14A |
| − | | | + | |parent = Clockwork Tunnels |
| − | | | + | |segment = Scenario Room |
| − | | | + | |5 = {{location|Wasteworks|Infernal Passage}} |
| + | |number = 14 | ||
| + | |letter = B | ||
| + | |notes = This room has been encountered in tier 3. | ||
| − | + | An unmoving [[Tortodrone]] seems to have been edited by [[fiend]]s. The Tortodrone is surrounded by [[Dark Matter]] crystals and has dark purple shards protruding from the top of its body. | |
| − | + | ||
| − | + | ||
| − | + | ||
| − | + | ||
| − | + | ||
| + | A [[Pit Boss]] and two [[Yesman|Yesmen]] spawns upon entering the area. | ||
| + | }} | ||
| − | {{Scenario Room | + | {{GeographyList |
| − | | | + | |area file = Scenario Room-Clockworks_17 |
| − | | | + | |parent = Clockwork Tunnels |
| − | | | + | |segment = Scenario Room |
| − | | | + | |5 = {{location|Clockwork Tunnels|Gremlin Grounds}} |
| − | | | + | |number = 15 |
| + | |letter = A | ||
| + | |notes = This room has been encountered in tier 1. | ||
| − | + | An unmoving [[Tortodrone]] can be seen next to some grass. | |
| − | + | ||
| − | + | ||
| − | + | ||
| − | + | ||
| − | + | ||
| − | + | }} | |
| − | + | ||
| − | + | ||
| − | + | ||
| − | + | ||
| − | + | ||
| − | {{ | + | {{GeographyList |
| − | | | + | |parent = Clockwork Tunnels |
| − | | | + | |segment = Scenario Room |
| − | | | + | |5 = {{location|Cooling Chamber||1.2}} |
| − | | | + | |number = 16 |
| − | | | + | |notes = This room has been encountered in tier 3. |
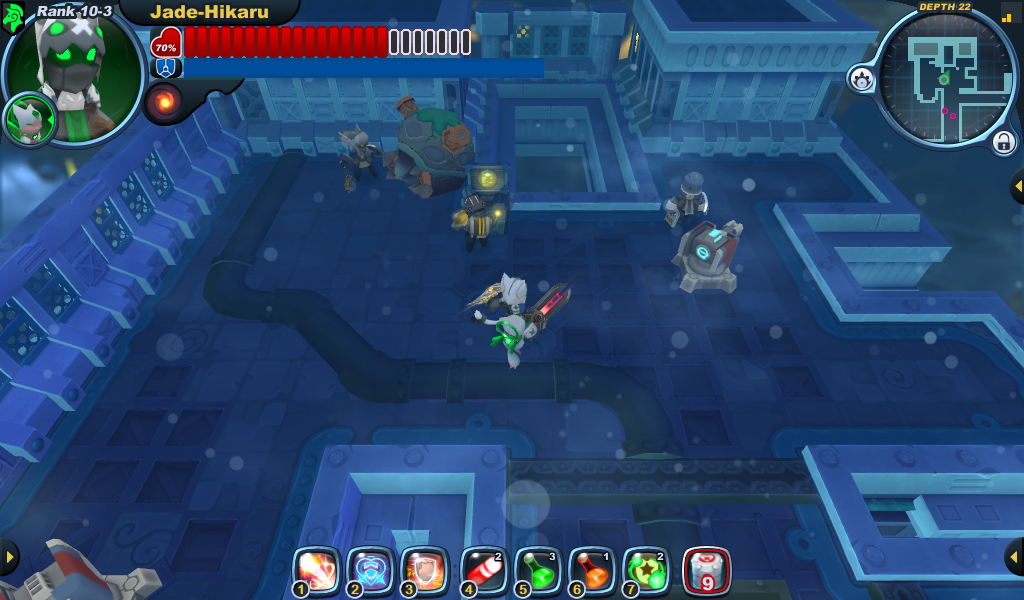
| − | {{Scenario Room | + | Some Knights and [[Recon Ranger]]s seems to have set a camping around an unmoving [[Tortodrone]] to rest and collect samples of the stratum. Two [[Mecha Turret]]s are active helping to keep the area safe. One of the Knights have a [[Pulsar]] and one of the Recon Rangers have a [[Robo Wrecker]]. |
| − | | | + | |
| − | | | + | {{Dialogue/Showhide |
| − | | | + | |title = Dialogues |
| − | | | + | |content = |
| − | | | + | *We're resting here for a while before we journey deeper into the Clockworks. |
| + | *Preparation is your best tool for survival in the Clockworks. | ||
| + | *I keep a sword around for close enounters. | ||
| + | *I always carry a blaster, never know when it might come in handy. | ||
| + | *Don't forget your shield, it will save your life! | ||
| + | *Did you see something out there? | ||
| + | *Just a few more tests... | ||
| + | *Well met! | ||
| + | }} | ||
| + | }} | ||
| + | |||
| + | {{GeographyList | ||
| + | |area file = Scenario Room-Clockworks_11 | ||
| + | |parent = Clockwork Tunnels | ||
| + | |segment = Scenario Room | ||
| + | |5 = {{location|Clockwork Tunnels||1.2}}. | ||
| + | |number = 17 | ||
| + | |letter = A | ||
| + | |notes = This room has been encountered in tier 1 and 2. | ||
| + | |||
| + | A room with [[Gremlin]] tools. The room looks like it's under construction. | ||
| + | }} | ||
| + | |||
| + | {{GeographyList | ||
| + | |area file = Scenario Room-Clockworks_15 | ||
| + | |parent = Clockwork Tunnels | ||
| + | |segment = Scenario Room | ||
| + | |5 = {{location|Cooling Chamber||1.2}} | ||
| + | |number = 18 | ||
| + | |letter = A | ||
| + | |notes = This room has been encountered in tier 2. | ||
| + | |||
| + | A construction site for the [[Roarmulus Twin]]. The button opens the gates and spawns 2 [[Gun Puppy|Gun Puppies]]. Behind them are 2 [[Treasure Box]]es surrounded by {{exploration|Rocket Block}}s found in the {{location|Ironclaw Munitions Factory||1.2}}. | ||
| + | }} | ||
| + | |||
| + | {{GeographyList | ||
| + | |area file = Area-Plan of Attack-Power Grid | ||
| + | |map file = Map-Clockwork Tunnels-Scenario Room17A | ||
| + | |parent = Clockwork Tunnels | ||
| + | |segment = Scenario Room | ||
| + | |5 = {{location|Power Complex|Gremlin Grounds}} | ||
| + | |number = 18 | ||
| + | |letter = B | ||
| + | |notes = This variant is always encountered in the {{mission|Plan of Attack}}: ''Power Grid'' | ||
| + | |||
| + | A construction site for the [[Roarmulus Twin]]. | ||
| + | }} | ||
| + | |||
| + | {{GeographyList | ||
| + | |area file = Terminal Meltdown Fuel Depot Entrance | ||
| + | |parent = Clockwork Tunnels | ||
| + | |5 = {{location|Blast Furnace|Slimeway}} | ||
| + | |number = 19 | ||
| + | |letter = A | ||
| + | |notes = This room can always be encountered in {{mission|Terminal Meltdown}}: ''Red Alert'' | ||
| + | }} | ||
| + | |||
| + | {{GeographyList | ||
| + | |area file = Scenario Room-DevilishDrudgery_1 | ||
| + | |parent = Devilish Drudgery | ||
| + | |segment = Scenario Room | ||
| + | |5 = {{location|Devilish Drudgery|Overtime, Every Time|1.3}},<br><br> {{location|Devilish Drudgery|Hiring Freeze|1.3}},<br><br> and {{location|Devilish Drudgery|Everybody's Fired|1.3}} | ||
| + | |number = 1 | ||
| + | |notes = This room can be encountered at any tier. | ||
| + | |||
| + | Placing the 5 statues on the 5 buttons completes the ritual. Some of the possible spawns after completing the ritual include: [[Crowns]], Fiend-related drops (like {{mat|Mug of Misery}}), five [[Silkwing]]s, [[Devilite]]s and [[Pit Boss|Pit Bosses]], or a [[Trojan]] (as can be seen [[:File:Scenario_Room-devildrudgery1.2summonedtrojan.png|here]]). | ||
| + | |||
| + | The sparkling book pile reads: ''5 Ways to Appease your Pit Boss.'' | ||
| + | }} | ||
| + | |||
| + | {{GeographyList | ||
| + | |area file = Scenario Room-DevilishDrudgery_3 | ||
| + | |parent = Devilish Drudgery | ||
| + | |segment = Scenario Room | ||
| + | |5 = Any level from<br>{{location|Devilish Drudgery||1.2}} | ||
| + | |number = 2 | ||
| + | |notes = This room has been encountered in tier 2. | ||
| + | |||
| + | A suspicious looking fiend activity. Several fiends, particularly [[Devilite]]s or [[Gorgo]]s, can spawn, ready to glower at any knights passing through. | ||
| + | |||
| + | Fiendish Self-Help book reads: ''How do draw infernal symbols''. | ||
| + | |||
| + | Board reads: ''A Notice to All Employees: Due to continual under-performance, there will be no paid holidays or free coffee in the break room''. No wonder they're so angry! | ||
| + | }} | ||
| + | |||
| + | {{GeographyList | ||
| + | |area file = Scenario Room-DevilishDrudgery_2 | ||
| + | |parent = Devilish Drudgery | ||
| + | |segment = Scenario Room | ||
| + | |5 = {{location|Devilish Drudgery|Overtime, Every Time|1.3}}<br>and<br>{{location|Devilish Drudgery|Toxic Workplace|1.3}} | ||
| + | |number = 3 | ||
| + | |letter = A | ||
| + | |notes = This room has been encountered in tier 2 and 3. | ||
| + | |||
| + | A suspicious looking fiend activity. Several [[devilite]]s spawn with a [[silkwing]], ready to glower at any knights passing through. They seem to be shoving [[Dark Matter]] into a stitched-together [[Tortodrone]]. The button near the top lowers the gate. | ||
| + | |||
| + | A closer look at the tortodrone can be seen [[:File:Scenario_Room-devildrudgery2.2closertortodrone.png|here]]. | ||
| + | |||
| + | To check this room in a different theme check [https://forums.spiralknights.com/en/node/85284#comment-767999 this] and [https://forums.spiralknights.com/en/node/86971#comment-769486 this] forum's comment. | ||
| + | }} | ||
| + | |||
| + | {{GeographyList | ||
| + | |area file = Scenario Room-DevilishDrudgery_4 | ||
| + | |parent = Devilish Drudgery | ||
| + | |segment = Scenario Room | ||
| + | |5 = {{location|Devilish Drudgery|Wired for Synergy|1.3}} | ||
| + | |number = 3 | ||
| + | |letter = B | ||
| + | |notes = This room has been encountered in tier 2 and 3. | ||
| + | |||
| + | A suspicious looking fiend activity. Several [[devilite]]s spawn with a [[silkwing]], ready to glower at any knights passing through. They seem to be shoving [[Dark Matter]] into a stitched-together [[Tortodrone]]. The button near the top lowers the gate. | ||
| + | |||
| + | A closer look at the tortodrone can be seen [[:File:Scenario_Room-devildrudgery2.2closertortodrone.png|here]]. | ||
| + | |||
| + | To check this room in a different theme check [https://forums.spiralknights.com/en/node/85284#comment-767999 this] and [https://forums.spiralknights.com/en/node/86971#comment-769486 this] forum's comment. | ||
| + | }} | ||
| + | |||
| + | {{GeographyList | ||
| + | |parent = Devilish Drudgery | ||
| + | |segment = Scenario Room | ||
| + | |5 = {{location|Devilish Drudgery|Overtime, Every Time|1.3}} | ||
| + | |number = 5 | ||
| + | |notes = This area only appears during the [[March of the Tortodrones]] event. This room has been encountered in tier 3. | ||
| + | |||
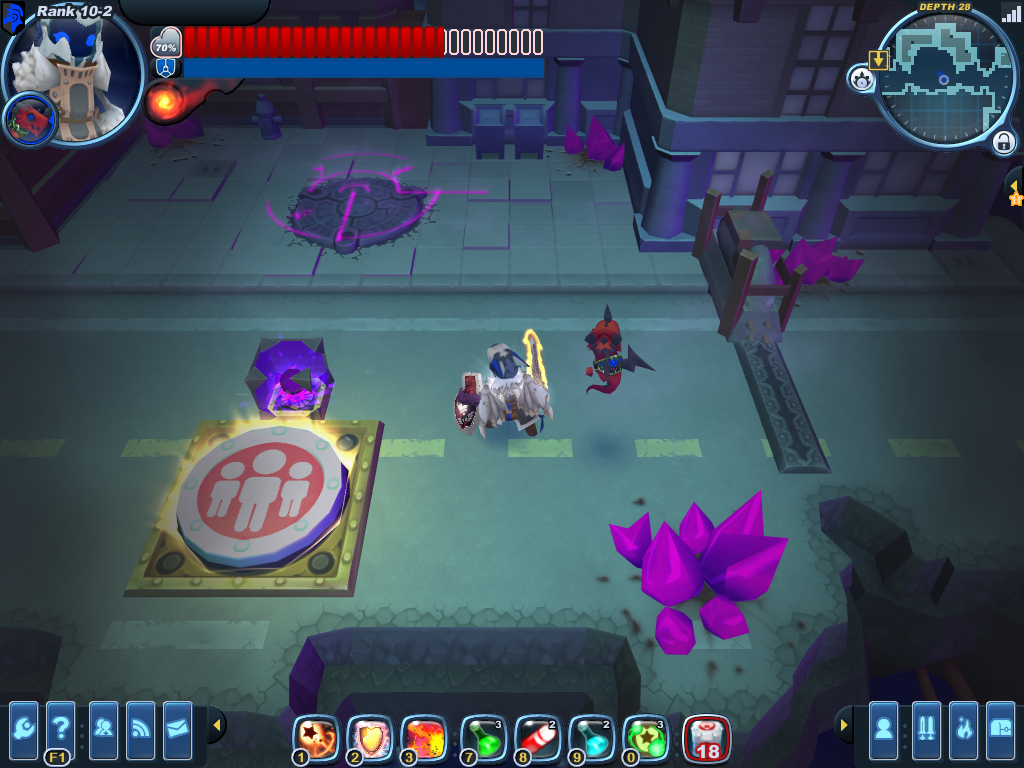
| + | A party button waits beyond aesthetic piles of [[Dark Matter|dark matter]]. The area features a single {{exploration|Vortex Block}}. Several monsters spawn to fight, including [[Devilite]]s, [[Trojan]]s, and [[Howlitzer]]s. | ||
| + | |||
| + | The [[March of the Tortodrones#Gameplay|bulk glyph]] reward for this area seems to be rather small. | ||
| + | |||
| + | }} | ||
| + | |||
| + | {{GeographyList | ||
| + | |area file = Area-Work for Idle Hands-Devilish Drudgery | ||
| + | |parent = Devilish Drudgery | ||
| + | |segment = Scenario Room | ||
| + | |5 = {{location|Devilish Drudgery|Overtime, Every Time|1.3}} | ||
| + | |number = 6 | ||
| + | |notes = This room can always be encountered in {{mission|Work for Idle Hands}}: ''Devilish Drudgery'' | ||
| + | }} | ||
| + | |||
| + | {{GeographyList | ||
| + | |area file = Area-Whipping and Mishandling-Sol'Fork Downtown | ||
| + | |parent = Devilish Drudgery | ||
| + | |segment = Scenario Room | ||
| + | |5 = {{location|Devilish Drudgery|Everybody's Fired|1.3}} | ||
| + | |number = 7 | ||
| + | |notes = This room can always be encountered in {{mission|Whipping and Mishandling}}: ''Sol'Fork Downtown'' | ||
| + | }} | ||
{{Table/End}} | {{Table/End}} | ||
| − | [[ | + | == See Also == |
| + | {{exploration see also}} | ||
| + | |||
| + | [[Category:Geography]] | ||
| + | [[Category:Exploration]] | ||
Revision as of 04:21, 12 May 2020
A Scenario Room is a special room in the Clockworks that offer a little story and atmosphere, hints of a larger story, or a special bonus to those that discover them. Note that certain ones can also be found in missions as well, though they tend to be a bit different than those encountered in the arcade. Some scenario rooms are rarer than others.
List
| Map | Visual | Location | Level &/or Segment | Notes | ||||||||||||||||
| Scenario Room1 | 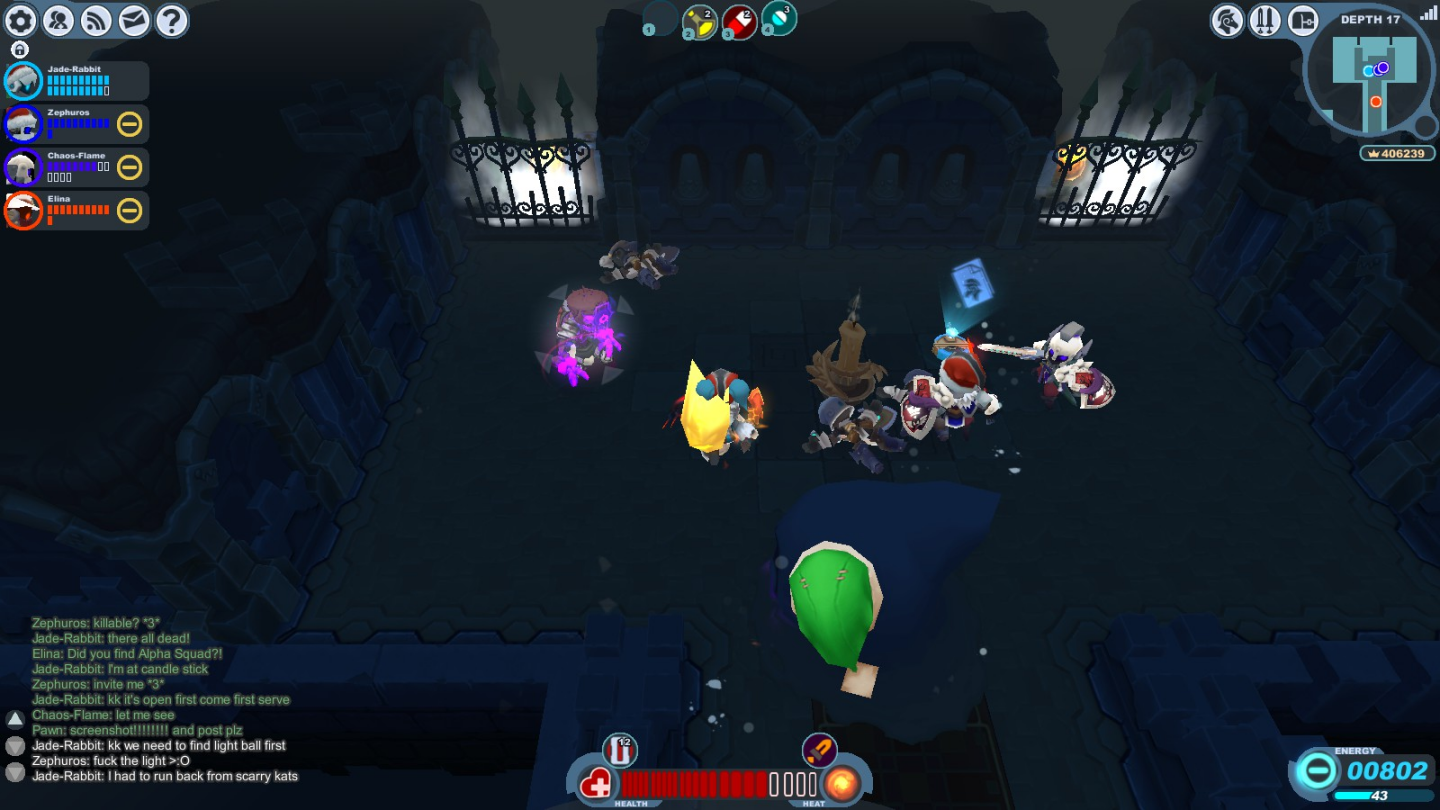
|
Candlestick Keep | "Scenario Room" Segment | Notes:
This room has been encountered in tier 2 and 3. There are two fallen Knights in a gated room with a Carnavon. | ||||||||||||||||

|
|
Candlestick Keep | Cold Shadows | Notes:
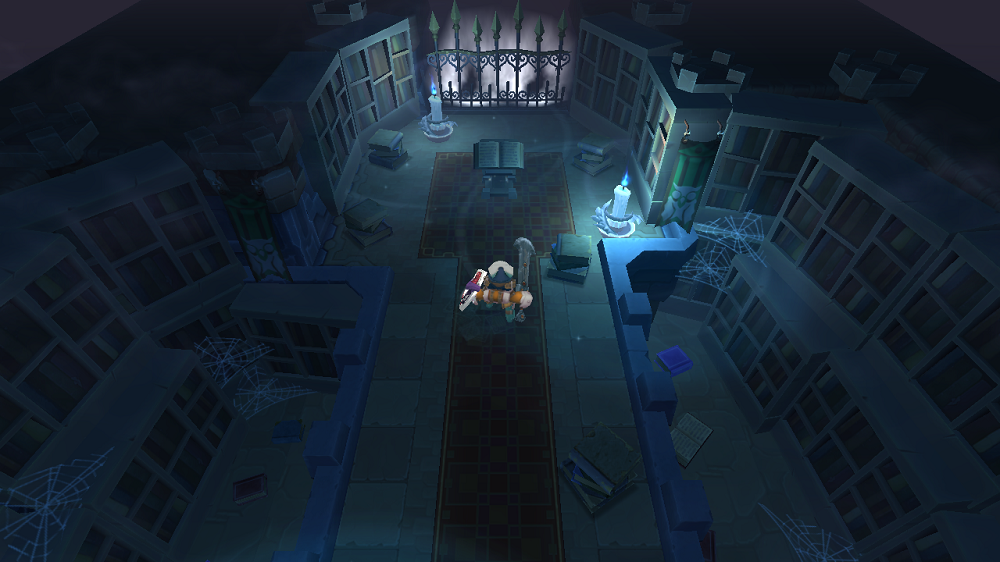
This room can always be encountered in 9-1
| ||||||||||||||||

|
|
Clockwork Tunnels | "Scenario Room" Segment | Notes:
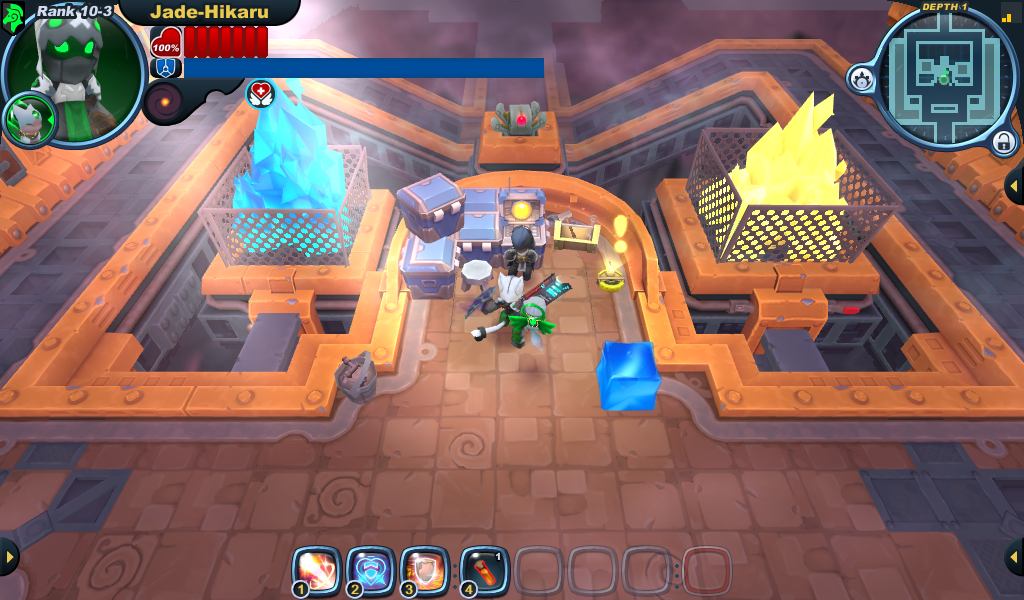
This room can be encountered at any tier. A Geo Knight with a monitor is studying the affects of minerals have that attract certain types of monsters. There is also an Ice Cube whose name is Hubert. The monsters that the Geo Knight studies are Wolvers, Jelly Cubes, Scuttlebots, Ironclaw Menders, Yesmen and Spookats. | ||||||||||||||||
| |
|
Clockwork Tunnels | Blast Furnace and Cooling Chamber: Wild Path |
Notes:
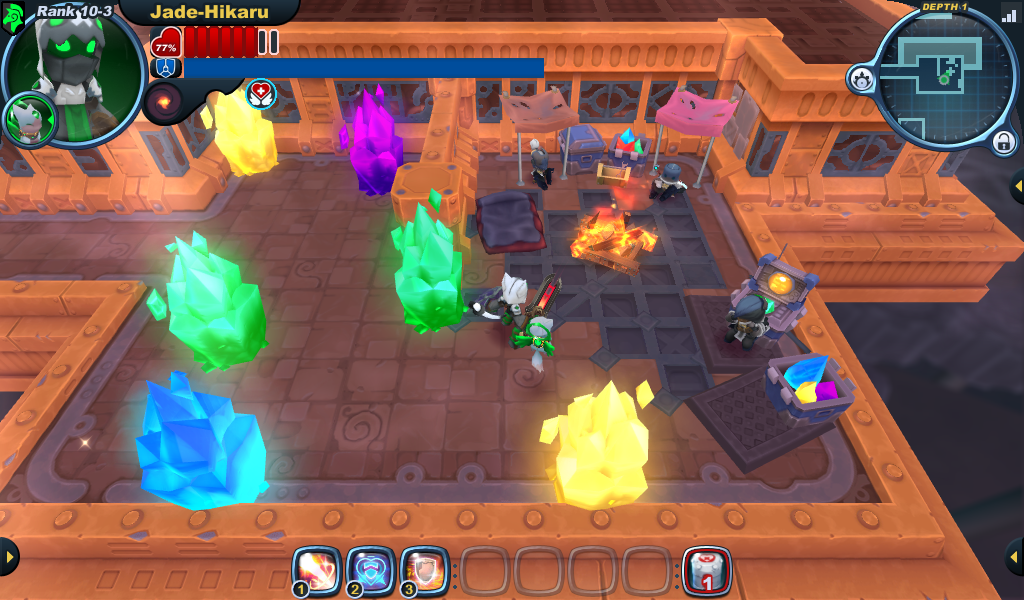
This room can be encountered at any tier. Three Geo Knights from Spiral HQ set up a campsite around a mineral room. | ||||||||||||||||
| Scenario Room3A | 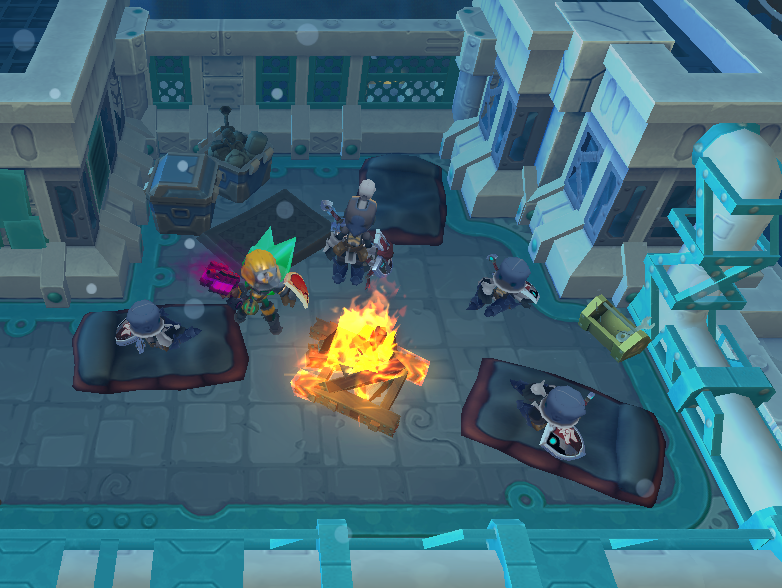
|
Clockwork Tunnels | Cooling Chamber | Notes:
This room has been encountered in tier 2. A campfire with 4 knights. It looks like the knights are on their first expedition in the Clockworks. | ||||||||||||||||
| Scenario Room4A | 
|
Clockwork Tunnels | Wasteworks: Wild Path, and Blast Furnace |
Notes:
This room has been encountered in tier 2 and 3. A campfire with a frightened knight in a corner. The containers are empty and one of them have been overturned. It is possible some monsters have attacked the place. | ||||||||||||||||
| Scenario Room4B | 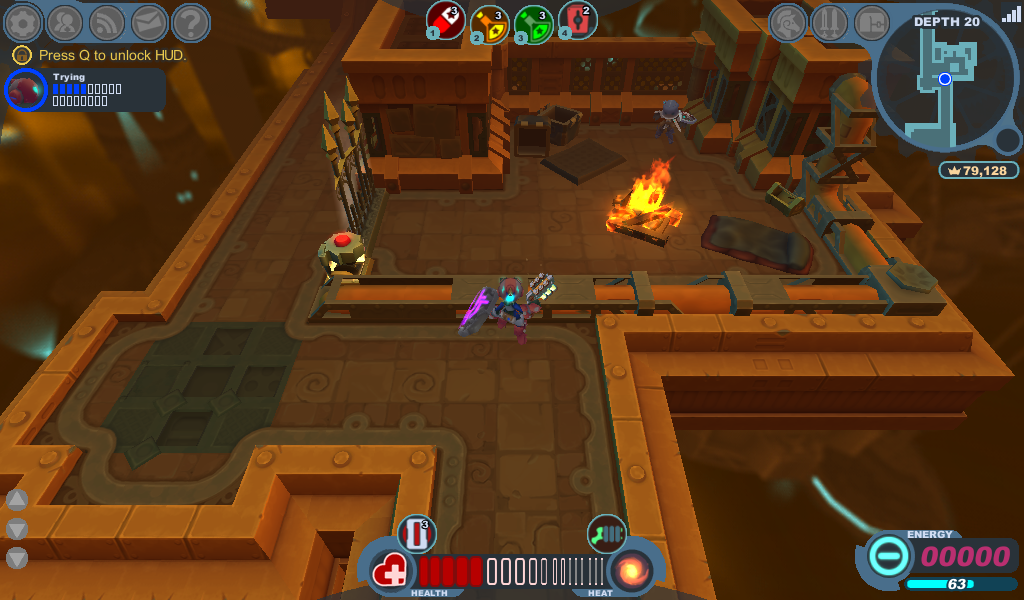
|
Clockwork Tunnels | "Scenario Room" Segment | Notes:
This room has been encountered in tier 3. A campfire with a frightened knight in a corner. The containers are empty and one of them have been overturned. It is possible some monsters have attacked the place. | ||||||||||||||||
| Scenario Room5A | 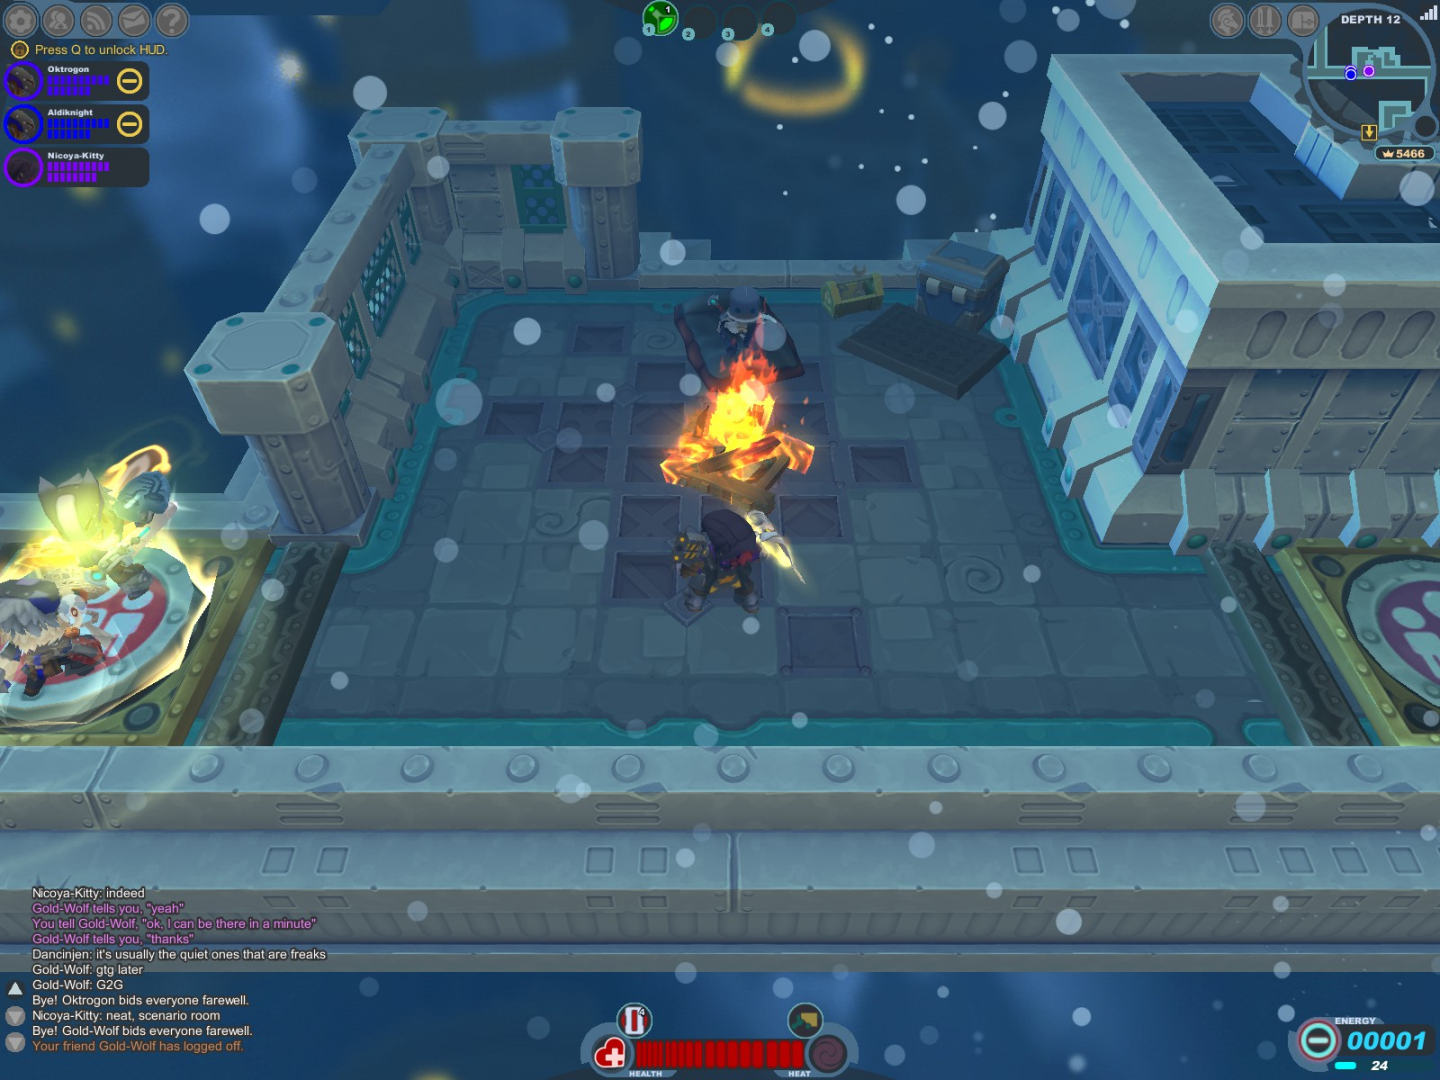
|
Clockwork Tunnels | Cooling Chamber | Notes:
This room has been encountered in tier 1 and 2. A campfire with a resting knight between two party buttons. Standing in the area will refill your knight's health. | ||||||||||||||||
| Scenario Room6A | 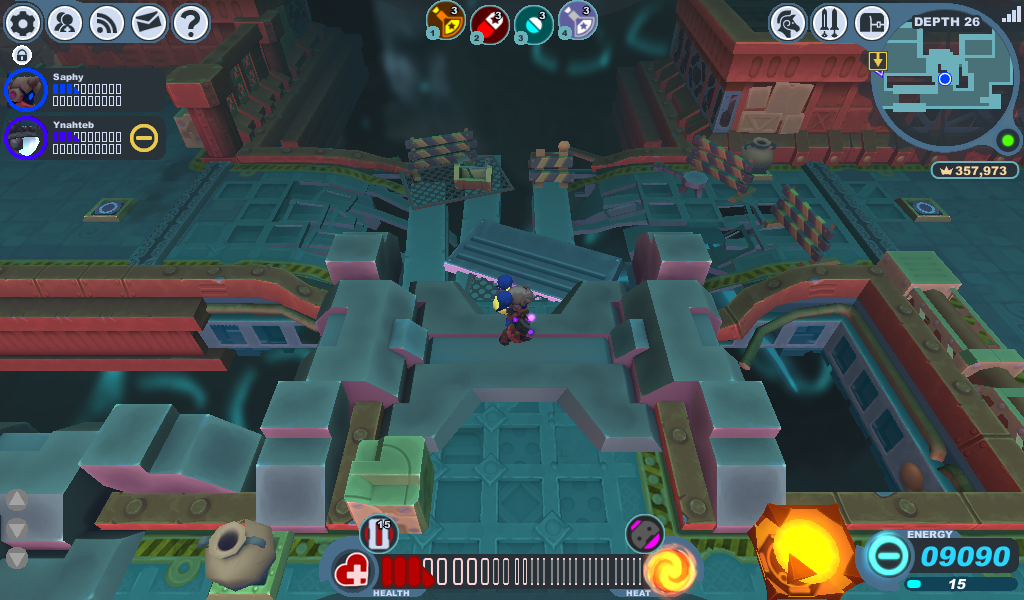
|
Clockwork Tunnels | Cooling Chamber: Wild Path, Wasteworks: Infernal Passage, and Power Complex |
Notes:
This room has been encountered in tier 3. A bridge that is or is not being repaired - or destroyed. Some Knockers, Thwackers and Menders will spawn as the player passes through the room. | ||||||||||||||||
| Scenario Room7A | 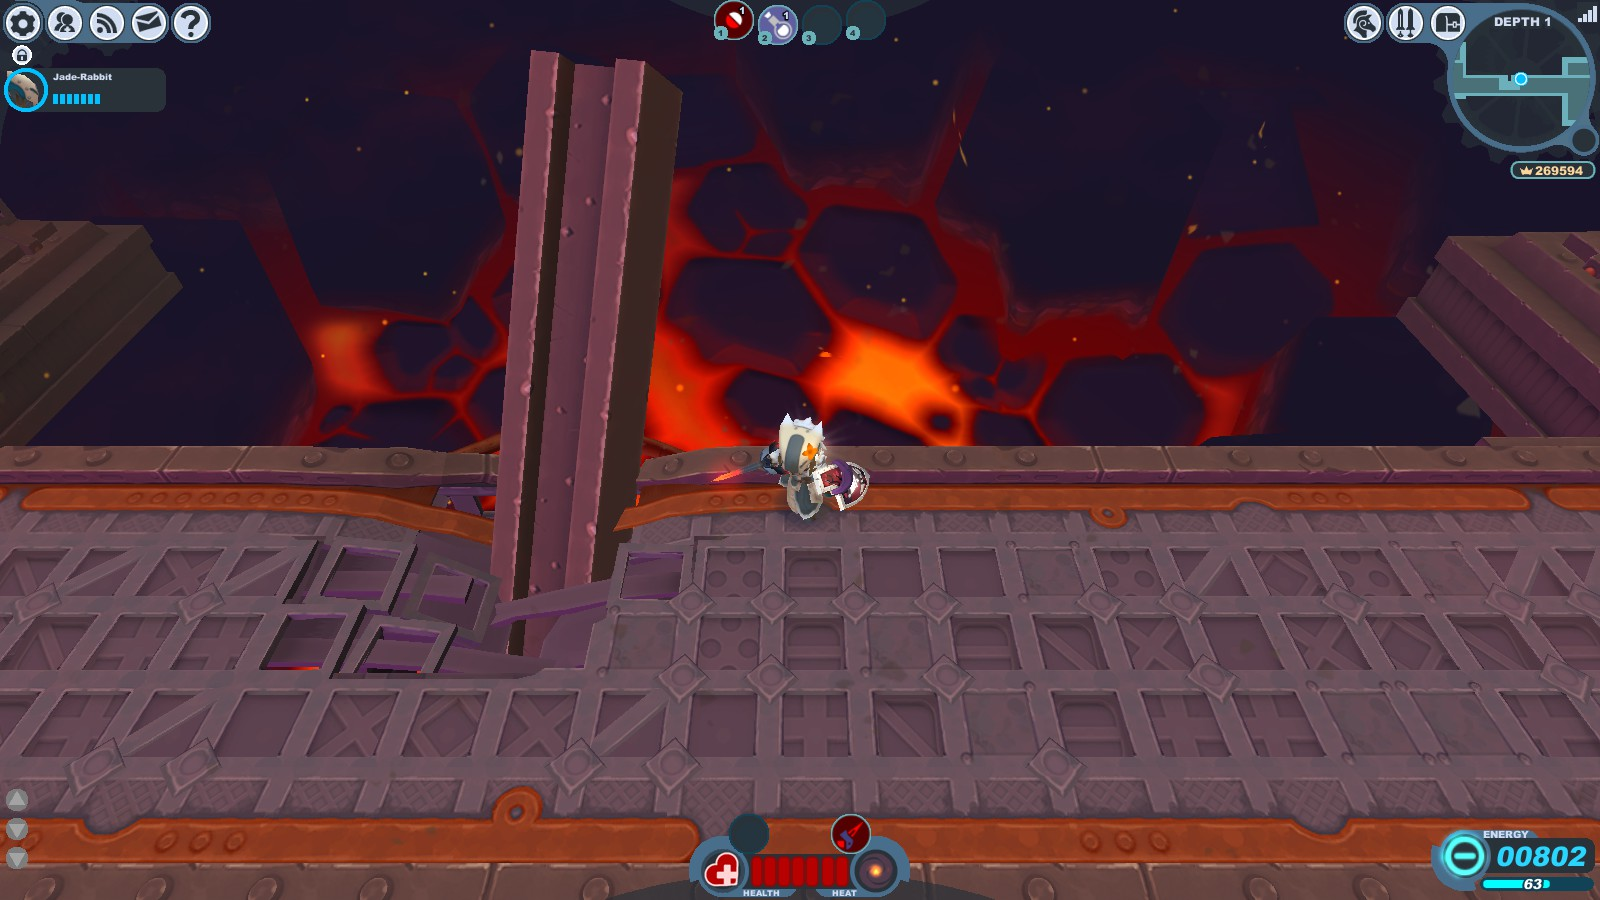
|
Clockwork Tunnels | Blast Furnace, Cooling Chamber, and Power Complex |
Notes:
This room has been encountered in tier 1 and 3. A giant metal beam that's been driven down the path. | ||||||||||||||||
| Scenario Room8A | 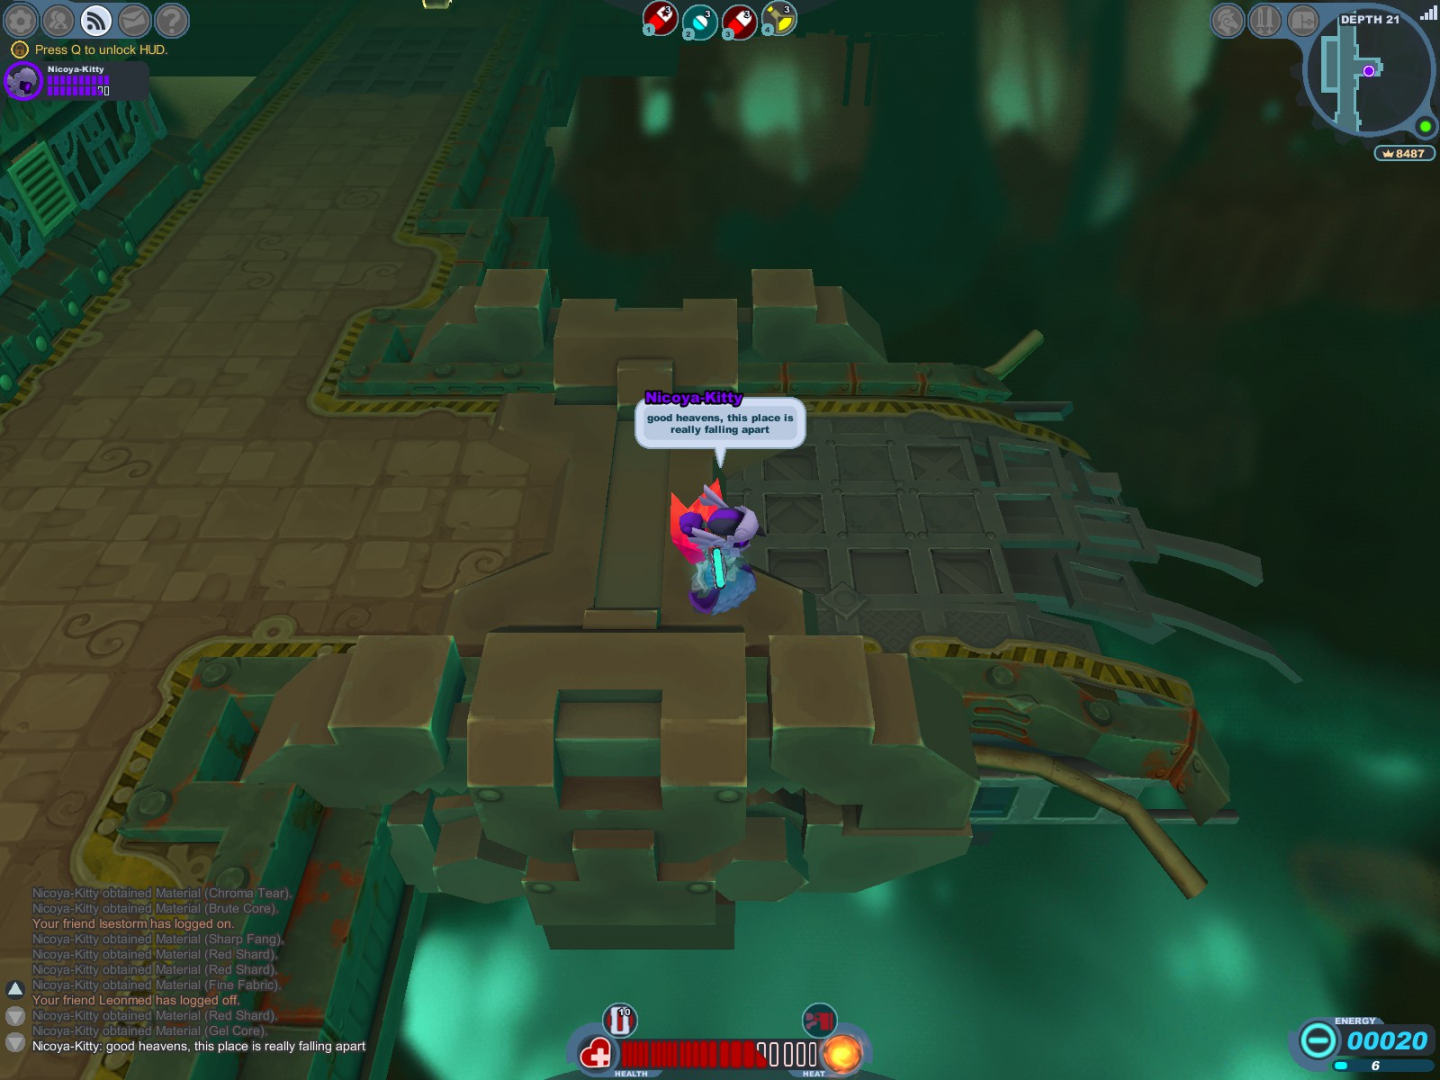
|
Clockwork Tunnels | Wasteworks and Power Complex |
Notes:
This room has been encountered in tier 3. A broken bridge or hallway. It doesn't look like work will continue on that section. | ||||||||||||||||
| Scenario Room9A | 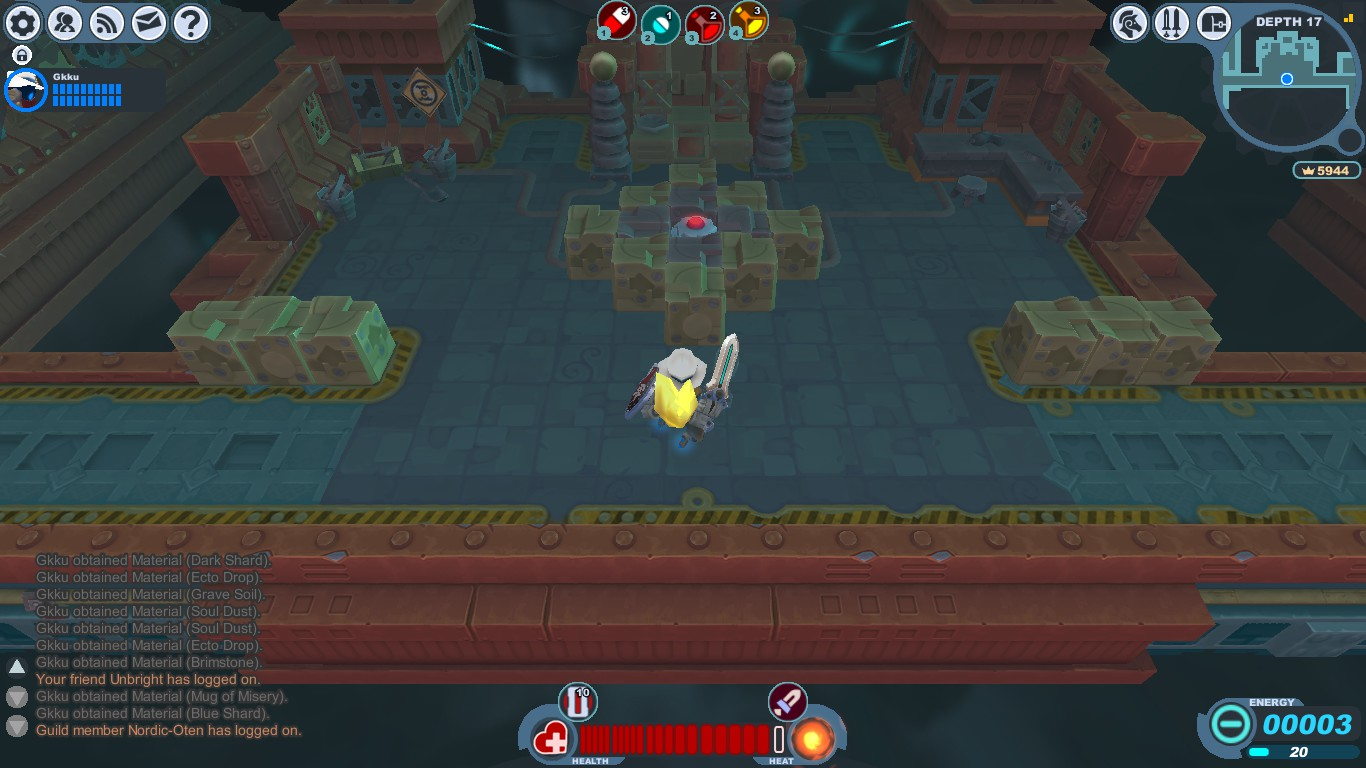
|
Clockwork Tunnels | Power Complex: Infernal Passage | Notes:
This room has been encountered in tier 2. A possible Gremlin workshop of some sort. A Thwacker spawns at the corner table in the top right, and hitting the switch in the middle spawns 2 friendly Mecha Knights from the empty areas in the top of the room. Scuttlebots will also spawn from the destroyed grey blocks. | ||||||||||||||||
| Scenario Room10A | 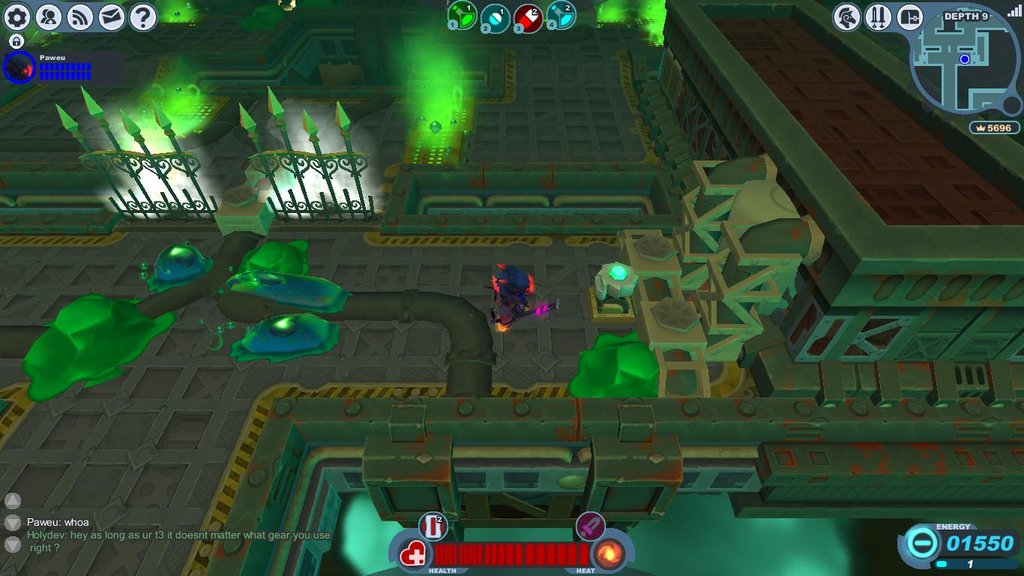
|
Clockwork Tunnels | Wasteworks: Slimeway | Notes:
This room has been encountered in tier 2. A slimy area with some tubes and poison traps. Toxigels may appear in the area. | ||||||||||||||||
| Scenario Room11A | 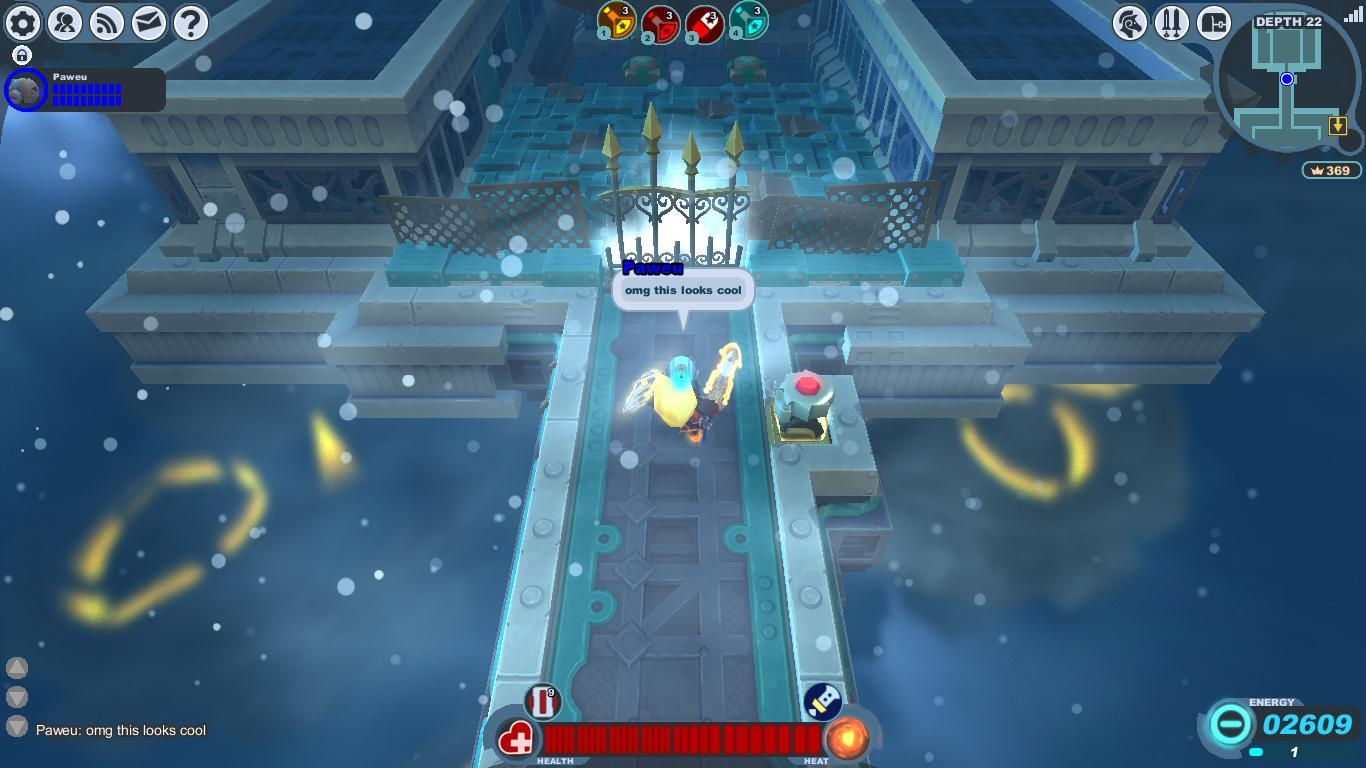
|
Clockwork Tunnels | Cooling Chamber | Notes:
This room has been encountered in tier 3. A possible storage area of some sort. The grey blocks reveal hidden Scuttlebots and Treasure Boxes can be found at the end of the room. | ||||||||||||||||
| Scenario Room12A | 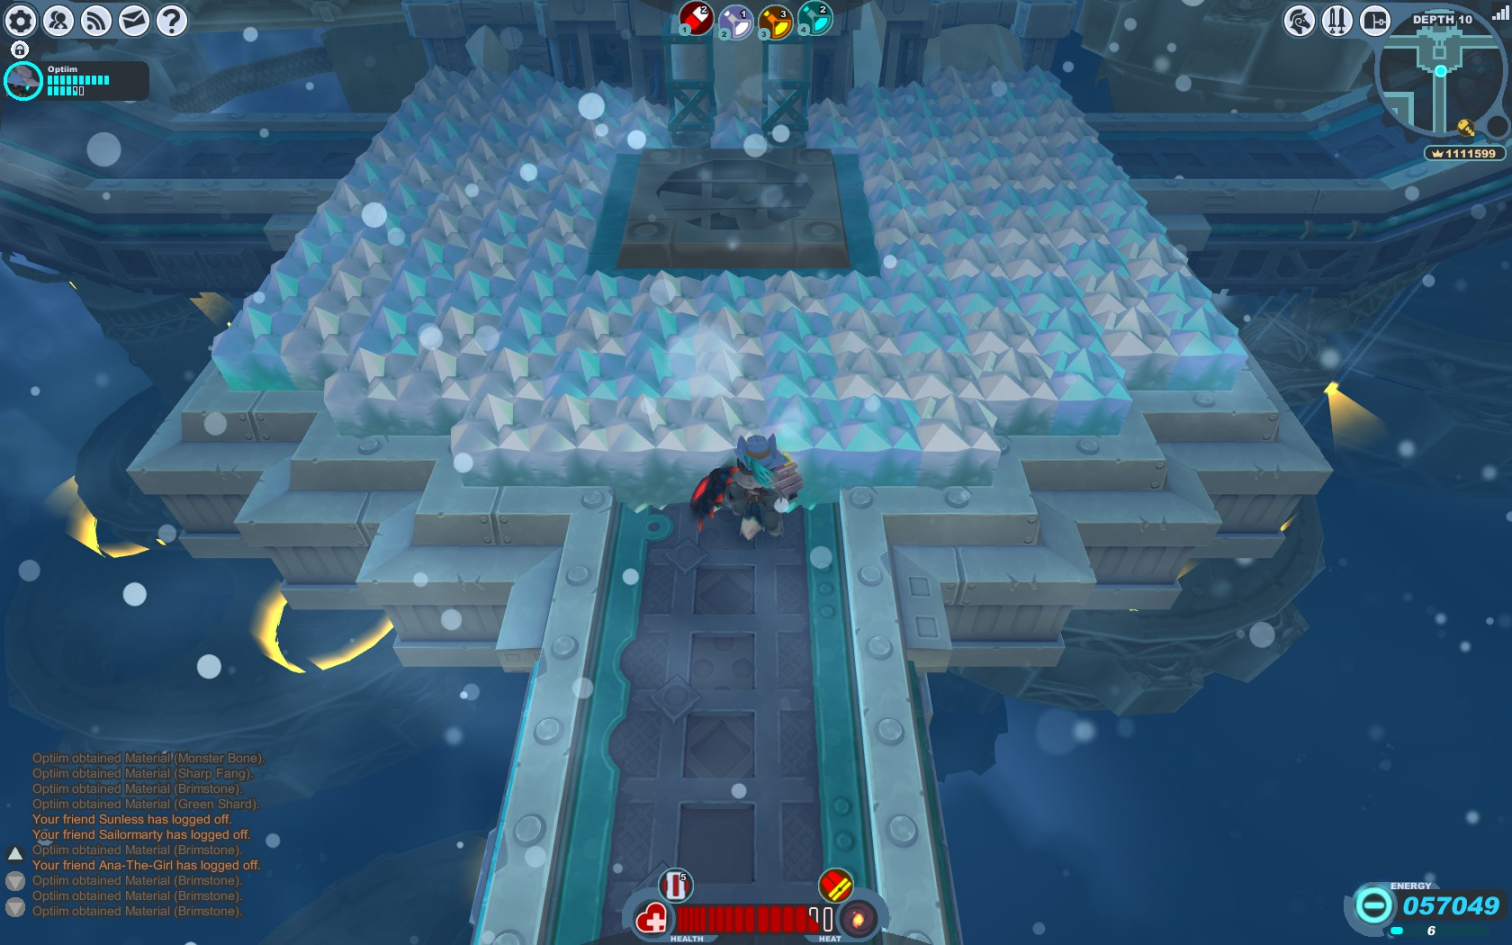
|
Clockwork Tunnels | Cooling Chamber | Notes:
This room has been encountered in tier 2. A room with a large cooling fan in the center surrounded by Crystal Blocks. Breaking some of the blocks will spawn Ice Cubes. When cleaning some space, two dead Gremlin bodies can be found lying on the ground. | ||||||||||||||||
| Scenario Room13A | 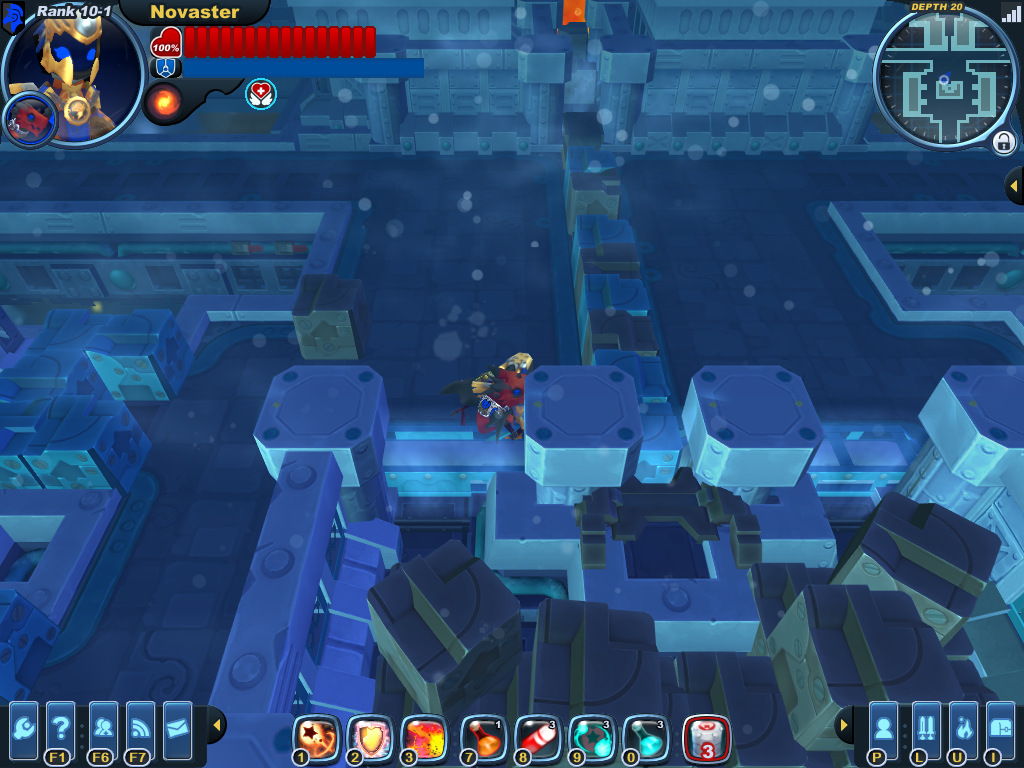
|
Clockwork Tunnels | Cooling Chamber: Mechanized Mile | Notes:
This room has been encountered in tier 3. A storage room of some kind. Gremlins hang around the area. Some of the blocks are hidden monster cages, which seem to only spawn Scuttlebots here. | ||||||||||||||||
| Scenario Room14A | 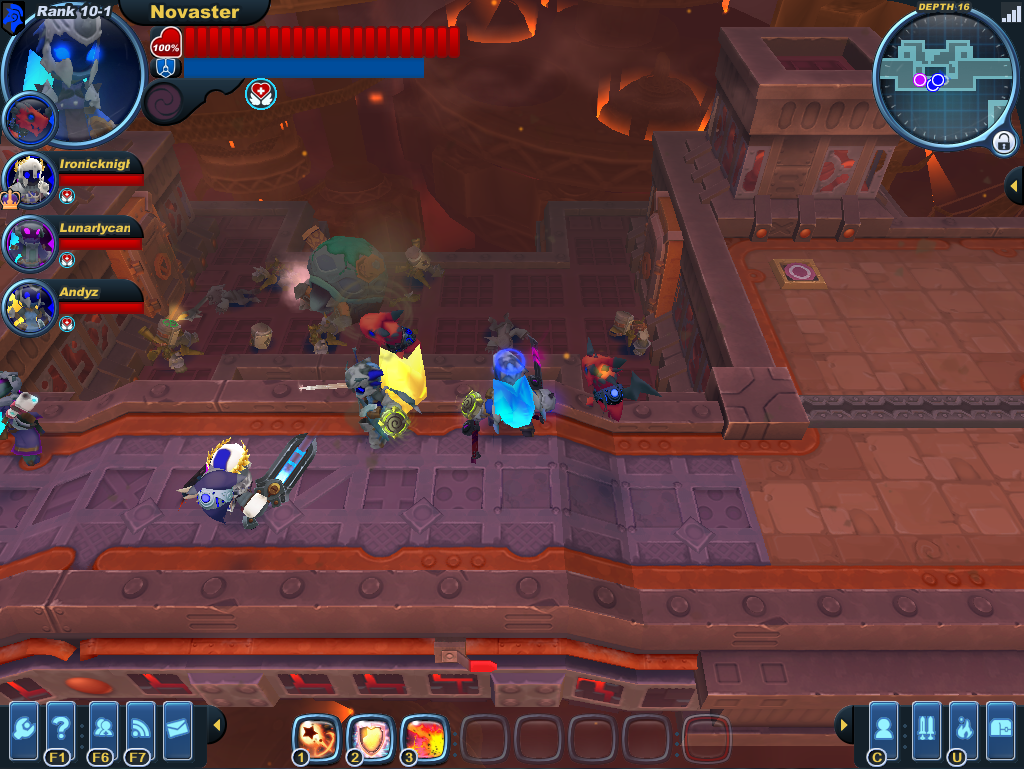
|
Clockwork Tunnels | Wasteworks: Infernal Passage, and Blast Furnace |
Notes:
This room has been encountered in tier 3. An unmoving Tortodrone can be seen on a lower platform, next to some ruined constructs. | ||||||||||||||||
| Scenario Room14B | 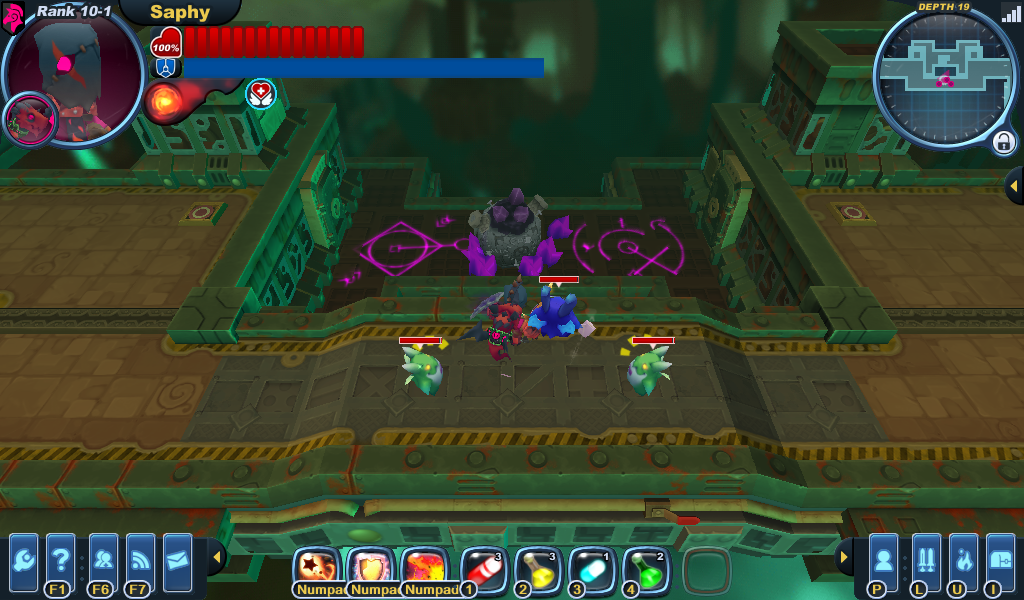
|
Clockwork Tunnels | Wasteworks: Infernal Passage | Notes:
This room has been encountered in tier 3. An unmoving Tortodrone seems to have been edited by fiends. The Tortodrone is surrounded by Dark Matter crystals and has dark purple shards protruding from the top of its body. | ||||||||||||||||
| Scenario Room15A | 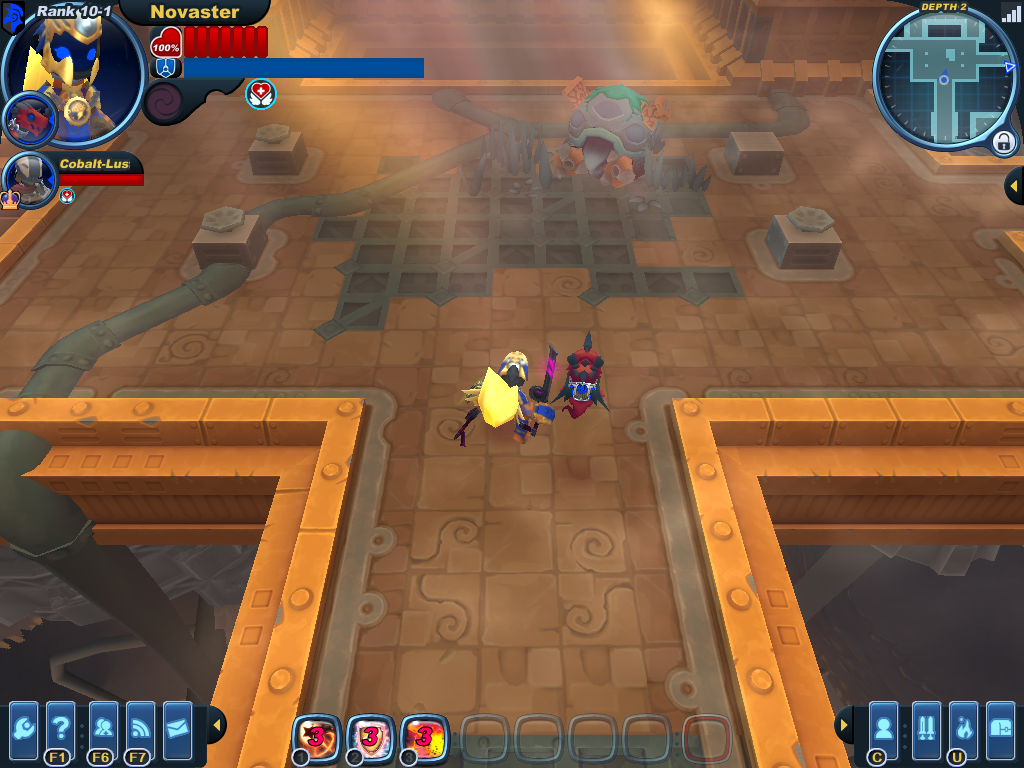
|
Clockwork Tunnels | Clockwork Tunnels: Gremlin Grounds | Notes:
This room has been encountered in tier 1. An unmoving Tortodrone can be seen next to some grass. | ||||||||||||||||

|
|
Clockwork Tunnels | Cooling Chamber | Notes:
This room has been encountered in tier 3. Some Knights and Recon Rangers seems to have set a camping around an unmoving Tortodrone to rest and collect samples of the stratum. Two Mecha Turrets are active helping to keep the area safe. One of the Knights have a Pulsar and one of the Recon Rangers have a Robo Wrecker.
| ||||||||||||||||
| Scenario Room17A | 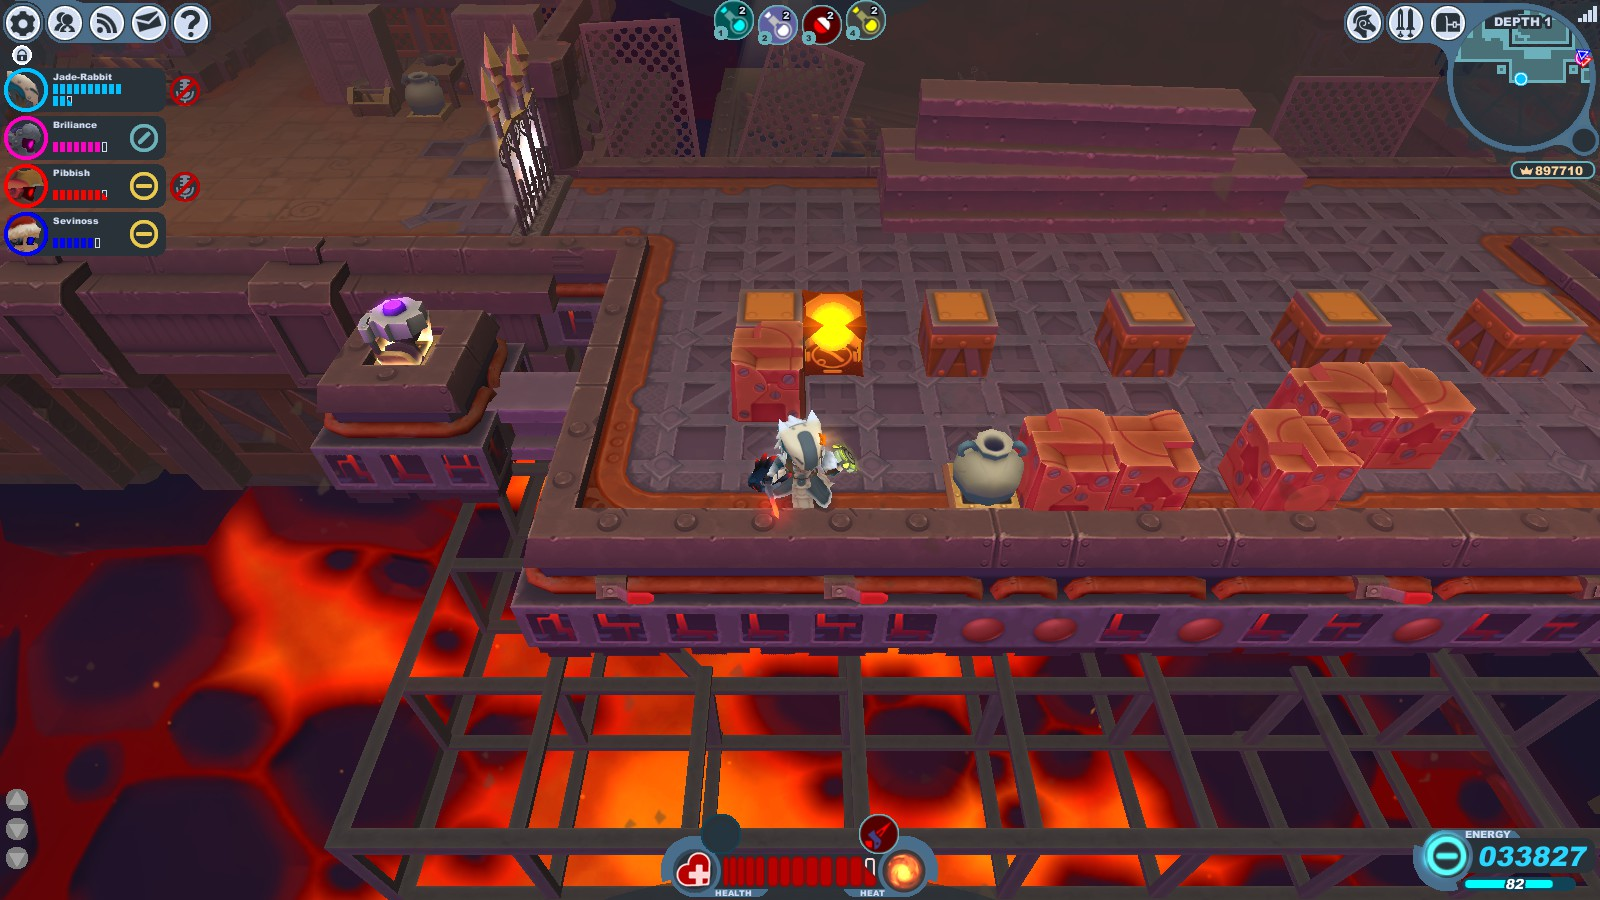
|
Clockwork Tunnels | Clockwork Tunnels. | Notes:
This room has been encountered in tier 1 and 2. A room with Gremlin tools. The room looks like it's under construction. | ||||||||||||||||
| Scenario Room18A | 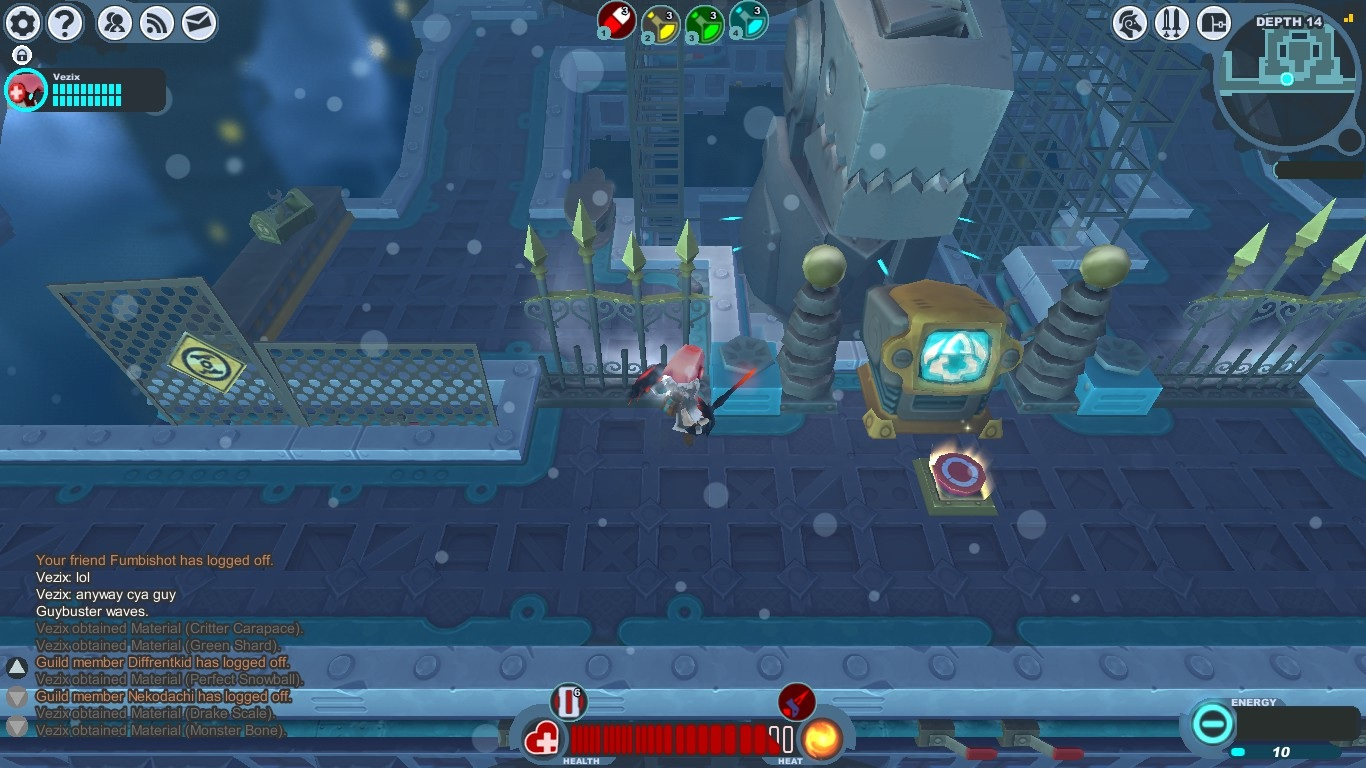
|
Clockwork Tunnels | Cooling Chamber | Notes:
This room has been encountered in tier 2. A construction site for the Roarmulus Twin. The button opens the gates and spawns 2 Gun Puppies. Behind them are 2 Treasure Boxes surrounded by Rocket Blocks found in the Ironclaw Munitions Factory. | ||||||||||||||||
| Scenario Room18B | 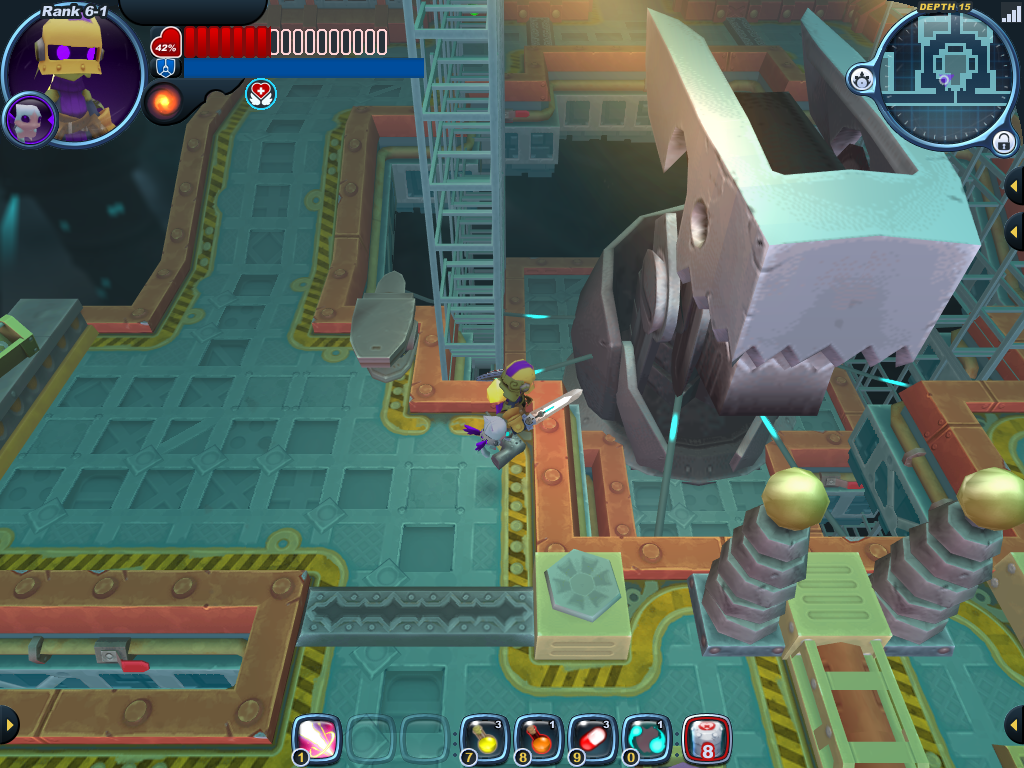
|
Clockwork Tunnels | Power Complex: Gremlin Grounds | Notes:
This variant is always encountered in the 6-1 A construction site for the Roarmulus Twin. | ||||||||||||||||
| 19A | 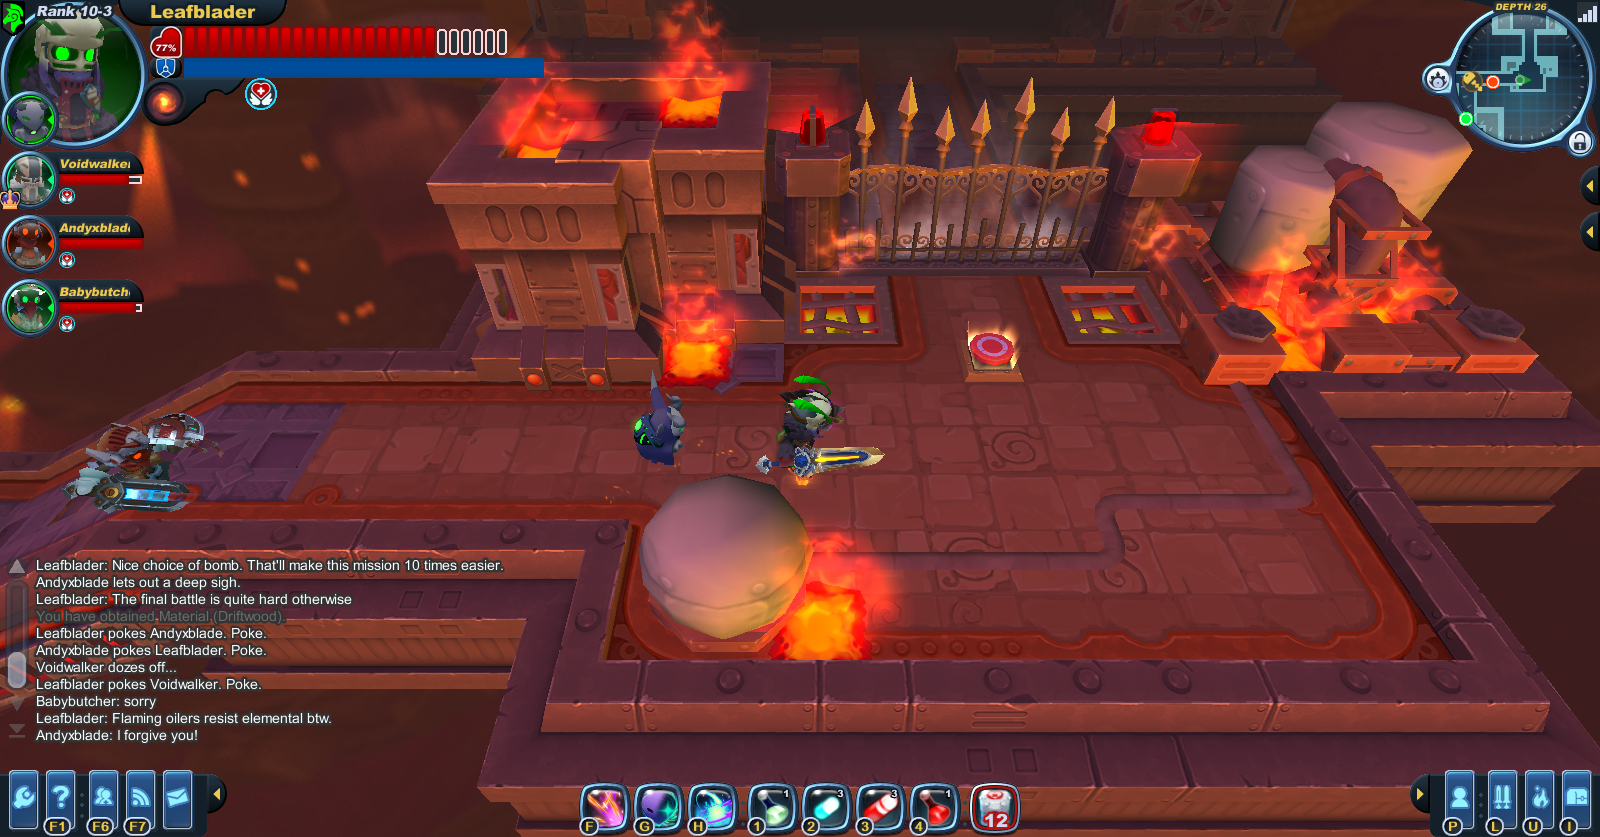
|
Clockwork Tunnels | Blast Furnace: Slimeway | Notes:
This room can always be encountered in 9-2 | ||||||||||||||||
| Scenario Room1 | 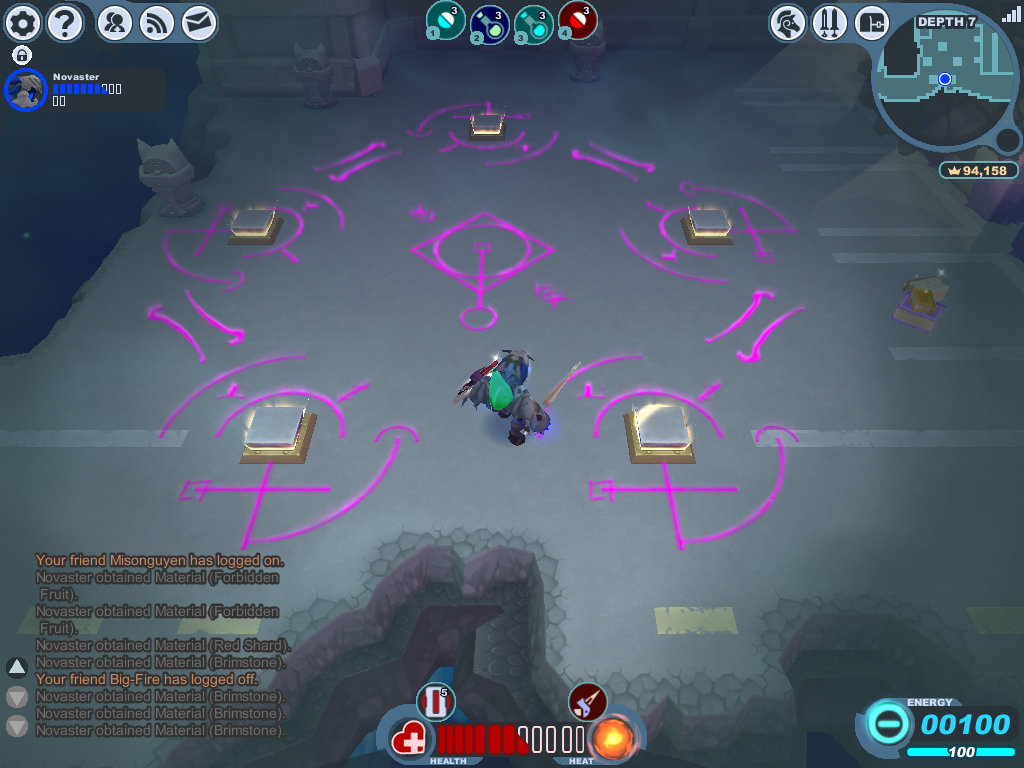
|
Devilish Drudgery | Overtime, Every Time, Hiring Freeze, and Everybody's Fired |
Notes:
This room can be encountered at any tier. Placing the 5 statues on the 5 buttons completes the ritual. Some of the possible spawns after completing the ritual include: Crowns, Fiend-related drops (like The sparkling book pile reads: 5 Ways to Appease your Pit Boss. | ||||||||||||||||
| Scenario Room2 | 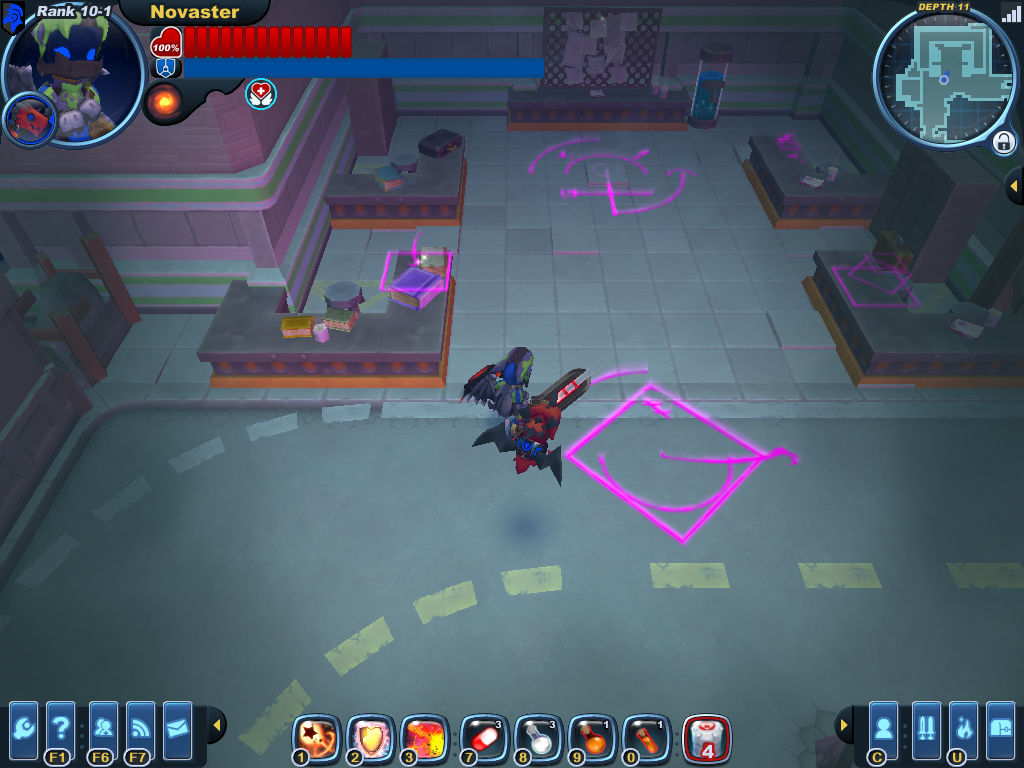
|
Devilish Drudgery | Any level from Devilish Drudgery |
Notes:
This room has been encountered in tier 2. A suspicious looking fiend activity. Several fiends, particularly Devilites or Gorgos, can spawn, ready to glower at any knights passing through. Fiendish Self-Help book reads: How do draw infernal symbols. Board reads: A Notice to All Employees: Due to continual under-performance, there will be no paid holidays or free coffee in the break room. No wonder they're so angry! | ||||||||||||||||
| Scenario Room3A | 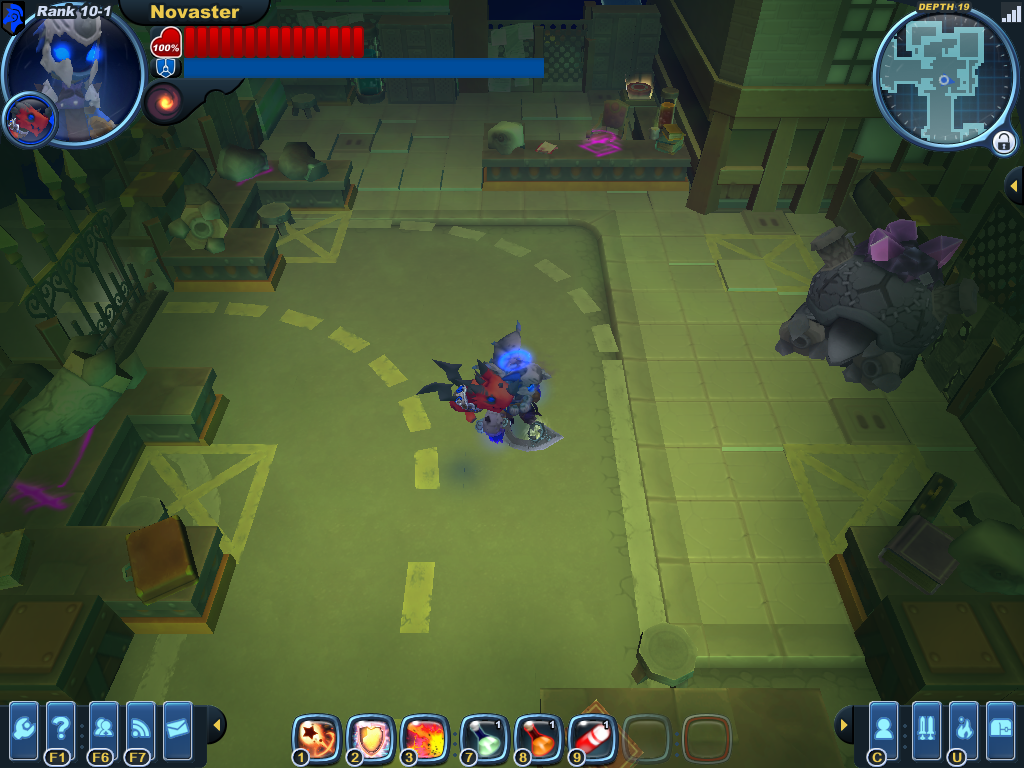
|
Devilish Drudgery | Overtime, Every Time and Toxic Workplace |
Notes:
This room has been encountered in tier 2 and 3. A suspicious looking fiend activity. Several devilites spawn with a silkwing, ready to glower at any knights passing through. They seem to be shoving Dark Matter into a stitched-together Tortodrone. The button near the top lowers the gate. A closer look at the tortodrone can be seen here. To check this room in a different theme check this and this forum's comment. | ||||||||||||||||
| Scenario Room3B | 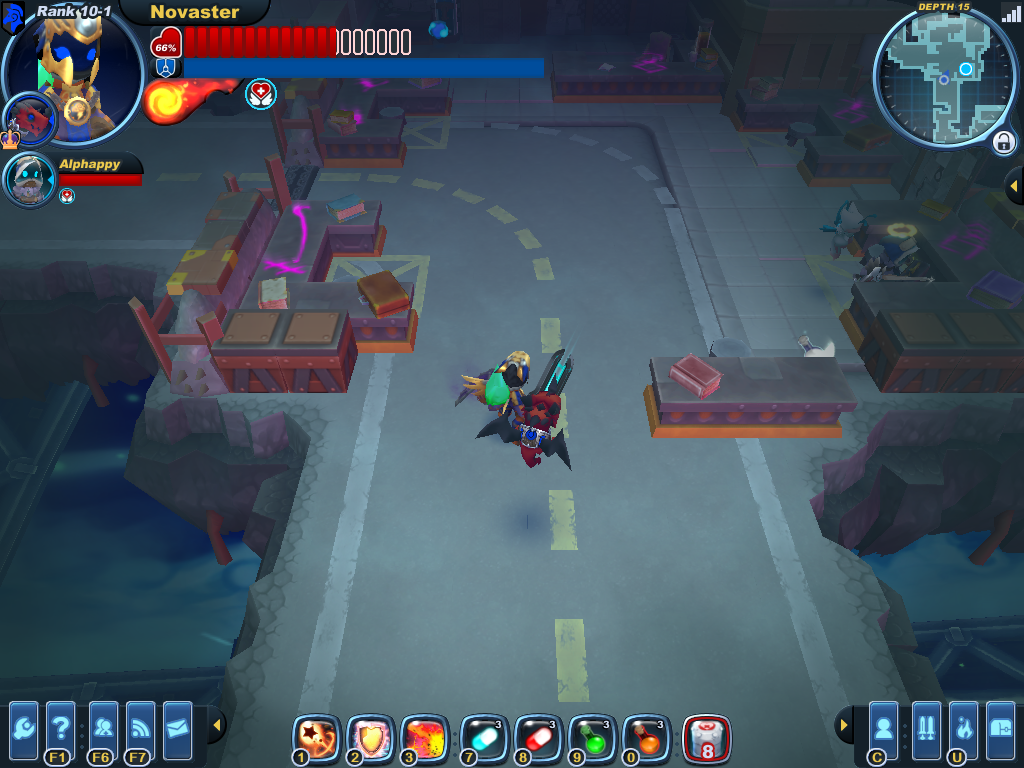
|
Devilish Drudgery | Wired for Synergy | Notes:
This room has been encountered in tier 2 and 3. A suspicious looking fiend activity. Several devilites spawn with a silkwing, ready to glower at any knights passing through. They seem to be shoving Dark Matter into a stitched-together Tortodrone. The button near the top lowers the gate. A closer look at the tortodrone can be seen here. To check this room in a different theme check this and this forum's comment. | ||||||||||||||||

|
|
Devilish Drudgery | Overtime, Every Time | Notes:
This area only appears during the March of the Tortodrones event. This room has been encountered in tier 3. A party button waits beyond aesthetic piles of dark matter. The area features a single Vortex Block. Several monsters spawn to fight, including Devilites, Trojans, and Howlitzers. The bulk glyph reward for this area seems to be rather small. | ||||||||||||||||

|
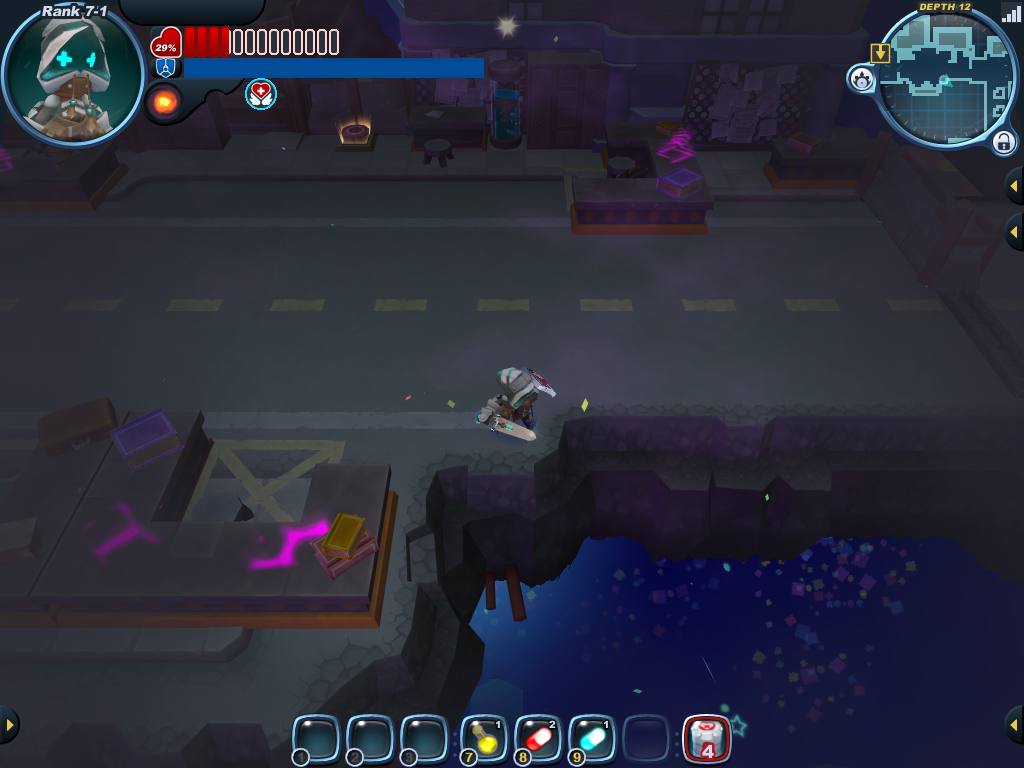
|
Devilish Drudgery | Overtime, Every Time | Notes:
This room can always be encountered in 5-1 | ||||||||||||||||

|
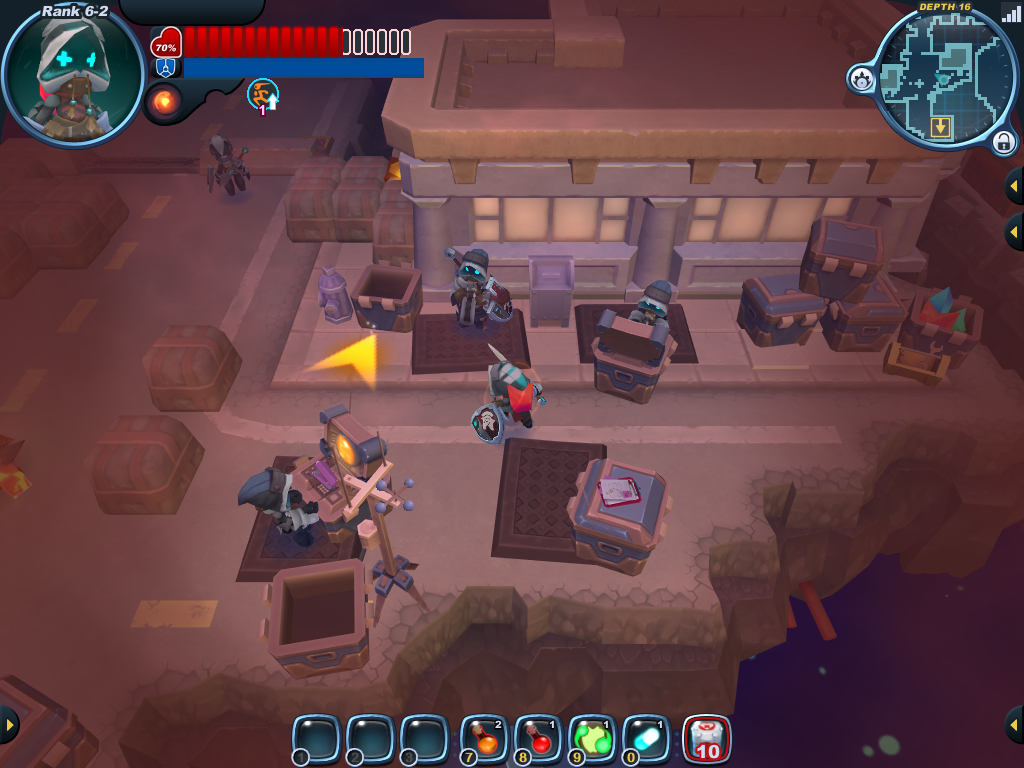
|
Devilish Drudgery | Everybody's Fired | Notes:
This room can always be encountered in 6-2 |