Difference between revisions of "Furniture"
From SpiralKnights
m (mystical not mythical) |
(added in links for groups) |
||
| Line 11: | Line 11: | ||
|example name = Spiral Blue Bed | |example name = Spiral Blue Bed | ||
|general name = Bed | |general name = Bed | ||
| − | |group = Birdsong Emporium | + | |group = [[Birdsong Emporium Furniture|Birdsong Emporium]] |
|type = Bed | |type = Bed | ||
|image = tooltip | |image = tooltip | ||
| Line 20: | Line 20: | ||
|example name = Spiral Blue Chest of Drawers | |example name = Spiral Blue Chest of Drawers | ||
|general name = Chest of Drawers | |general name = Chest of Drawers | ||
| − | |group = Birdsong Emporium | + | |group = [[Birdsong Emporium Furniture|Birdsong Emporium]] |
|type = Doodad | |type = Doodad | ||
|image = tooltip | |image = tooltip | ||
| Line 29: | Line 29: | ||
|example name = Spiral Blue Compact Chair | |example name = Spiral Blue Compact Chair | ||
|general name = Compact Chair | |general name = Compact Chair | ||
| − | |group = Birdsong Emporium | + | |group = [[Birdsong Emporium Furniture|Birdsong Emporium]] |
|type = Seat | |type = Seat | ||
|image = tooltip | |image = tooltip | ||
| Line 47: | Line 47: | ||
|example name = Energy Well | |example name = Energy Well | ||
|general name = Energy Well | |general name = Energy Well | ||
| − | |group = Birdsong Emporium | + | |group = [[Birdsong Emporium Furniture|Birdsong Emporium]] |
|type = Special | |type = Special | ||
|image = tooltip | |image = tooltip | ||
| Line 56: | Line 56: | ||
|example name = Field Sensor | |example name = Field Sensor | ||
|general name = Field Sensor | |general name = Field Sensor | ||
| − | |group = Birdsong Emporium | + | |group = [[Birdsong Emporium Furniture|Birdsong Emporium]] |
|type = Doodad | |type = Doodad | ||
|image = tooltip | |image = tooltip | ||
| Line 65: | Line 65: | ||
|example name = Spiral Blue Footlocker | |example name = Spiral Blue Footlocker | ||
|general name = Footlocker | |general name = Footlocker | ||
| − | |group = Birdsong Emporium | + | |group = [[Birdsong Emporium Furniture|Birdsong Emporium]] |
|type = Doodad | |type = Doodad | ||
|image = tooltip | |image = tooltip | ||
| Line 74: | Line 74: | ||
|example name = Blue Light Beacon | |example name = Blue Light Beacon | ||
|general name = Light Beacon | |general name = Light Beacon | ||
| − | |group = Birdsong Emporium | + | |group = [[Birdsong Emporium Furniture|Birdsong Emporium]] |
|type = Light | |type = Light | ||
|image = tooltip | |image = tooltip | ||
| Line 83: | Line 83: | ||
|example name = Spiral Blue Modular Table | |example name = Spiral Blue Modular Table | ||
|general name = Modular Table | |general name = Modular Table | ||
| − | |group = Birdsong Emporium | + | |group = [[Birdsong Emporium Furniture|Birdsong Emporium]] |
|type = Doodad | |type = Doodad | ||
|image = tooltip | |image = tooltip | ||
| Line 101: | Line 101: | ||
|example name = Sundries | |example name = Sundries | ||
|general name = Sundries | |general name = Sundries | ||
| − | |group = Birdsong Emporium | + | |group = [[Birdsong Emporium Furniture|Birdsong Emporium]] |
|type = Doodad | |type = Doodad | ||
|image = tooltip | |image = tooltip | ||
| Line 110: | Line 110: | ||
|example name = Spiral Blue Supply Shelf | |example name = Spiral Blue Supply Shelf | ||
|general name = Supply Shelf | |general name = Supply Shelf | ||
| − | |group = Birdsong Emporium | + | |group = [[Birdsong Emporium Furniture|Birdsong Emporium]] |
|type = Wall | |type = Wall | ||
|image = tooltip | |image = tooltip | ||
| Line 119: | Line 119: | ||
|example name = Toughbox | |example name = Toughbox | ||
|general name = Toughbox | |general name = Toughbox | ||
| − | |group = Birdsong Emporium | + | |group = [[Birdsong Emporium Furniture|Birdsong Emporium]] |
|type = Doodad | |type = Doodad | ||
|image = tooltip | |image = tooltip | ||
| Line 128: | Line 128: | ||
|example name = Spiral Blue Wardrobe | |example name = Spiral Blue Wardrobe | ||
|general name = Wardrobe | |general name = Wardrobe | ||
| − | |group = Birdsong Emporium | + | |group = [[Birdsong Emporium Furniture|Birdsong Emporium]] |
|type = Wall | |type = Wall | ||
|image = tooltip | |image = tooltip | ||
| Line 137: | Line 137: | ||
|example name = Weapon Crate | |example name = Weapon Crate | ||
|general name = Weapon Crate | |general name = Weapon Crate | ||
| − | |group = Birdsong Emporium | + | |group = [[Birdsong Emporium Furniture|Birdsong Emporium]] |
|type = Doodad | |type = Doodad | ||
|image = tooltip | |image = tooltip | ||
| Line 146: | Line 146: | ||
|example name = White Flying Snipe | |example name = White Flying Snipe | ||
|general name = Flying Snipe | |general name = Flying Snipe | ||
| − | |group = Snipe (Haven) | + | |group = [[Snipe (Furniture)|Snipe (Haven)]] |
|type = Creature | |type = Creature | ||
|image = overworld | |image = overworld | ||
| Line 155: | Line 155: | ||
|example name = White Lazy Snipe | |example name = White Lazy Snipe | ||
|general name = Lazy Snipe | |general name = Lazy Snipe | ||
| − | |group = Snipe (Haven) | + | |group = [[Snipe (Furniture)|Snipe (Haven)]] |
|type = Creature | |type = Creature | ||
|image = overworld | |image = overworld | ||
| Line 164: | Line 164: | ||
|example name = White Wandering Snipe | |example name = White Wandering Snipe | ||
|general name = Wandering Snipe | |general name = Wandering Snipe | ||
| − | |group = Snipe (Haven) | + | |group = [[Snipe (Furniture)|Snipe (Haven)]] |
|type = Creature | |type = Creature | ||
|image = overworld | |image = overworld | ||
| Line 173: | Line 173: | ||
|example name = Recruit's Battle Stand | |example name = Recruit's Battle Stand | ||
|general name = Recruit's Battle Stand | |general name = Recruit's Battle Stand | ||
| − | |group = Homecoming | + | |group = [[Homecoming Furniture|Homecoming]] |
|type = Stand | |type = Stand | ||
|image = tooltip | |image = tooltip | ||
| Line 182: | Line 182: | ||
|example name = Knight's Battle Stand | |example name = Knight's Battle Stand | ||
|general name = Knight's Battle Stand | |general name = Knight's Battle Stand | ||
| − | |group = Homecoming | + | |group = [[Homecoming Furniture|Homecoming]] |
|type = Stand | |type = Stand | ||
|image = tooltip | |image = tooltip | ||
| Line 191: | Line 191: | ||
|example name = Champion's Battle Stand | |example name = Champion's Battle Stand | ||
|general name = Champion's Battle Stand | |general name = Champion's Battle Stand | ||
| − | |group = Homecoming | + | |group = [[Homecoming Furniture|Homecoming]] |
|type = Stand | |type = Stand | ||
|image = tooltip | |image = tooltip | ||
| Line 200: | Line 200: | ||
|example name = Vanguard's Battle Stand | |example name = Vanguard's Battle Stand | ||
|general name = Vanguard's Battle Stand | |general name = Vanguard's Battle Stand | ||
| − | |group = Homecoming | + | |group = [[Homecoming Furniture|Homecoming]] |
|type = Stand | |type = Stand | ||
|image = tooltip | |image = tooltip | ||
| Line 209: | Line 209: | ||
|example name = Frumious Fang | |example name = Frumious Fang | ||
|general name = Frumious Fang | |general name = Frumious Fang | ||
| − | |group = Boss Trophy (Armero) | + | |group = [[Trophy Furniture|Boss Trophy (Armero)]] |
|type = Stand | |type = Stand | ||
|image = tooltip | |image = tooltip | ||
| Line 218: | Line 218: | ||
|example name = Replica Natural Snarbolax | |example name = Replica Natural Snarbolax | ||
|general name = Replica Natural Snarbolax | |general name = Replica Natural Snarbolax | ||
| − | |group = Boss Trophy (Armero) | + | |group = [[Trophy Furniture|Boss Trophy (Armero)]] |
|type = Stand | |type = Stand | ||
|image = tooltip | |image = tooltip | ||
| Line 227: | Line 227: | ||
|example name = Replica Shadowy Snarbolax | |example name = Replica Shadowy Snarbolax | ||
|general name = Replica Shadowy Snarbolax | |general name = Replica Shadowy Snarbolax | ||
| − | |group = Boss Trophy (Armero) | + | |group = [[Trophy Furniture|Boss Trophy (Armero)]] |
|type = Stand | |type = Stand | ||
|image = tooltip | |image = tooltip | ||
| Line 236: | Line 236: | ||
|example name = Jelly Gem | |example name = Jelly Gem | ||
|general name = Jelly Gem | |general name = Jelly Gem | ||
| − | |group = Boss Trophy (Armero) | + | |group = [[Trophy Furniture|Boss Trophy (Armero)]] |
|type = Stand | |type = Stand | ||
|image = tooltip | |image = tooltip | ||
| Line 245: | Line 245: | ||
|example name = Royal Jelly Crown | |example name = Royal Jelly Crown | ||
|general name = Royal Jelly Crown | |general name = Royal Jelly Crown | ||
| − | |group = Boss Trophy (Armero) | + | |group = [[Trophy Furniture|Boss Trophy (Armero)]] |
|type = Stand | |type = Stand | ||
|image = tooltip | |image = tooltip | ||
| Line 254: | Line 254: | ||
|example name = Replica Royal Jelly | |example name = Replica Royal Jelly | ||
|general name = Replica Royal Jelly | |general name = Replica Royal Jelly | ||
| − | |group = Boss Trophy (Armero) | + | |group = [[Trophy Furniture|Boss Trophy (Armero)]] |
|type = Stand | |type = Stand | ||
|image = tooltip | |image = tooltip | ||
| Line 263: | Line 263: | ||
|example name = Roarmulus Blueprints | |example name = Roarmulus Blueprints | ||
|general name = Roarmulus Blueprints | |general name = Roarmulus Blueprints | ||
| − | |group = Boss Trophy (Armero) | + | |group = [[Trophy Furniture|Boss Trophy (Armero)]] |
|type = Stand | |type = Stand | ||
|image = tooltip | |image = tooltip | ||
| Line 272: | Line 272: | ||
|example name = Small Replica Roarmulus Twin | |example name = Small Replica Roarmulus Twin | ||
|general name = Small Replica Roarmulus Twin | |general name = Small Replica Roarmulus Twin | ||
| − | |group = Boss Trophy (Armero) | + | |group = [[Trophy Furniture|Boss Trophy (Armero)]] |
|type = Stand | |type = Stand | ||
|image = tooltip | |image = tooltip | ||
| Line 281: | Line 281: | ||
|example name = Large Replica Roarmulus Twin | |example name = Large Replica Roarmulus Twin | ||
|general name = Large Replica Roarmulus Twin | |general name = Large Replica Roarmulus Twin | ||
| − | |group = Boss Trophy (Armero) | + | |group = [[Trophy Furniture|Boss Trophy (Armero)]] |
|type = Stand | |type = Stand | ||
|image = tooltip | |image = tooltip | ||
| Line 290: | Line 290: | ||
|example name = Almirian Seal | |example name = Almirian Seal | ||
|general name = Almirian Seal | |general name = Almirian Seal | ||
| − | |group = Boss Trophy (Armero) | + | |group = [[Trophy Furniture|Boss Trophy (Armero)]] |
|type = Stand | |type = Stand | ||
|image = tooltip | |image = tooltip | ||
| Line 298: | Line 298: | ||
{{FurnitureList | {{FurnitureList | ||
|example name = Lord Vanaduke's Mask | |example name = Lord Vanaduke's Mask | ||
| − | |general name = | + | |general name = [[Trophy Furniture|Boss Trophy (Armero)]] |
|group = Boss Trophy (Armero) | |group = Boss Trophy (Armero) | ||
|type = Stand | |type = Stand | ||
| Line 308: | Line 308: | ||
|example name = Lord Vanaduke's Finery | |example name = Lord Vanaduke's Finery | ||
|general name = Lord Vanaduke's Finery | |general name = Lord Vanaduke's Finery | ||
| − | |group = Boss Trophy (Armero) | + | |group = [[Trophy Furniture|Boss Trophy (Armero)]] |
|type = Stand | |type = Stand | ||
|image = tooltip | |image = tooltip | ||
| Line 317: | Line 317: | ||
|example name = White Candles | |example name = White Candles | ||
|general name = Candles (Winterfest) | |general name = Candles (Winterfest) | ||
| − | |group = Winterfest | + | |group = [[Winterfest Furniture|Winterfest]] |
|type = Light | |type = Light | ||
|image = tooltip | |image = tooltip | ||
| Line 326: | Line 326: | ||
|example name = White Holiday Presents | |example name = White Holiday Presents | ||
|general name = Holiday Presents | |general name = Holiday Presents | ||
| − | |group = Winterfest | + | |group = [[Winterfest Furniture|Winterfest]] |
|type = Doodad | |type = Doodad | ||
|image = tooltip | |image = tooltip | ||
| Line 335: | Line 335: | ||
|example name = Snow Block | |example name = Snow Block | ||
|general name = Snow Block | |general name = Snow Block | ||
| − | |group = Winterfest | + | |group = [[Winterfest Furniture|Winterfest]] |
|type = Doodad | |type = Doodad | ||
|image = tooltip | |image = tooltip | ||
| Line 344: | Line 344: | ||
|example name = Green Winterfest Tree | |example name = Green Winterfest Tree | ||
|general name = Winterfest Tree | |general name = Winterfest Tree | ||
| − | |group = Winterfest | + | |group = [[Winterfest Furniture|Winterfest]] |
|type = Plant | |type = Plant | ||
|image = tooltip | |image = tooltip | ||
| Line 353: | Line 353: | ||
|example name = Ancient Bookcase | |example name = Ancient Bookcase | ||
|general name = Ancient Bookcase | |general name = Ancient Bookcase | ||
| − | |group = Moorcroft | + | |group = [[Moorcroft Furniture|Moorcroft]] |
|type = Wall | |type = Wall | ||
|image = tooltip | |image = tooltip | ||
| Line 362: | Line 362: | ||
|example name = Ancient Tome Stand | |example name = Ancient Tome Stand | ||
|general name = Ancient Tome Stand | |general name = Ancient Tome Stand | ||
| − | |group = Moorcroft | + | |group = [[Moorcroft Furniture|Moorcroft]] |
|type = Stand | |type = Stand | ||
|image = tooltip | |image = tooltip | ||
| Line 371: | Line 371: | ||
|example name = Green Antique Bench | |example name = Green Antique Bench | ||
|general name = Antique Bench | |general name = Antique Bench | ||
| − | |group = Moorcroft | + | |group = [[Moorcroft Furniture|Moorcroft]] |
|type = Seat | |type = Seat | ||
|image = tooltip | |image = tooltip | ||
| Line 380: | Line 380: | ||
|example name = Purple Antique Chair | |example name = Purple Antique Chair | ||
|general name = Antique Chair | |general name = Antique Chair | ||
| − | |group = Moorcroft | + | |group = [[Moorcroft Furniture|Moorcroft]] |
|type = Seat | |type = Seat | ||
|image = tooltip | |image = tooltip | ||
| Line 389: | Line 389: | ||
|example name = Antique Luggage | |example name = Antique Luggage | ||
|general name = Antique Luggage | |general name = Antique Luggage | ||
| − | |group = Moorcroft | + | |group = [[Moorcroft Furniture|Moorcroft]] |
|type = Doodad | |type = Doodad | ||
|image = tooltip | |image = tooltip | ||
| Line 398: | Line 398: | ||
|example name = Antique Suitcases | |example name = Antique Suitcases | ||
|general name = Antique Suitcases | |general name = Antique Suitcases | ||
| − | |group = Moorcroft | + | |group = [[Moorcroft Furniture|Moorcroft]] |
|type = Doodad | |type = Doodad | ||
|image = tooltip | |image = tooltip | ||
| Line 407: | Line 407: | ||
|example name = Antique Table | |example name = Antique Table | ||
|general name = Antique Table | |general name = Antique Table | ||
| − | |group = Moorcroft | + | |group = [[Moorcroft Furniture|Moorcroft]] |
|type = Doodad | |type = Doodad | ||
|image = tooltip | |image = tooltip | ||
| Line 416: | Line 416: | ||
|example name = Bone Stack | |example name = Bone Stack | ||
|general name = Bone Stack | |general name = Bone Stack | ||
| − | |group = Moorcroft | + | |group = [[Moorcroft Furniture|Moorcroft]] |
|type = Doodad | |type = Doodad | ||
|image = tooltip | |image = tooltip | ||
| Line 425: | Line 425: | ||
|example name = Curious Mewkat | |example name = Curious Mewkat | ||
|general name = Curious Mewkat | |general name = Curious Mewkat | ||
| − | |group = Moorcroft | + | |group = [[Moorcroft Furniture|Moorcroft]] |
|type = Creature | |type = Creature | ||
|image = overworld | |image = overworld | ||
| Line 434: | Line 434: | ||
|example name = Cursed Tome Stand | |example name = Cursed Tome Stand | ||
|general name = Cursed Tome Stand | |general name = Cursed Tome Stand | ||
| − | |group = Moorcroft | + | |group = [[Moorcroft Furniture|Moorcroft]] |
|type = Stand | |type = Stand | ||
|image = tooltip | |image = tooltip | ||
| Line 443: | Line 443: | ||
|example name = Mystical Tome Stand | |example name = Mystical Tome Stand | ||
|general name = Mystical Tome Stand | |general name = Mystical Tome Stand | ||
| − | |group = Moorcroft | + | |group = [[Moorcroft Furniture|Moorcroft]] |
|type = Stand | |type = Stand | ||
|image = tooltip | |image = tooltip | ||
| Line 452: | Line 452: | ||
|example name = Blue Short Gaslamp | |example name = Blue Short Gaslamp | ||
|general name = Gaslamp (Short) | |general name = Gaslamp (Short) | ||
| − | |group = Moorcroft | + | |group = [[Moorcroft Furniture|Moorcroft]] |
|type = Light | |type = Light | ||
|image = tooltip | |image = tooltip | ||
| Line 461: | Line 461: | ||
|example name = Purple Tall Gaslamp | |example name = Purple Tall Gaslamp | ||
|general name = Gaslamp (Tall) | |general name = Gaslamp (Tall) | ||
| − | |group = Moorcroft | + | |group = [[Moorcroft Furniture|Moorcroft]] |
|type = Light | |type = Light | ||
|image = tooltip | |image = tooltip | ||
| Line 470: | Line 470: | ||
|example name = Skull Pile | |example name = Skull Pile | ||
|general name = Skull Pile | |general name = Skull Pile | ||
| − | |group = Moorcroft | + | |group = [[Moorcroft Furniture|Moorcroft]] |
|type = Doodad | |type = Doodad | ||
|image = tooltip | |image = tooltip | ||
| Line 479: | Line 479: | ||
|example name = Musty Tome Stack | |example name = Musty Tome Stack | ||
|general name = Tome Stack | |general name = Tome Stack | ||
| − | |group = Moorcroft | + | |group = [[Moorcroft Furniture|Moorcroft]] |
|type = Doodad | |type = Doodad | ||
|image = tooltip | |image = tooltip | ||
| Line 488: | Line 488: | ||
|example name = Zombie Bellhop | |example name = Zombie Bellhop | ||
|general name = Zombie Bellhop | |general name = Zombie Bellhop | ||
| − | |group = Moorcroft | + | |group = [[Moorcroft Furniture|Moorcroft]] |
|type = Creature | |type = Creature | ||
|image = tooltip | |image = tooltip | ||
| Line 497: | Line 497: | ||
|example name = Black Lazy Gobblesnipe | |example name = Black Lazy Gobblesnipe | ||
|general name = Lazy Gobblesnipe | |general name = Lazy Gobblesnipe | ||
| − | |group = Snipe ( | + | |group = [[Snipe (Furniture)|Snipe (Gobblesnipe)]] |
|type = Creature | |type = Creature | ||
|image = overworld | |image = overworld | ||
| Line 506: | Line 506: | ||
|example name = Brown Plump Gobblesnipe | |example name = Brown Plump Gobblesnipe | ||
|general name = Plump Gobblesnipe | |general name = Plump Gobblesnipe | ||
| − | |group = Snipe ( | + | |group = [[Snipe (Furniture)|Snipe (Gobblesnipe)]] |
|type = Creature | |type = Creature | ||
|image = overworld | |image = overworld | ||
| Line 515: | Line 515: | ||
|example name = Gold Wandering Gobblesnipe | |example name = Gold Wandering Gobblesnipe | ||
|general name = Wandering Gobblesnipe | |general name = Wandering Gobblesnipe | ||
| − | |group = Snipe ( | + | |group = [[Snipe (Furniture)|Snipe (Gobblesnipe)]] |
|type = Creature | |type = Creature | ||
|image = overworld | |image = overworld | ||
| Line 524: | Line 524: | ||
|example name = Winterfest Table | |example name = Winterfest Table | ||
|general name = Winterfest Table | |general name = Winterfest Table | ||
| − | |group = Winterfest | + | |group = [[Winterfest Furniture|Winterfest]] |
|type = Doodad | |type = Doodad | ||
|image = tooltip | |image = tooltip | ||
| Line 533: | Line 533: | ||
|example name = Broken Obsidian Obelisk | |example name = Broken Obsidian Obelisk | ||
|general name = Obsidian Obelisk | |general name = Obsidian Obelisk | ||
| − | |group = Apocrean | + | |group = [[Apocrean Furniture|Apocrean]] |
|type = Doodad | |type = Doodad | ||
|image = tooltip | |image = tooltip | ||
| Line 541: | Line 541: | ||
{{FurnitureList | {{FurnitureList | ||
|example name = Charred Chair | |example name = Charred Chair | ||
| − | |general name = | + | |general name = Chair (Almire) |
| − | |group = Almirian | + | |group = [[Almire Furniture|Almirian]] |
|type = Seat | |type = Seat | ||
|image = tooltip | |image = tooltip | ||
| Line 550: | Line 550: | ||
{{FurnitureList | {{FurnitureList | ||
|example name = Restored Bench | |example name = Restored Bench | ||
| − | |general name = | + | |general name = Bench (Almire) |
| − | |group = Almirian | + | |group = [[Almire Furniture|Almirian]] |
|type = Seat | |type = Seat | ||
|image = tooltip | |image = tooltip | ||
| Line 560: | Line 560: | ||
|example name = Cursed Nature Sprite | |example name = Cursed Nature Sprite | ||
|general name = Cursed Nature Sprite | |general name = Cursed Nature Sprite | ||
| − | |group = Almirian | + | |group = [[Almire Furniture|Almirian]] |
|type = Creature | |type = Creature | ||
|image = overworld | |image = overworld | ||
| Line 569: | Line 569: | ||
|example name = Nature Sprite | |example name = Nature Sprite | ||
|general name = Nature Sprite | |general name = Nature Sprite | ||
| − | |group = Almirian | + | |group = [[Almire Furniture|Almirian]] |
|type = Creature | |type = Creature | ||
|image = overworld | |image = overworld | ||
| Line 577: | Line 577: | ||
{{FurnitureList | {{FurnitureList | ||
|example name = Restored Rug | |example name = Restored Rug | ||
| − | |general name = | + | |general name = Rug (Almire) |
| − | |group = Almirian | + | |group = [[Almire Furniture|Almirian]] |
|type = Mat | |type = Mat | ||
|image = tooltip | |image = tooltip | ||
| Line 586: | Line 586: | ||
{{FurnitureList | {{FurnitureList | ||
|example name = Restored Table | |example name = Restored Table | ||
| − | |general name = | + | |general name = Table (Almire) |
| − | |group = Almirian | + | |group = [[Almire Furniture|Almirian]] |
|type = Doodad | |type = Doodad | ||
|image = tooltip | |image = tooltip | ||
| Line 595: | Line 595: | ||
{{FurnitureList | {{FurnitureList | ||
|example name = Charred Tapestry | |example name = Charred Tapestry | ||
| − | |general name = | + | |general name = Tapestry (Almire) |
| − | |group = Almirian | + | |group = [[Almire Furniture|Almirian]] |
|type = Doodad | |type = Doodad | ||
|image = tooltip | |image = tooltip | ||
Revision as of 01:47, 21 November 2014


Furniture is a type of item that can be placed in a Guild Hall. These are purely aesthetic items, with only a few exceptions (such as the Energy Well). Furniture items were introduced with the Guild Hall Update in November 2012, along with a major Guild Hall redesign featuring expansions and rooms in which Furniture can be placed. Furniture items show up in the "Furnishing" tab of the arsenal. This tab does not show up if there is no furniture in the arsenal. Furniture can be obtained and arranged in a variety of ways. See individual pages for availability and other details.
Contents
List of Furniture Items
There are different color variations available for many of these items. See individual pages for more visuals.
- fixed capital letter in "Start" (consistency with template naming like SKWindow/NewRow etc.)|- valign="middle" | style="background: #c7dbea; padding: 3px 3px 3px 3px; border-radius: 5px;" align="center" | [[{{{link}}}|Bed]]
| style="background: #c7dbea; padding: 3px 3px 3px 3px; border-radius: 5px;" |
| style="background: #c7dbea; padding: 3px 3px 3px 3px; border-radius: 5px;" align = "center" valign = "middle" | Bed
| style="background: #c7dbea; padding: 3px 3px 3px 3px; border-radius: 5px;" align = "center" valign = "middle" | Birdsong Emporium
| style="background: #c7dbea; padding: 3px 3px 3px 3px; border-radius: 5px;" valign = "top" | Interactive: ???
|- valign="middle" | style="background: #c7dbea; padding: 3px 3px 3px 3px; border-radius: 5px;" align="center" | [[{{{link}}}|Chest of Drawers]]
| style="background: #c7dbea; padding: 3px 3px 3px 3px; border-radius: 5px;" |
| style="background: #c7dbea; padding: 3px 3px 3px 3px; border-radius: 5px;" align = "center" valign = "middle" | Doodad
| style="background: #c7dbea; padding: 3px 3px 3px 3px; border-radius: 5px;" align = "center" valign = "middle" | Birdsong Emporium
| style="background: #c7dbea; padding: 3px 3px 3px 3px; border-radius: 5px;" valign = "top" | Interactive: ???
|- valign="middle" | style="background: #c7dbea; padding: 3px 3px 3px 3px; border-radius: 5px;" align="center" | [[{{{link}}}|Compact Chair]]
| style="background: #c7dbea; padding: 3px 3px 3px 3px; border-radius: 5px;" |
| style="background: #c7dbea; padding: 3px 3px 3px 3px; border-radius: 5px;" align = "center" valign = "middle" | Seat
| style="background: #c7dbea; padding: 3px 3px 3px 3px; border-radius: 5px;" align = "center" valign = "middle" | Birdsong Emporium
| style="background: #c7dbea; padding: 3px 3px 3px 3px; border-radius: 5px;" valign = "top" | Interactive: ???
|- valign="middle" | style="background: #c7dbea; padding: 3px 3px 3px 3px; border-radius: 5px;" align="center" | [[{{{link}}}|Crash Pod]]
| style="background: #c7dbea; padding: 3px 3px 3px 3px; border-radius: 5px;" |
| style="background: #c7dbea; padding: 3px 3px 3px 3px; border-radius: 5px;" align = "center" valign = "middle" | Doodad
| style="background: #c7dbea; padding: 3px 3px 3px 3px; border-radius: 5px;" align = "center" valign = "middle" | Birdsong Emporium
| style="background: #c7dbea; padding: 3px 3px 3px 3px; border-radius: 5px;" valign = "top" | Interactive: ???
|- valign="middle" | style="background: #c7dbea; padding: 3px 3px 3px 3px; border-radius: 5px;" align="center" | [[{{{link}}}|Energy Well]]
| style="background: #c7dbea; padding: 3px 3px 3px 3px; border-radius: 5px;" |
| style="background: #c7dbea; padding: 3px 3px 3px 3px; border-radius: 5px;" align = "center" valign = "middle" | Special
| style="background: #c7dbea; padding: 3px 3px 3px 3px; border-radius: 5px;" align = "center" valign = "middle" | Birdsong Emporium
| style="background: #c7dbea; padding: 3px 3px 3px 3px; border-radius: 5px;" valign = "top" | Interactive: ???
|- valign="middle" | style="background: #c7dbea; padding: 3px 3px 3px 3px; border-radius: 5px;" align="center" | [[{{{link}}}|Field Sensor]]
| style="background: #c7dbea; padding: 3px 3px 3px 3px; border-radius: 5px;" |
| style="background: #c7dbea; padding: 3px 3px 3px 3px; border-radius: 5px;" align = "center" valign = "middle" | Doodad
| style="background: #c7dbea; padding: 3px 3px 3px 3px; border-radius: 5px;" align = "center" valign = "middle" | Birdsong Emporium
| style="background: #c7dbea; padding: 3px 3px 3px 3px; border-radius: 5px;" valign = "top" | Interactive: ???
|- valign="middle" | style="background: #c7dbea; padding: 3px 3px 3px 3px; border-radius: 5px;" align="center" | [[{{{link}}}|Footlocker]]
| style="background: #c7dbea; padding: 3px 3px 3px 3px; border-radius: 5px;" |
| style="background: #c7dbea; padding: 3px 3px 3px 3px; border-radius: 5px;" align = "center" valign = "middle" | Doodad
| style="background: #c7dbea; padding: 3px 3px 3px 3px; border-radius: 5px;" align = "center" valign = "middle" | Birdsong Emporium
| style="background: #c7dbea; padding: 3px 3px 3px 3px; border-radius: 5px;" valign = "top" | Interactive: ???
|- valign="middle" | style="background: #c7dbea; padding: 3px 3px 3px 3px; border-radius: 5px;" align="center" | [[{{{link}}}|Light Beacon]]
| style="background: #c7dbea; padding: 3px 3px 3px 3px; border-radius: 5px;" || style="background: #c7dbea; padding: 3px 3px 3px 3px; border-radius: 5px;" align = "center" valign = "middle" | Light
| style="background: #c7dbea; padding: 3px 3px 3px 3px; border-radius: 5px;" align = "center" valign = "middle" | Birdsong Emporium
| style="background: #c7dbea; padding: 3px 3px 3px 3px; border-radius: 5px;" valign = "top" | Interactive: ???
|- valign="middle" | style="background: #c7dbea; padding: 3px 3px 3px 3px; border-radius: 5px;" align="center" | [[{{{link}}}|Modular Table]]
| style="background: #c7dbea; padding: 3px 3px 3px 3px; border-radius: 5px;" |
| style="background: #c7dbea; padding: 3px 3px 3px 3px; border-radius: 5px;" align = "center" valign = "middle" | Doodad
| style="background: #c7dbea; padding: 3px 3px 3px 3px; border-radius: 5px;" align = "center" valign = "middle" | Birdsong Emporium
| style="background: #c7dbea; padding: 3px 3px 3px 3px; border-radius: 5px;" valign = "top" | Interactive: ???
|- valign="middle" | style="background: #c7dbea; padding: 3px 3px 3px 3px; border-radius: 5px;" align="center" | [[{{{link}}}|Potted Plant]]
| style="background: #c7dbea; padding: 3px 3px 3px 3px; border-radius: 5px;" |
| style="background: #c7dbea; padding: 3px 3px 3px 3px; border-radius: 5px;" align = "center" valign = "middle" | Plant
| style="background: #c7dbea; padding: 3px 3px 3px 3px; border-radius: 5px;" align = "center" valign = "middle" | Birdsong Emporium
| style="background: #c7dbea; padding: 3px 3px 3px 3px; border-radius: 5px;" valign = "top" | Interactive: ???
|- valign="middle" | style="background: #c7dbea; padding: 3px 3px 3px 3px; border-radius: 5px;" align="center" | [[{{{link}}}|Sundries]]
| style="background: #c7dbea; padding: 3px 3px 3px 3px; border-radius: 5px;" |
| style="background: #c7dbea; padding: 3px 3px 3px 3px; border-radius: 5px;" align = "center" valign = "middle" | Doodad
| style="background: #c7dbea; padding: 3px 3px 3px 3px; border-radius: 5px;" align = "center" valign = "middle" | Birdsong Emporium
| style="background: #c7dbea; padding: 3px 3px 3px 3px; border-radius: 5px;" valign = "top" | Interactive: ???
|- valign="middle" | style="background: #c7dbea; padding: 3px 3px 3px 3px; border-radius: 5px;" align="center" | [[{{{link}}}|Supply Shelf]]
| style="background: #c7dbea; padding: 3px 3px 3px 3px; border-radius: 5px;" |
| style="background: #c7dbea; padding: 3px 3px 3px 3px; border-radius: 5px;" align = "center" valign = "middle" | Wall
| style="background: #c7dbea; padding: 3px 3px 3px 3px; border-radius: 5px;" align = "center" valign = "middle" | Birdsong Emporium
| style="background: #c7dbea; padding: 3px 3px 3px 3px; border-radius: 5px;" valign = "top" | Interactive: ???
|- valign="middle" | style="background: #c7dbea; padding: 3px 3px 3px 3px; border-radius: 5px;" align="center" | [[{{{link}}}|Toughbox]]
| style="background: #c7dbea; padding: 3px 3px 3px 3px; border-radius: 5px;" |
| style="background: #c7dbea; padding: 3px 3px 3px 3px; border-radius: 5px;" align = "center" valign = "middle" | Doodad
| style="background: #c7dbea; padding: 3px 3px 3px 3px; border-radius: 5px;" align = "center" valign = "middle" | Birdsong Emporium
| style="background: #c7dbea; padding: 3px 3px 3px 3px; border-radius: 5px;" valign = "top" | Interactive: ???
|- valign="middle" | style="background: #c7dbea; padding: 3px 3px 3px 3px; border-radius: 5px;" align="center" | [[{{{link}}}|Wardrobe]]
| style="background: #c7dbea; padding: 3px 3px 3px 3px; border-radius: 5px;" |
| style="background: #c7dbea; padding: 3px 3px 3px 3px; border-radius: 5px;" align = "center" valign = "middle" | Wall
| style="background: #c7dbea; padding: 3px 3px 3px 3px; border-radius: 5px;" align = "center" valign = "middle" | Birdsong Emporium
| style="background: #c7dbea; padding: 3px 3px 3px 3px; border-radius: 5px;" valign = "top" | Interactive: ???
|- valign="middle" | style="background: #c7dbea; padding: 3px 3px 3px 3px; border-radius: 5px;" align="center" | [[{{{link}}}|Weapon Crate]]
| style="background: #c7dbea; padding: 3px 3px 3px 3px; border-radius: 5px;" |
| style="background: #c7dbea; padding: 3px 3px 3px 3px; border-radius: 5px;" align = "center" valign = "middle" | Doodad
| style="background: #c7dbea; padding: 3px 3px 3px 3px; border-radius: 5px;" align = "center" valign = "middle" | Birdsong Emporium
| style="background: #c7dbea; padding: 3px 3px 3px 3px; border-radius: 5px;" valign = "top" | Interactive: ???
|- valign="middle" | style="background: #c7dbea; padding: 3px 3px 3px 3px; border-radius: 5px;" align="center" | [[{{{link}}}|Flying Snipe]]
| style="background: #c7dbea; padding: 3px 3px 3px 3px; border-radius: 5px;" |
| style="background: #c7dbea; padding: 3px 3px 3px 3px; border-radius: 5px;" align = "center" valign = "middle" | Creature
| style="background: #c7dbea; padding: 3px 3px 3px 3px; border-radius: 5px;" align = "center" valign = "middle" | Snipe (Haven)
| style="background: #c7dbea; padding: 3px 3px 3px 3px; border-radius: 5px;" valign = "top" | Interactive: ???
|- valign="middle" | style="background: #c7dbea; padding: 3px 3px 3px 3px; border-radius: 5px;" align="center" | [[{{{link}}}|Lazy Snipe]]
| style="background: #c7dbea; padding: 3px 3px 3px 3px; border-radius: 5px;" |
| style="background: #c7dbea; padding: 3px 3px 3px 3px; border-radius: 5px;" align = "center" valign = "middle" | Creature
| style="background: #c7dbea; padding: 3px 3px 3px 3px; border-radius: 5px;" align = "center" valign = "middle" | Snipe (Haven)
| style="background: #c7dbea; padding: 3px 3px 3px 3px; border-radius: 5px;" valign = "top" | Interactive: ???
|- valign="middle" | style="background: #c7dbea; padding: 3px 3px 3px 3px; border-radius: 5px;" align="center" | [[{{{link}}}|Wandering Snipe]]
| style="background: #c7dbea; padding: 3px 3px 3px 3px; border-radius: 5px;" |
| style="background: #c7dbea; padding: 3px 3px 3px 3px; border-radius: 5px;" align = "center" valign = "middle" | Creature
| style="background: #c7dbea; padding: 3px 3px 3px 3px; border-radius: 5px;" align = "center" valign = "middle" | Snipe (Haven)
| style="background: #c7dbea; padding: 3px 3px 3px 3px; border-radius: 5px;" valign = "top" | Interactive: ???
|- valign="middle" | style="background: #c7dbea; padding: 3px 3px 3px 3px; border-radius: 5px;" align="center" | [[{{{link}}}|Recruit's Battle Stand]]
| style="background: #c7dbea; padding: 3px 3px 3px 3px; border-radius: 5px;" |
| style="background: #c7dbea; padding: 3px 3px 3px 3px; border-radius: 5px;" align = "center" valign = "middle" | Stand
| style="background: #c7dbea; padding: 3px 3px 3px 3px; border-radius: 5px;" align = "center" valign = "middle" | Homecoming
| style="background: #c7dbea; padding: 3px 3px 3px 3px; border-radius: 5px;" valign = "top" | Interactive: ???
|- valign="middle" | style="background: #c7dbea; padding: 3px 3px 3px 3px; border-radius: 5px;" align="center" | [[{{{link}}}|Knight's Battle Stand]]
| style="background: #c7dbea; padding: 3px 3px 3px 3px; border-radius: 5px;" |
| style="background: #c7dbea; padding: 3px 3px 3px 3px; border-radius: 5px;" align = "center" valign = "middle" | Stand
| style="background: #c7dbea; padding: 3px 3px 3px 3px; border-radius: 5px;" align = "center" valign = "middle" | Homecoming
| style="background: #c7dbea; padding: 3px 3px 3px 3px; border-radius: 5px;" valign = "top" | Interactive: ???
|- valign="middle" | style="background: #c7dbea; padding: 3px 3px 3px 3px; border-radius: 5px;" align="center" | [[{{{link}}}|Champion's Battle Stand]]
| style="background: #c7dbea; padding: 3px 3px 3px 3px; border-radius: 5px;" |
| style="background: #c7dbea; padding: 3px 3px 3px 3px; border-radius: 5px;" align = "center" valign = "middle" | Stand
| style="background: #c7dbea; padding: 3px 3px 3px 3px; border-radius: 5px;" align = "center" valign = "middle" | Homecoming
| style="background: #c7dbea; padding: 3px 3px 3px 3px; border-radius: 5px;" valign = "top" | Interactive: ???
|- valign="middle" | style="background: #c7dbea; padding: 3px 3px 3px 3px; border-radius: 5px;" align="center" | [[{{{link}}}|Vanguard's Battle Stand]]
| style="background: #c7dbea; padding: 3px 3px 3px 3px; border-radius: 5px;" |
| style="background: #c7dbea; padding: 3px 3px 3px 3px; border-radius: 5px;" align = "center" valign = "middle" | Stand
| style="background: #c7dbea; padding: 3px 3px 3px 3px; border-radius: 5px;" align = "center" valign = "middle" | Homecoming
| style="background: #c7dbea; padding: 3px 3px 3px 3px; border-radius: 5px;" valign = "top" | Interactive: ???
|- valign="middle" | style="background: #c7dbea; padding: 3px 3px 3px 3px; border-radius: 5px;" align="center" | [[{{{link}}}|Frumious Fang]]
| style="background: #c7dbea; padding: 3px 3px 3px 3px; border-radius: 5px;" |
| style="background: #c7dbea; padding: 3px 3px 3px 3px; border-radius: 5px;" align = "center" valign = "middle" | Stand
| style="background: #c7dbea; padding: 3px 3px 3px 3px; border-radius: 5px;" align = "center" valign = "middle" | Boss Trophy (Armero)
| style="background: #c7dbea; padding: 3px 3px 3px 3px; border-radius: 5px;" valign = "top" | Interactive: ???
|- valign="middle" | style="background: #c7dbea; padding: 3px 3px 3px 3px; border-radius: 5px;" align="center" | [[{{{link}}}|Replica Natural Snarbolax]]
| style="background: #c7dbea; padding: 3px 3px 3px 3px; border-radius: 5px;" |
| style="background: #c7dbea; padding: 3px 3px 3px 3px; border-radius: 5px;" align = "center" valign = "middle" | Stand
| style="background: #c7dbea; padding: 3px 3px 3px 3px; border-radius: 5px;" align = "center" valign = "middle" | Boss Trophy (Armero)
| style="background: #c7dbea; padding: 3px 3px 3px 3px; border-radius: 5px;" valign = "top" | Interactive: ???
|- valign="middle" | style="background: #c7dbea; padding: 3px 3px 3px 3px; border-radius: 5px;" align="center" | [[{{{link}}}|Replica Shadowy Snarbolax]]
| style="background: #c7dbea; padding: 3px 3px 3px 3px; border-radius: 5px;" |
| style="background: #c7dbea; padding: 3px 3px 3px 3px; border-radius: 5px;" align = "center" valign = "middle" | Stand
| style="background: #c7dbea; padding: 3px 3px 3px 3px; border-radius: 5px;" align = "center" valign = "middle" | Boss Trophy (Armero)
| style="background: #c7dbea; padding: 3px 3px 3px 3px; border-radius: 5px;" valign = "top" | Interactive: ???
|- valign="middle" | style="background: #c7dbea; padding: 3px 3px 3px 3px; border-radius: 5px;" align="center" | [[{{{link}}}|Jelly Gem]]
| style="background: #c7dbea; padding: 3px 3px 3px 3px; border-radius: 5px;" |
| style="background: #c7dbea; padding: 3px 3px 3px 3px; border-radius: 5px;" align = "center" valign = "middle" | Stand
| style="background: #c7dbea; padding: 3px 3px 3px 3px; border-radius: 5px;" align = "center" valign = "middle" | Boss Trophy (Armero)
| style="background: #c7dbea; padding: 3px 3px 3px 3px; border-radius: 5px;" valign = "top" | Interactive: ???
|- valign="middle" | style="background: #c7dbea; padding: 3px 3px 3px 3px; border-radius: 5px;" align="center" | [[{{{link}}}|Royal Jelly Crown]]
| style="background: #c7dbea; padding: 3px 3px 3px 3px; border-radius: 5px;" |
| style="background: #c7dbea; padding: 3px 3px 3px 3px; border-radius: 5px;" align = "center" valign = "middle" | Stand
| style="background: #c7dbea; padding: 3px 3px 3px 3px; border-radius: 5px;" align = "center" valign = "middle" | Boss Trophy (Armero)
| style="background: #c7dbea; padding: 3px 3px 3px 3px; border-radius: 5px;" valign = "top" | Interactive: ???
|- valign="middle" | style="background: #c7dbea; padding: 3px 3px 3px 3px; border-radius: 5px;" align="center" | [[{{{link}}}|Replica Royal Jelly]]
| style="background: #c7dbea; padding: 3px 3px 3px 3px; border-radius: 5px;" |
| style="background: #c7dbea; padding: 3px 3px 3px 3px; border-radius: 5px;" align = "center" valign = "middle" | Stand
| style="background: #c7dbea; padding: 3px 3px 3px 3px; border-radius: 5px;" align = "center" valign = "middle" | Boss Trophy (Armero)
| style="background: #c7dbea; padding: 3px 3px 3px 3px; border-radius: 5px;" valign = "top" | Interactive: ???
|- valign="middle" | style="background: #c7dbea; padding: 3px 3px 3px 3px; border-radius: 5px;" align="center" | [[{{{link}}}|Roarmulus Blueprints]]
| style="background: #c7dbea; padding: 3px 3px 3px 3px; border-radius: 5px;" |
| style="background: #c7dbea; padding: 3px 3px 3px 3px; border-radius: 5px;" align = "center" valign = "middle" | Stand
| style="background: #c7dbea; padding: 3px 3px 3px 3px; border-radius: 5px;" align = "center" valign = "middle" | Boss Trophy (Armero)
| style="background: #c7dbea; padding: 3px 3px 3px 3px; border-radius: 5px;" valign = "top" | Interactive: ???
|- valign="middle" | style="background: #c7dbea; padding: 3px 3px 3px 3px; border-radius: 5px;" align="center" | [[{{{link}}}|Small Replica Roarmulus Twin]]
| style="background: #c7dbea; padding: 3px 3px 3px 3px; border-radius: 5px;" |
| style="background: #c7dbea; padding: 3px 3px 3px 3px; border-radius: 5px;" align = "center" valign = "middle" | Stand
| style="background: #c7dbea; padding: 3px 3px 3px 3px; border-radius: 5px;" align = "center" valign = "middle" | Boss Trophy (Armero)
| style="background: #c7dbea; padding: 3px 3px 3px 3px; border-radius: 5px;" valign = "top" | Interactive: ???
|- valign="middle" | style="background: #c7dbea; padding: 3px 3px 3px 3px; border-radius: 5px;" align="center" | [[{{{link}}}|Large Replica Roarmulus Twin]]
| style="background: #c7dbea; padding: 3px 3px 3px 3px; border-radius: 5px;" |
| style="background: #c7dbea; padding: 3px 3px 3px 3px; border-radius: 5px;" align = "center" valign = "middle" | Stand
| style="background: #c7dbea; padding: 3px 3px 3px 3px; border-radius: 5px;" align = "center" valign = "middle" | Boss Trophy (Armero)
| style="background: #c7dbea; padding: 3px 3px 3px 3px; border-radius: 5px;" valign = "top" | Interactive: ???
|- valign="middle" | style="background: #c7dbea; padding: 3px 3px 3px 3px; border-radius: 5px;" align="center" | [[{{{link}}}|Almirian Seal]]
| style="background: #c7dbea; padding: 3px 3px 3px 3px; border-radius: 5px;" |
| style="background: #c7dbea; padding: 3px 3px 3px 3px; border-radius: 5px;" align = "center" valign = "middle" | Stand
| style="background: #c7dbea; padding: 3px 3px 3px 3px; border-radius: 5px;" align = "center" valign = "middle" | Boss Trophy (Armero)
| style="background: #c7dbea; padding: 3px 3px 3px 3px; border-radius: 5px;" valign = "top" | Interactive: ???
|- valign="middle" | style="background: #c7dbea; padding: 3px 3px 3px 3px; border-radius: 5px;" align="center" | [[{{{link}}}|Boss Trophy (Armero)]]
| style="background: #c7dbea; padding: 3px 3px 3px 3px; border-radius: 5px;" |
| style="background: #c7dbea; padding: 3px 3px 3px 3px; border-radius: 5px;" align = "center" valign = "middle" | Stand
| style="background: #c7dbea; padding: 3px 3px 3px 3px; border-radius: 5px;" align = "center" valign = "middle" | Boss Trophy (Armero)
| style="background: #c7dbea; padding: 3px 3px 3px 3px; border-radius: 5px;" valign = "top" | Interactive: ???
|- valign="middle" | style="background: #c7dbea; padding: 3px 3px 3px 3px; border-radius: 5px;" align="center" | [[{{{link}}}|Lord Vanaduke's Finery]]
| style="background: #c7dbea; padding: 3px 3px 3px 3px; border-radius: 5px;" |
| style="background: #c7dbea; padding: 3px 3px 3px 3px; border-radius: 5px;" align = "center" valign = "middle" | Stand
| style="background: #c7dbea; padding: 3px 3px 3px 3px; border-radius: 5px;" align = "center" valign = "middle" | Boss Trophy (Armero)
| style="background: #c7dbea; padding: 3px 3px 3px 3px; border-radius: 5px;" valign = "top" | Interactive: ???
|- valign="middle" | style="background: #c7dbea; padding: 3px 3px 3px 3px; border-radius: 5px;" align="center" | [[{{{link}}}|Candles (Winterfest)]]
| style="background: #c7dbea; padding: 3px 3px 3px 3px; border-radius: 5px;" |
| style="background: #c7dbea; padding: 3px 3px 3px 3px; border-radius: 5px;" align = "center" valign = "middle" | Light
| style="background: #c7dbea; padding: 3px 3px 3px 3px; border-radius: 5px;" align = "center" valign = "middle" | Winterfest
| style="background: #c7dbea; padding: 3px 3px 3px 3px; border-radius: 5px;" valign = "top" | Interactive: ???
|- valign="middle" | style="background: #c7dbea; padding: 3px 3px 3px 3px; border-radius: 5px;" align="center" | [[{{{link}}}|Holiday Presents]]
| style="background: #c7dbea; padding: 3px 3px 3px 3px; border-radius: 5px;" |
| style="background: #c7dbea; padding: 3px 3px 3px 3px; border-radius: 5px;" align = "center" valign = "middle" | Doodad
| style="background: #c7dbea; padding: 3px 3px 3px 3px; border-radius: 5px;" align = "center" valign = "middle" | Winterfest
| style="background: #c7dbea; padding: 3px 3px 3px 3px; border-radius: 5px;" valign = "top" | Interactive: ???
|- valign="middle" | style="background: #c7dbea; padding: 3px 3px 3px 3px; border-radius: 5px;" align="center" | [[{{{link}}}|Snow Block]]
| style="background: #c7dbea; padding: 3px 3px 3px 3px; border-radius: 5px;" |
| style="background: #c7dbea; padding: 3px 3px 3px 3px; border-radius: 5px;" align = "center" valign = "middle" | Doodad
| style="background: #c7dbea; padding: 3px 3px 3px 3px; border-radius: 5px;" align = "center" valign = "middle" | Winterfest
| style="background: #c7dbea; padding: 3px 3px 3px 3px; border-radius: 5px;" valign = "top" | Interactive: ???
|- valign="middle" | style="background: #c7dbea; padding: 3px 3px 3px 3px; border-radius: 5px;" align="center" | [[{{{link}}}|Winterfest Tree]]
| style="background: #c7dbea; padding: 3px 3px 3px 3px; border-radius: 5px;" |
| style="background: #c7dbea; padding: 3px 3px 3px 3px; border-radius: 5px;" align = "center" valign = "middle" | Plant
| style="background: #c7dbea; padding: 3px 3px 3px 3px; border-radius: 5px;" align = "center" valign = "middle" | Winterfest
| style="background: #c7dbea; padding: 3px 3px 3px 3px; border-radius: 5px;" valign = "top" | Interactive: ???
|- valign="middle" | style="background: #c7dbea; padding: 3px 3px 3px 3px; border-radius: 5px;" align="center" | [[{{{link}}}|Ancient Bookcase]]
| style="background: #c7dbea; padding: 3px 3px 3px 3px; border-radius: 5px;" |
| style="background: #c7dbea; padding: 3px 3px 3px 3px; border-radius: 5px;" align = "center" valign = "middle" | Wall
| style="background: #c7dbea; padding: 3px 3px 3px 3px; border-radius: 5px;" align = "center" valign = "middle" | Moorcroft
| style="background: #c7dbea; padding: 3px 3px 3px 3px; border-radius: 5px;" valign = "top" | Interactive: ???
|- valign="middle" | style="background: #c7dbea; padding: 3px 3px 3px 3px; border-radius: 5px;" align="center" | [[{{{link}}}|Ancient Tome Stand]]
| style="background: #c7dbea; padding: 3px 3px 3px 3px; border-radius: 5px;" |
| style="background: #c7dbea; padding: 3px 3px 3px 3px; border-radius: 5px;" align = "center" valign = "middle" | Stand
| style="background: #c7dbea; padding: 3px 3px 3px 3px; border-radius: 5px;" align = "center" valign = "middle" | Moorcroft
| style="background: #c7dbea; padding: 3px 3px 3px 3px; border-radius: 5px;" valign = "top" | Interactive: ???
|- valign="middle" | style="background: #c7dbea; padding: 3px 3px 3px 3px; border-radius: 5px;" align="center" | [[{{{link}}}|Antique Bench]]
| style="background: #c7dbea; padding: 3px 3px 3px 3px; border-radius: 5px;" |
| style="background: #c7dbea; padding: 3px 3px 3px 3px; border-radius: 5px;" align = "center" valign = "middle" | Seat
| style="background: #c7dbea; padding: 3px 3px 3px 3px; border-radius: 5px;" align = "center" valign = "middle" | Moorcroft
| style="background: #c7dbea; padding: 3px 3px 3px 3px; border-radius: 5px;" valign = "top" | Interactive: ???
|- valign="middle" | style="background: #c7dbea; padding: 3px 3px 3px 3px; border-radius: 5px;" align="center" | [[{{{link}}}|Antique Chair]]
| style="background: #c7dbea; padding: 3px 3px 3px 3px; border-radius: 5px;" |
| style="background: #c7dbea; padding: 3px 3px 3px 3px; border-radius: 5px;" align = "center" valign = "middle" | Seat
| style="background: #c7dbea; padding: 3px 3px 3px 3px; border-radius: 5px;" align = "center" valign = "middle" | Moorcroft
| style="background: #c7dbea; padding: 3px 3px 3px 3px; border-radius: 5px;" valign = "top" | Interactive: ???
|- valign="middle" | style="background: #c7dbea; padding: 3px 3px 3px 3px; border-radius: 5px;" align="center" | [[{{{link}}}|Antique Luggage]]
| style="background: #c7dbea; padding: 3px 3px 3px 3px; border-radius: 5px;" |
| style="background: #c7dbea; padding: 3px 3px 3px 3px; border-radius: 5px;" align = "center" valign = "middle" | Doodad
| style="background: #c7dbea; padding: 3px 3px 3px 3px; border-radius: 5px;" align = "center" valign = "middle" | Moorcroft
| style="background: #c7dbea; padding: 3px 3px 3px 3px; border-radius: 5px;" valign = "top" | Interactive: ???
|- valign="middle" | style="background: #c7dbea; padding: 3px 3px 3px 3px; border-radius: 5px;" align="center" | [[{{{link}}}|Antique Suitcases]]
| style="background: #c7dbea; padding: 3px 3px 3px 3px; border-radius: 5px;" |
| style="background: #c7dbea; padding: 3px 3px 3px 3px; border-radius: 5px;" align = "center" valign = "middle" | Doodad
| style="background: #c7dbea; padding: 3px 3px 3px 3px; border-radius: 5px;" align = "center" valign = "middle" | Moorcroft
| style="background: #c7dbea; padding: 3px 3px 3px 3px; border-radius: 5px;" valign = "top" | Interactive: ???
|- valign="middle" | style="background: #c7dbea; padding: 3px 3px 3px 3px; border-radius: 5px;" align="center" | [[{{{link}}}|Antique Table]]
| style="background: #c7dbea; padding: 3px 3px 3px 3px; border-radius: 5px;" |
| style="background: #c7dbea; padding: 3px 3px 3px 3px; border-radius: 5px;" align = "center" valign = "middle" | Doodad
| style="background: #c7dbea; padding: 3px 3px 3px 3px; border-radius: 5px;" align = "center" valign = "middle" | Moorcroft
| style="background: #c7dbea; padding: 3px 3px 3px 3px; border-radius: 5px;" valign = "top" | Interactive: ???
|- valign="middle" | style="background: #c7dbea; padding: 3px 3px 3px 3px; border-radius: 5px;" align="center" | [[{{{link}}}|Bone Stack]]
| style="background: #c7dbea; padding: 3px 3px 3px 3px; border-radius: 5px;" |
| style="background: #c7dbea; padding: 3px 3px 3px 3px; border-radius: 5px;" align = "center" valign = "middle" | Doodad
| style="background: #c7dbea; padding: 3px 3px 3px 3px; border-radius: 5px;" align = "center" valign = "middle" | Moorcroft
| style="background: #c7dbea; padding: 3px 3px 3px 3px; border-radius: 5px;" valign = "top" | Interactive: ???
|- valign="middle" | style="background: #c7dbea; padding: 3px 3px 3px 3px; border-radius: 5px;" align="center" | [[{{{link}}}|Curious Mewkat]]
| style="background: #c7dbea; padding: 3px 3px 3px 3px; border-radius: 5px;" |
| style="background: #c7dbea; padding: 3px 3px 3px 3px; border-radius: 5px;" align = "center" valign = "middle" | Creature
| style="background: #c7dbea; padding: 3px 3px 3px 3px; border-radius: 5px;" align = "center" valign = "middle" | Moorcroft
| style="background: #c7dbea; padding: 3px 3px 3px 3px; border-radius: 5px;" valign = "top" | Interactive: ???
|- valign="middle" | style="background: #c7dbea; padding: 3px 3px 3px 3px; border-radius: 5px;" align="center" | [[{{{link}}}|Cursed Tome Stand]]
| style="background: #c7dbea; padding: 3px 3px 3px 3px; border-radius: 5px;" |
| style="background: #c7dbea; padding: 3px 3px 3px 3px; border-radius: 5px;" align = "center" valign = "middle" | Stand
| style="background: #c7dbea; padding: 3px 3px 3px 3px; border-radius: 5px;" align = "center" valign = "middle" | Moorcroft
| style="background: #c7dbea; padding: 3px 3px 3px 3px; border-radius: 5px;" valign = "top" | Interactive: ???
|- valign="middle" | style="background: #c7dbea; padding: 3px 3px 3px 3px; border-radius: 5px;" align="center" | [[{{{link}}}|Mystical Tome Stand]]
| style="background: #c7dbea; padding: 3px 3px 3px 3px; border-radius: 5px;" |
| style="background: #c7dbea; padding: 3px 3px 3px 3px; border-radius: 5px;" align = "center" valign = "middle" | Stand
| style="background: #c7dbea; padding: 3px 3px 3px 3px; border-radius: 5px;" align = "center" valign = "middle" | Moorcroft
| style="background: #c7dbea; padding: 3px 3px 3px 3px; border-radius: 5px;" valign = "top" | Interactive: ???
|- valign="middle" | style="background: #c7dbea; padding: 3px 3px 3px 3px; border-radius: 5px;" align="center" | [[{{{link}}}|Gaslamp (Short)]]
| style="background: #c7dbea; padding: 3px 3px 3px 3px; border-radius: 5px;" |
| style="background: #c7dbea; padding: 3px 3px 3px 3px; border-radius: 5px;" align = "center" valign = "middle" | Light
| style="background: #c7dbea; padding: 3px 3px 3px 3px; border-radius: 5px;" align = "center" valign = "middle" | Moorcroft
| style="background: #c7dbea; padding: 3px 3px 3px 3px; border-radius: 5px;" valign = "top" | Interactive: ???
|- valign="middle" | style="background: #c7dbea; padding: 3px 3px 3px 3px; border-radius: 5px;" align="center" | [[{{{link}}}|Gaslamp (Tall)]]
| style="background: #c7dbea; padding: 3px 3px 3px 3px; border-radius: 5px;" |
| style="background: #c7dbea; padding: 3px 3px 3px 3px; border-radius: 5px;" align = "center" valign = "middle" | Light
| style="background: #c7dbea; padding: 3px 3px 3px 3px; border-radius: 5px;" align = "center" valign = "middle" | Moorcroft
| style="background: #c7dbea; padding: 3px 3px 3px 3px; border-radius: 5px;" valign = "top" | Interactive: ???
|- valign="middle" | style="background: #c7dbea; padding: 3px 3px 3px 3px; border-radius: 5px;" align="center" | [[{{{link}}}|Skull Pile]]
| style="background: #c7dbea; padding: 3px 3px 3px 3px; border-radius: 5px;" |
| style="background: #c7dbea; padding: 3px 3px 3px 3px; border-radius: 5px;" align = "center" valign = "middle" | Doodad
| style="background: #c7dbea; padding: 3px 3px 3px 3px; border-radius: 5px;" align = "center" valign = "middle" | Moorcroft
| style="background: #c7dbea; padding: 3px 3px 3px 3px; border-radius: 5px;" valign = "top" | Interactive: ???
|- valign="middle" | style="background: #c7dbea; padding: 3px 3px 3px 3px; border-radius: 5px;" align="center" | [[{{{link}}}|Tome Stack]]
| style="background: #c7dbea; padding: 3px 3px 3px 3px; border-radius: 5px;" |
| style="background: #c7dbea; padding: 3px 3px 3px 3px; border-radius: 5px;" align = "center" valign = "middle" | Doodad
| style="background: #c7dbea; padding: 3px 3px 3px 3px; border-radius: 5px;" align = "center" valign = "middle" | Moorcroft
| style="background: #c7dbea; padding: 3px 3px 3px 3px; border-radius: 5px;" valign = "top" | Interactive: ???
|- valign="middle" | style="background: #c7dbea; padding: 3px 3px 3px 3px; border-radius: 5px;" align="center" | [[{{{link}}}|Zombie Bellhop]]
| style="background: #c7dbea; padding: 3px 3px 3px 3px; border-radius: 5px;" |
| style="background: #c7dbea; padding: 3px 3px 3px 3px; border-radius: 5px;" align = "center" valign = "middle" | Creature
| style="background: #c7dbea; padding: 3px 3px 3px 3px; border-radius: 5px;" align = "center" valign = "middle" | Moorcroft
| style="background: #c7dbea; padding: 3px 3px 3px 3px; border-radius: 5px;" valign = "top" | Interactive: ???
|- valign="middle" | style="background: #c7dbea; padding: 3px 3px 3px 3px; border-radius: 5px;" align="center" | [[{{{link}}}|Lazy Gobblesnipe]]
| style="background: #c7dbea; padding: 3px 3px 3px 3px; border-radius: 5px;" |
| style="background: #c7dbea; padding: 3px 3px 3px 3px; border-radius: 5px;" align = "center" valign = "middle" | Creature
| style="background: #c7dbea; padding: 3px 3px 3px 3px; border-radius: 5px;" align = "center" valign = "middle" | Snipe (Gobblesnipe)
| style="background: #c7dbea; padding: 3px 3px 3px 3px; border-radius: 5px;" valign = "top" | Interactive: ???
|- valign="middle" | style="background: #c7dbea; padding: 3px 3px 3px 3px; border-radius: 5px;" align="center" | [[{{{link}}}|Plump Gobblesnipe]]
| style="background: #c7dbea; padding: 3px 3px 3px 3px; border-radius: 5px;" |
| style="background: #c7dbea; padding: 3px 3px 3px 3px; border-radius: 5px;" align = "center" valign = "middle" | Creature
| style="background: #c7dbea; padding: 3px 3px 3px 3px; border-radius: 5px;" align = "center" valign = "middle" | Snipe (Gobblesnipe)
| style="background: #c7dbea; padding: 3px 3px 3px 3px; border-radius: 5px;" valign = "top" | Interactive: ???
|- valign="middle" | style="background: #c7dbea; padding: 3px 3px 3px 3px; border-radius: 5px;" align="center" | [[{{{link}}}|Wandering Gobblesnipe]]
| style="background: #c7dbea; padding: 3px 3px 3px 3px; border-radius: 5px;" |
| style="background: #c7dbea; padding: 3px 3px 3px 3px; border-radius: 5px;" align = "center" valign = "middle" | Creature
| style="background: #c7dbea; padding: 3px 3px 3px 3px; border-radius: 5px;" align = "center" valign = "middle" | Snipe (Gobblesnipe)
| style="background: #c7dbea; padding: 3px 3px 3px 3px; border-radius: 5px;" valign = "top" | Interactive: ???
|- valign="middle" | style="background: #c7dbea; padding: 3px 3px 3px 3px; border-radius: 5px;" align="center" | [[{{{link}}}|Winterfest Table]]
| style="background: #c7dbea; padding: 3px 3px 3px 3px; border-radius: 5px;" |
| style="background: #c7dbea; padding: 3px 3px 3px 3px; border-radius: 5px;" align = "center" valign = "middle" | Doodad
| style="background: #c7dbea; padding: 3px 3px 3px 3px; border-radius: 5px;" align = "center" valign = "middle" | Winterfest
| style="background: #c7dbea; padding: 3px 3px 3px 3px; border-radius: 5px;" valign = "top" | Interactive: ???
|- valign="middle" | style="background: #c7dbea; padding: 3px 3px 3px 3px; border-radius: 5px;" align="center" | [[{{{link}}}|Obsidian Obelisk]]
| style="background: #c7dbea; padding: 3px 3px 3px 3px; border-radius: 5px;" |
| style="background: #c7dbea; padding: 3px 3px 3px 3px; border-radius: 5px;" align = "center" valign = "middle" | Doodad
| style="background: #c7dbea; padding: 3px 3px 3px 3px; border-radius: 5px;" align = "center" valign = "middle" | Apocrean
| style="background: #c7dbea; padding: 3px 3px 3px 3px; border-radius: 5px;" valign = "top" | Interactive: ???
|- valign="middle" | style="background: #c7dbea; padding: 3px 3px 3px 3px; border-radius: 5px;" align="center" | [[{{{link}}}|Chair (Almire)]]
| style="background: #c7dbea; padding: 3px 3px 3px 3px; border-radius: 5px;" |
| style="background: #c7dbea; padding: 3px 3px 3px 3px; border-radius: 5px;" align = "center" valign = "middle" | Seat
| style="background: #c7dbea; padding: 3px 3px 3px 3px; border-radius: 5px;" align = "center" valign = "middle" | Almirian
| style="background: #c7dbea; padding: 3px 3px 3px 3px; border-radius: 5px;" valign = "top" | Interactive: ???
|- valign="middle" | style="background: #c7dbea; padding: 3px 3px 3px 3px; border-radius: 5px;" align="center" | [[{{{link}}}|Bench (Almire)]]
| style="background: #c7dbea; padding: 3px 3px 3px 3px; border-radius: 5px;" |
| style="background: #c7dbea; padding: 3px 3px 3px 3px; border-radius: 5px;" align = "center" valign = "middle" | Seat
| style="background: #c7dbea; padding: 3px 3px 3px 3px; border-radius: 5px;" align = "center" valign = "middle" | Almirian
| style="background: #c7dbea; padding: 3px 3px 3px 3px; border-radius: 5px;" valign = "top" | Interactive: ???
|- valign="middle" | style="background: #c7dbea; padding: 3px 3px 3px 3px; border-radius: 5px;" align="center" | [[{{{link}}}|Cursed Nature Sprite]]
| style="background: #c7dbea; padding: 3px 3px 3px 3px; border-radius: 5px;" || style="background: #c7dbea; padding: 3px 3px 3px 3px; border-radius: 5px;" align = "center" valign = "middle" | Creature
| style="background: #c7dbea; padding: 3px 3px 3px 3px; border-radius: 5px;" align = "center" valign = "middle" | Almirian
| style="background: #c7dbea; padding: 3px 3px 3px 3px; border-radius: 5px;" valign = "top" | Interactive: ???
|- valign="middle" | style="background: #c7dbea; padding: 3px 3px 3px 3px; border-radius: 5px;" align="center" | [[{{{link}}}|Nature Sprite]]
| style="background: #c7dbea; padding: 3px 3px 3px 3px; border-radius: 5px;" || style="background: #c7dbea; padding: 3px 3px 3px 3px; border-radius: 5px;" align = "center" valign = "middle" | Creature
| style="background: #c7dbea; padding: 3px 3px 3px 3px; border-radius: 5px;" align = "center" valign = "middle" | Almirian
| style="background: #c7dbea; padding: 3px 3px 3px 3px; border-radius: 5px;" valign = "top" | Interactive: ???
|- valign="middle" | style="background: #c7dbea; padding: 3px 3px 3px 3px; border-radius: 5px;" align="center" | [[{{{link}}}|Rug (Almire)]]
| style="background: #c7dbea; padding: 3px 3px 3px 3px; border-radius: 5px;" |
| style="background: #c7dbea; padding: 3px 3px 3px 3px; border-radius: 5px;" align = "center" valign = "middle" | Mat
| style="background: #c7dbea; padding: 3px 3px 3px 3px; border-radius: 5px;" align = "center" valign = "middle" | Almirian
| style="background: #c7dbea; padding: 3px 3px 3px 3px; border-radius: 5px;" valign = "top" | Interactive: ???
|- valign="middle" | style="background: #c7dbea; padding: 3px 3px 3px 3px; border-radius: 5px;" align="center" | [[{{{link}}}|Table (Almire)]]
| style="background: #c7dbea; padding: 3px 3px 3px 3px; border-radius: 5px;" |
| style="background: #c7dbea; padding: 3px 3px 3px 3px; border-radius: 5px;" align = "center" valign = "middle" | Doodad
| style="background: #c7dbea; padding: 3px 3px 3px 3px; border-radius: 5px;" align = "center" valign = "middle" | Almirian
| style="background: #c7dbea; padding: 3px 3px 3px 3px; border-radius: 5px;" valign = "top" | Interactive: ???
|- valign="middle" | style="background: #c7dbea; padding: 3px 3px 3px 3px; border-radius: 5px;" align="center" | [[{{{link}}}|Tapestry (Almire)]]
| style="background: #c7dbea; padding: 3px 3px 3px 3px; border-radius: 5px;" |
| style="background: #c7dbea; padding: 3px 3px 3px 3px; border-radius: 5px;" align = "center" valign = "middle" | Doodad
| style="background: #c7dbea; padding: 3px 3px 3px 3px; border-radius: 5px;" align = "center" valign = "middle" | Almirian
| style="background: #c7dbea; padding: 3px 3px 3px 3px; border-radius: 5px;" valign = "top" | Interactive: ???
|}
Obtaining Furniture
| |
The topic of this article or section is subject to personal opinion, and does not represent any one absolute truth. |
| If you disagree, discuss your concerns on the the talk page before editing. |
General Furniture
To date, furniture items are released in distinct groups, such as "Moorcroft" or "Winterfest." While these groups are not named as such in-game, the items in a "group" are clear - either because of an obvious theme or method of acquisition. More items can be added to a group over time. For example, the Zombie Bellhop was added to the Moorcroft Prize Box during the second Kataclysmic Confrontation.
The only exceptions to this "released in distinct groups" rule so far are snipes - different types come from a large number of unrelated sources.
Most Furniture items come from various Prize Boxes - these boxes give random prizes, so what you want might not be what you get. The box the furniture items come from might change over time, as seen with the Winterfest items. (Initially, these came from a Winterfest Prize Box, then they were available in the Decoration Kit Prize Box). Many furniture items are available from the Guild Hall's Birdsong Emporium - sometimes furniture is added to this catalog without public announcement (Copper Yellow items were as such) so check it once in a while! Other than these two sources, players might be told to pay attention to a Supply Depot Sale via a forum announcement like this one - several of the Moorcroft furniture items have been temporarily available in the Supply Depot. Certain furniture items can even be crafted by players!
So, furniture comes from many places. It would be prudent to "wait and see" - perhaps money could be saved! But then again, you might "miss out." The important thing to remember about furniture is that these items are designed to be for a group of people, not an individual - since the only place they can currently be used is in a Guild Hall! And Guilds are groups of people. Well...not all the time. Certainly, an individual can go about as the sole member of their own guild decorating their space, but in general - work together! Plan ahead! Be frugal! An item might cost a lot of energy from the depot, but if multiple players pool funding together to obtain the item, then it isn't so bad! Perhaps the high prices of some items in the Depot are high in order to encourage teamwork. ;)
Remember, always be very careful when pooling resources. Not every player can be trusted - sad stuff, so be wary!
Decorating your Guild Hall can be very expensive - or rather cheap if players work together and plan ahead economically to obtain desired items. This is especially important for the "Boss Trophy" Type of furniture!
Boss Trophies
A "Boss Trophy" is unlike other Furniture items - these are crafted at a special machine in the Hunter's Lodge, called the "Armero Alchemy Machine" by the community in general. These trophy items come at great cost, but decent planning and teamwork can make obtaining these items a great goal, instead of a tedious toil. Below are some tables outlining the raw material and crown costs of these furniture items. The actual cost of these might be very different for different guilds - would the participants rather buy materials from the Auction House, or "farm" for them in the clockworks?
Time and money... Which would you rather spend in large amounts? Decide together what is best for your group! Perhaps doing Shadow Lairs would be an alternative plan, since defeating bosses in a Shadow Lair gives more boss tokens. However, this leads to other expenses, such as the energy cost of the Shadow Keys, potentially more Sparks of Life used during the run, time planning, and so on.
| ||||||||||||||||||||||||||||||||||||||||||
|
| ||||||||||||||||||||||||||||||||||||||||||||||||||||||||||||||||||
|
| ||||||
|
Notes:
- Level 3 Creation:
- Obtain materials and crowns.
- Place materials and crowns in Guild Treasury.
- At Machine: Craft SIXTEEN Level 1 trophies >>> Craft FOUR Level 2 trophies >>> Craft ONE Level 3 trophy.
- Overall Cost: These tables only factor in raw crafting costs. If your guild wishes to buy materials from other players or the Auction House, then the ACTUAL "total" crown cost will be different (but always greater than or equal to the one listed) for your guild.
- Farming:
- Start with all players in lobby.
- Defeating boss could give 3-4 tokens, randomly. This results in the run range.
- Shadow Lairs are an alternative, but this leads to more expenses and planning.
In conclusion:
- Be frugal.
- Be patient.
- Be wary.
- Plan ahead!
Using Furniture
Design Mode
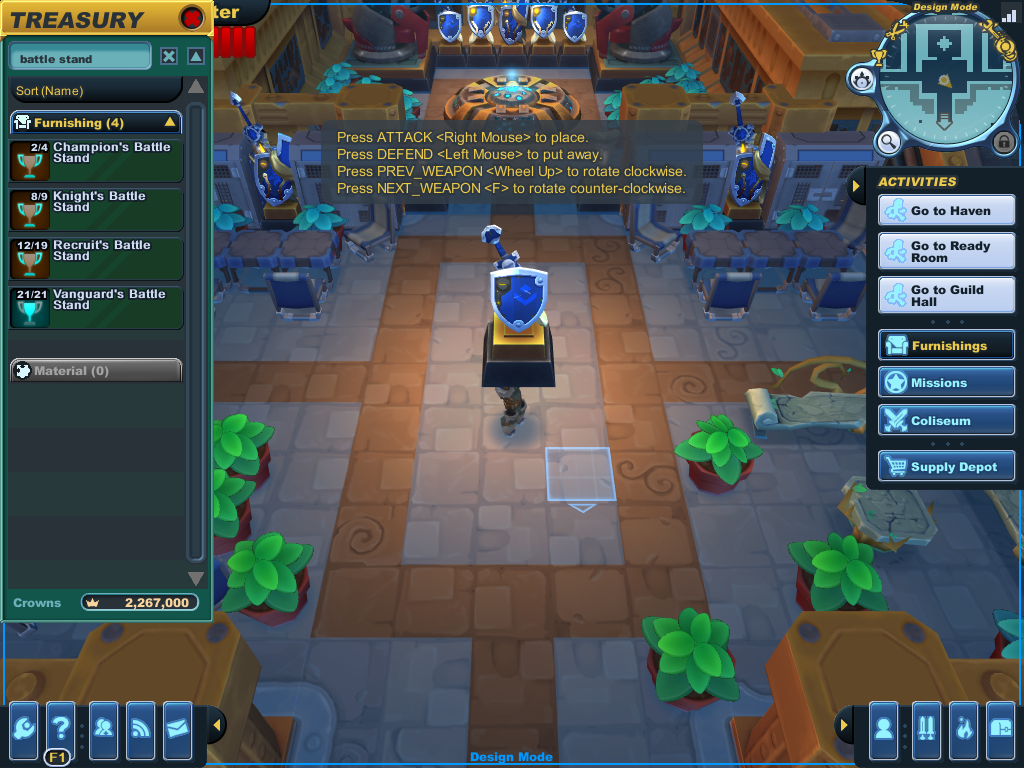
Your Guild's Furniture is stored in the Treasury and accessed while in Design Mode from the "Activities" tab on the right. You can search for specific items in the top left of the list panel.
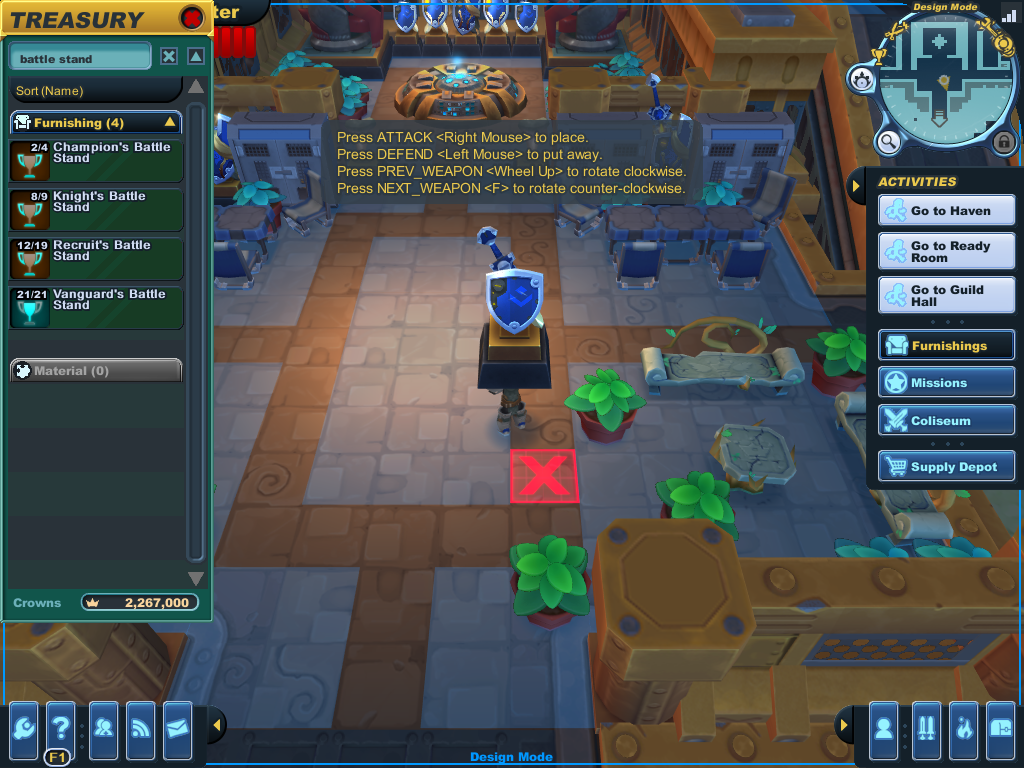
The interface will let you know if you can't put something somewhere.

Furniture is intangible while in Design Mode. Most furniture is solid once the hall is published - something to keep in mind.


Decorating a Guild Hall is fairly simple. Once Furniture has been obtained (methods below), go to the Hall's Command Console and deposit it into the Guild's Treasury - the furniture will go from your Knight's Arsenal into the Treasury. Once in the Treasury, furniture items can be placed around the Hall while in the Hall's Design Mode. Design Mode can only be entered by higher ranking members - interestingly, some ranks can move furniture in Design Mode, but not publish. Furniture items come in a variety of sizes, so some furniture can't be placed in certain areas. Design Mode is entered via the Command Console.
![]() Once placed in the Treasury, an item can NOT be taken back out into your arsenal! It belongs to the Hall!
Once placed in the Treasury, an item can NOT be taken back out into your arsenal! It belongs to the Hall!
The Design Mode will "teach" a player how to rotate, move, and generally "decorate" with furniture via various tips (see far left image in the above gallery). Tiles highlighted in blue can have furniture placed on them. A pink X means that it can't. In general, decorating with furniture is like carrying a statue (or Golden Key, Grim Totem, etc.) in the clockworks. Pick it up, put it down! Unlike these clockworks items, furniture can usually be rotated (not all furniture can be rotated - it will just bounce above the knight's head if it can't). Access what furniture your guild has available from the Activities tab on the right - click on the item in the Treasury list, and it will pop out above your Knight's head if it hasn't been placed.
Once a furniture is placed, you'll have to put it away (and take it out again) or pick it up and move (walk, etc.) with it in order to place it somewhere else.
The Guild Hall "remembers" where things are placed in Design Mode. The Hall itself - outside of Design Mode - will not show changes until it is published. This way, a decoration projects can be returned to in Design Mode over time, without disrupting the flow and function of the Hall. Decorating can take a lot of time sometimes, so this is very convenient. When you're ready, go to the Command Console and publish! Publishing takes you out of Design Mode. Design Mode can be exited without publishing - simply join other players or go to your Guild Hall through the Activities tab, etc.
If published: Your furniture items will now be where you put them while decorating in Design Mode, and you'll be able to sit in them (if they're seats) and so on. Remember - furniture items are intangible in Design Mode. Sometimes you can accidentally block off access to chairs and so on! The available spots to place furniture will prevent you from accidentally blocking off access to the Command Console and rooms, so don't worry too much.
When published, the Hall will send an announcement to all players in the Hall. Everyone will be loaded back at the entrance after a Hall is Published.
Published
Once published, many furniture items can be interacted with! Seats can be sat upon, the Energy Well allows player exchange, and very special furniture might summon strange but mostly harmless things, such as the cursed and mystical tome stands! Other furniture is just for looks. If an item can be interacted with, the game will let you know with a white homing animation - just like you see if you can pick something up, talk to NPCs, and so on. On certain graphics settings, pale smoke-like effects will emanate from the object if it can be interacted with.
You can sort of "interact" with creature type furniture - these entities will register your presence and this will have an effect on their course of travel, should they be "wandering" around your hall. There is no official "interaction" - just this AI behavior.
Notes
In the past, players didn't join each other at the entrance of the Hall. Near the initial release of furniture items (and the expandable Guild Hall), joining a player in a hall would land you right next to that person - sometimes "inside" a furniture piece! Understandably, this was promptly fixed.
Terminology: Types
Bed: any furniture item that a knight can lie down on.
Creature: any entity that comes in a cage. Most "Creature" type furniture can be walked through (intangible) - but a knight will cause a wandering entity to change its travel path.
Doodad: a general term used in many games to describe a miscellaneous, non-interactive, perhaps animated, decorative entity. This term is arbitrarily and unofficially used for understanding of item types on this wiki.
Light: any furniture item whose primary function is to provide illumination. Other glowing or luminous furniture items, such as the Energy Well, don't fall into this category.
Mat: any furniture item that looks like a carpet, rug, or similar item. They do not block or alter knight movement. Currently, these items take up space, and other furniture items cannot be placed on top, though wandering creatures can certainly walk over them.
Plant: any furniture item that is a plant.
Seat: any furniture item that can be sat upon. Currently, all types of seats (benches, chairs) can only be interacted with by one knight at a time.
Special: any furniture item that does not fall into the other types, due to some special property, such as opening an exclusive interface.
Stand: any furniture item that puts something special on display. Typically has a base colored dark yellow and black.
Wall: any furniture item that is tall and wide. Shelves and Wardrobes fall into this category.