Difference between revisions of "Starting out"
From SpiralKnights
Lishanglin (Talk | contribs) m (→The Game Window) |
m (Deleting word "Temp" from used image names, since old images are back. Also, this should be updated a bit.) |
||
| (46 intermediate revisions by 19 users not shown) | |||
| Line 1: | Line 1: | ||
| − | |||
Welcome to Spiral Knights! This is a tutorial for '''starting out''' in the game. | Welcome to Spiral Knights! This is a tutorial for '''starting out''' in the game. | ||
| − | == Creating | + | == Creating a Knight == |
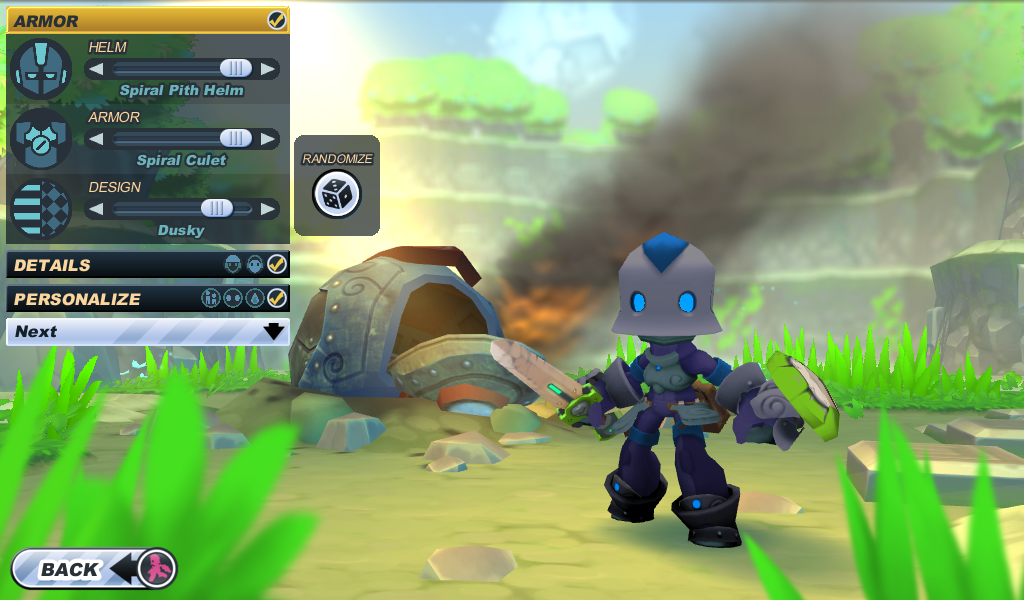
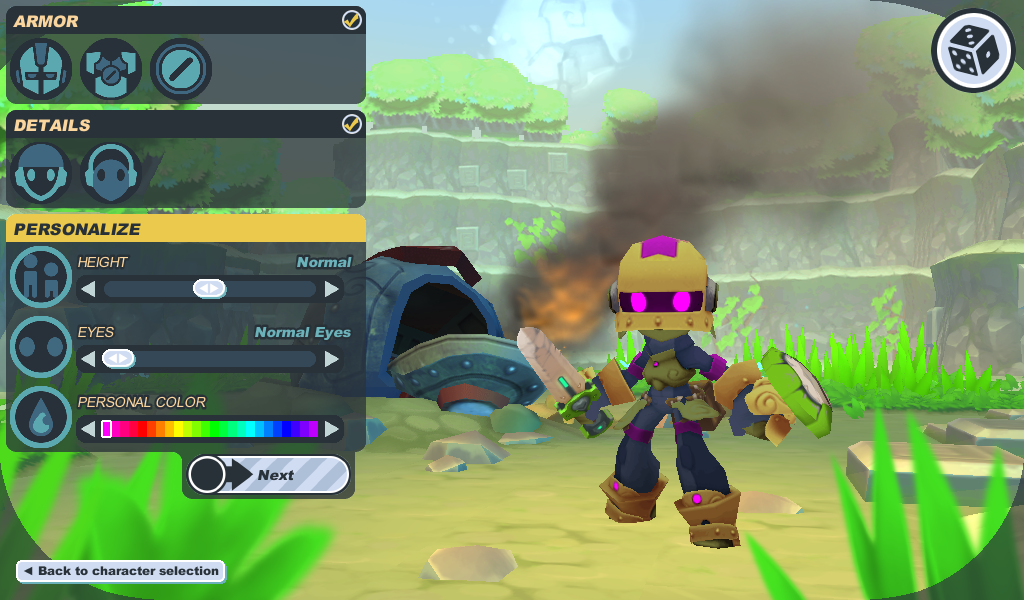
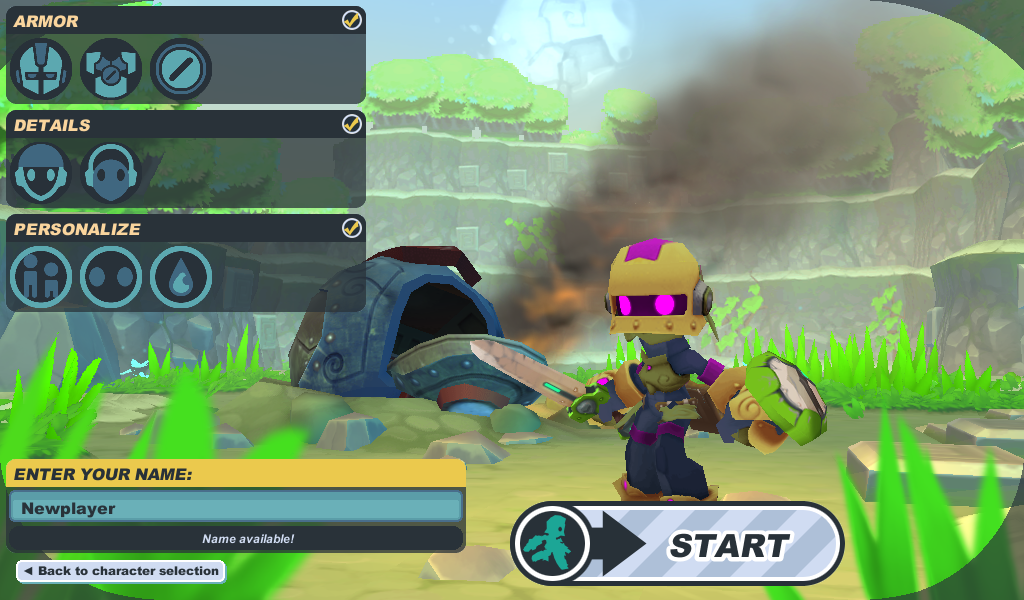
| − | + | After installing Spiral Knights and creating an account, players need to create a knight before they can start playing. In the first step, the knight's beginning helmet and armor is chosen, as well as the design color. The design color will be used as the base color in helmets and armor worn, depending on the design of the gear. Step 2 adds up to two optional accessories to the chosen gear. Step 3 allows to select the knight's height, eye shape, and personal color. The personal color will be the highlight color on helmet and armor, and it will also be the color of the knight's name in game. It will also be the color of the battle sprites eyes that belong to the knight. Once the knight is created and after playing the game, knights are able to buy and craft new gear to wear, but '''the design color cannot be changed'''. [[Height Modifier|Height]], [[eyes|eye shape]], and [[personal color]] modifiers are available in game. | |
| − | After | + | |
| − | + | In the last step of character creation, players must choose a single-word name which follows these guidelines: | |
| − | * Names can only be 18 characters long and can have no more than 2 consecutive letters (e.g. Moo, but not Moooooo). | + | * Names can only be 4 to 18 characters long and can have no more than 2 consecutive letters (e.g. Moo, but not Moooooo). |
| − | * | + | * Players can have up to two dashes in a name, but there needs to be a minimum of two characters between dashes. Each new word is automatically shown with a capital letter. (e.g. Knight-Of-Green) |
| − | * If | + | * If a player cannot think of a name, there are many [http://www.google.com/search?q=fantasy+name+generator random name generators] on the web that can make sequences of random syllables to help them come up with name ideas. |
* Knight names cannot contain any [[List_of_known_filtered_words|filtered words]]. | * Knight names cannot contain any [[List_of_known_filtered_words|filtered words]]. | ||
| − | * | + | * After clicking on the "Confirm" button to create the knight, if the name tried is already in use by another player, the player will receive a message saying "Sorry, that name is already in use." and they will need to try another name. |
| + | {| | ||
| + | |- | ||
| + | ||[[Image:Creation1.png|thumb|none|Step 1: Select a helm, armor and design color for the knight.]] | ||
| + | ||[[Image:Creation2.png|thumb|none|Step 2: Select up to two optional [[accessory|accessories]].]] | ||
| + | ||[[Image:Creation3.png|thumb|none|Step 3: Personalize the knight's height, eye shape, and personal color.]] | ||
| + | ||[[Image:Creation4.png|thumb|none|Step 4: Choose a name for the knight.]] | ||
| + | |} | ||
| + | |||
{{clearleft}} | {{clearleft}} | ||
== The Game Window == | == The Game Window == | ||
| − | The game window consists of a few different parts. Most of the window is taken up by the world view. Here | + | {{main|User interface}} |
| + | The game window consists of a few different parts. Most of the window is taken up by the world view. Here is possible to see the knight walking around (left mouse button, WASD Keys, OR Arrow Keys to move OR personalize movements and actions by hitting ESC and going to controls.) Left mouse button is used to access other information such as knight information, arsenal, mail, etc. | ||
[[Image:Interface.png|center|450px|thumb|Game Interface]] | [[Image:Interface.png|center|450px|thumb|Game Interface]] | ||
| − | The | + | The bottom left corner of the screen includes: |
*[[Image:Icon-settings.png|25px]] The [[main menu]] | *[[Image:Icon-settings.png|25px]] The [[main menu]] | ||
*[[Image:Icon-social.png|25px]] The [[social]] menu | *[[Image:Icon-social.png|25px]] The [[social]] menu | ||
| + | *[[Image:Icon-event hub.png|25px]] The event hub. | ||
*[[Image:Icon-mail.png|25px]] The [[mail|uplink]] menu | *[[Image:Icon-mail.png|25px]] The [[mail|uplink]] menu | ||
*[[Image:Icon-help.png|25px]] Help | *[[Image:Icon-help.png|25px]] Help | ||
| − | The top right corner of the screen is the [[minimap]]. This provides access to | + | The top right corner of the screen is the [[minimap]]. This provides access to the [[character]], [[arsenal]] and [[crowns]]. |
| − | + | ||
| − | + | Once the knight exits the Crash Site, the bottom right corner of the Arsenal will show the [[energy]] the knight owns. | |
| − | The bottom left corner of the screen displays | + | The bottom left corner of the screen displays the [[chat]]. Type ENTER or / to initiate chat. |
| − | While in the Clockworks, | + | While in the Clockworks, click [[Image:Temp Icon-HUD lock.png|20px]] below the mini-map or use the '''Q key''' to lock and unlock the HUD (heads-up display). This will prevent players from accidentally clicking open their character or arsenal while in the heat of battle. |
== Rescue Camp == | == Rescue Camp == | ||
| − | + | {{main|Rescue Camp}} | |
| − | All new knights begin at [[The Crash Site]]. This | + | All new knights begin at [[The Crash Site]]. This area gives them basic instruction in the game [[controls]]. Knights should proceed through this area to find the [[Rescue Camp]], where they will be able to interact with other players, save the rescue camp, and learn more about [[Cradle]]. Once the knight is ready to move on, they can proceed to the final gate and cross the chasm to [[Haven]]. Knights will not be able to return to the Rescue Camp, but there are more adventures and items available in Haven. |
== Haven == | == Haven == | ||
| Line 43: | Line 50: | ||
*The Bazaar has a variety of [[Strangers]] selling [[equipment]], an alchemy machine, a Spiral Quartermaster selling [[recipe]]s for [[crafting]], and a Token Trader taking [[token]]s for [[crafting|materials]]. | *The Bazaar has a variety of [[Strangers]] selling [[equipment]], an alchemy machine, a Spiral Quartermaster selling [[recipe]]s for [[crafting]], and a Token Trader taking [[token]]s for [[crafting|materials]]. | ||
*The Arcade is the location of the [[gate]]s that knights use to enter and explore the Clockworks. | *The Arcade is the location of the [[gate]]s that knights use to enter and explore the Clockworks. | ||
| + | * The Garrison contains an entrance to [[The Lab]], [[Guild Hall]]s and the [[Hall of Heroes]]. | ||
== The Clockworks == | == The Clockworks == | ||
| − | [[Image:Progress-window.png|thumb|The Progress tab of | + | {{main|Clockworks|Party|Exploration|Gate}} |
| − | [[Image:Progress- | + | [[Image:Progress-window.png|thumb|The Progress tab of the Character popup.]] |
| − | + | [[Image:Progress-bar.png|thumb|Progress toward getting access to the next tier.]] | |
| − | The [[Clockworks]] consist of many levels grouped into three tiers that are divided by two [[ | + | The [[Clockworks]] consist of many levels grouped into three tiers that are divided by two [[Subtown]]s, [[Moorcroft Manor]] and [[Emberlight]]. Knights can enter a [[gate]] and [[exploration|explore]] the levels with a [[party]] of 1 to 4 knights. |
| − | + | While exploring the Clockworks, knights will find [[Crowns]], [[Materials]], [[Heat]], [[Minerals]], and other special items like Mecha Knight Kits, and [[Energy Gates]]. | |
| − | + | The entrance to each subtown is guarded by the [[Spiral Warden]]. To proceed to the next tier the player must equip a certain star level of [[equipment]] and speak to [[Barrus]] in the [[Hall of Heroes]]. Players can check their progress toward gaining access to the next tier through the '''P key''' and choosing the progress tab, or by speaking to the Spiral Warden. | |
| − | + | Various Clockworks levels can also - and sometimes ''only'' - be accessed via the [[Missions]] interface, these missions take knights directly to the relevant depth of the Clockworks. The higher the rank of the mission, the deeper it is likely to be located within the clockworks. | |
=== Heat & Leveling Equipment === | === Heat & Leveling Equipment === | ||
| Line 61: | Line 69: | ||
{{main|Heat}} | {{main|Heat}} | ||
| − | Heat is the resource that is used to level up equipment. It is acquired by collecting special [[consumables]] called embers. Embers are the small heat tokens that are found in The Clockworks by defeating monsters or exploring | + | Heat is the resource that is used to level up equipment. It is acquired by collecting special [[consumables]] called embers. Embers are the small heat tokens that are found in The Clockworks by defeating monsters or exploring. |
| − | Upon successfully reaching the exit elevator of a gate level, | + | Upon successfully reaching the exit elevator of a gate level, the acquired heat is automatically distributed and applied to all of the equipment the knight are currently wearing that has not finished leveling. Once the knight has acquired enough Heat to satisfy the requirement, they can use the [[Forge]] to upgrade the equipment to the next level. Equipment can reach a maximum of level 10. |
Leveling equipment makes it more powerful, is needed for some precursor items used in [[crafting]], and sometimes adds bonuses to equipment. However, be aware that when a knight's equipment surpasses the current tier's equipment rating, its [[Clockworks#Equipment_Reduction|effectiveness is reduced]]. | Leveling equipment makes it more powerful, is needed for some precursor items used in [[crafting]], and sometimes adds bonuses to equipment. However, be aware that when a knight's equipment surpasses the current tier's equipment rating, its [[Clockworks#Equipment_Reduction|effectiveness is reduced]]. | ||
| Line 70: | Line 78: | ||
=== Getting More Energy === | === Getting More Energy === | ||
{{main|Energy|Energy Depot}} | {{main|Energy|Energy Depot}} | ||
| − | |||
| − | + | Energy can be purchased through the Energy Depot for real life money or using crowns in-game. The Energy Depot can be accessed by clicking on the blue circle with the horizontal line, the energy symbol, in the lower right hand corner of the Arsenal, or by interacting with a [[Stranger]] with the same symbol on his mask. | |
| − | The Purchase tab in the Energy Depot allows | + | The Purchase tab in the Energy Depot allows players to purchase energy with real money through various payment methods, including credit card and PayPal. Credit card payments can be completed in the game screen or in the [https://billing.spiralknights.com/billing/shared/select_type.jspx?choice=coins billing page]. |
| − | The Trade and Market tabs in the Energy Depot allow | + | The Trade and Market tabs in the Energy Depot allow players to purchase energy with crowns or sell energy for crowns. The Trade tab allows one click purchase for the current best offer for buying or selling energy for crowns. The Market tab allows players to set their desired price for buying or selling energy and then wait to see if someone takes their offer. |
{{clearright}} | {{clearright}} | ||
== Finding a Guild to Join == | == Finding a Guild to Join == | ||
{{main|Guild}} | {{main|Guild}} | ||
| − | Guilds are associations of people with the same goal or objectives. In Spiral Knights, joining a guild gives | + | Guilds are associations of people with the same goal or objectives. In Spiral Knights, joining a guild gives access to a special guildhall where all members can go to meet. Guilds also have their own chat channel that can be used anywhere. |
| − | There is a forum section devoted to guilds looking for more members. | + | There is a forum section devoted to guilds looking for more members. It can be found [http://forums.spiralknights.com/en/forum/3 here]. |
| − | == What to do with all | + | == What to do with all the crowns and materials? == |
{{main|Vendor|Crafting}} | {{main|Vendor|Crafting}} | ||
| − | When a knight is ready to upgrade [[equipment]], there are two choices: buying from a [[vendor]], or [[crafting]]. Most vendors have a randomized list of items or [[recipes]], so it is a good idea to check with the vendors on a regular basis. To craft items, a knight needs to know the recipe and have all the required materials. | + | When a knight is ready to upgrade [[equipment]], there are two choices: buying from a [[vendor]], or [[crafting]]. Most vendors have a randomized list of items or [[recipes]], so it is a good idea to check with the vendors on a regular basis. To craft items, a knight needs to know the recipe and have all the required materials. As well as the materials, crafting has a cost in crowns and requires [[Orbs of Alchemy]]. |
== See Also == | == See Also == | ||
| Line 95: | Line 102: | ||
*[[List of commonly used abbreviations]] | *[[List of commonly used abbreviations]] | ||
*[[:Category:Terminology]] | *[[:Category:Terminology]] | ||
| + | |||
| + | ==Other links== | ||
| + | *{{de|Der_Anfang|Der Anfang}} | ||
| + | *{{es|Cómo_empezar|Cómo empezar}} | ||
| + | *{{fr|Débuter}} | ||
{{guides}} | {{guides}} | ||
[[Category:Tutorials]] | [[Category:Tutorials]] | ||
| + | [[Category:Official Documentation]] | ||
Latest revision as of 19:30, 7 March 2017
Welcome to Spiral Knights! This is a tutorial for starting out in the game.
Contents
Creating a Knight
After installing Spiral Knights and creating an account, players need to create a knight before they can start playing. In the first step, the knight's beginning helmet and armor is chosen, as well as the design color. The design color will be used as the base color in helmets and armor worn, depending on the design of the gear. Step 2 adds up to two optional accessories to the chosen gear. Step 3 allows to select the knight's height, eye shape, and personal color. The personal color will be the highlight color on helmet and armor, and it will also be the color of the knight's name in game. It will also be the color of the battle sprites eyes that belong to the knight. Once the knight is created and after playing the game, knights are able to buy and craft new gear to wear, but the design color cannot be changed. Height, eye shape, and personal color modifiers are available in game.
In the last step of character creation, players must choose a single-word name which follows these guidelines:
- Names can only be 4 to 18 characters long and can have no more than 2 consecutive letters (e.g. Moo, but not Moooooo).
- Players can have up to two dashes in a name, but there needs to be a minimum of two characters between dashes. Each new word is automatically shown with a capital letter. (e.g. Knight-Of-Green)
- If a player cannot think of a name, there are many random name generators on the web that can make sequences of random syllables to help them come up with name ideas.
- Knight names cannot contain any filtered words.
- After clicking on the "Confirm" button to create the knight, if the name tried is already in use by another player, the player will receive a message saying "Sorry, that name is already in use." and they will need to try another name.
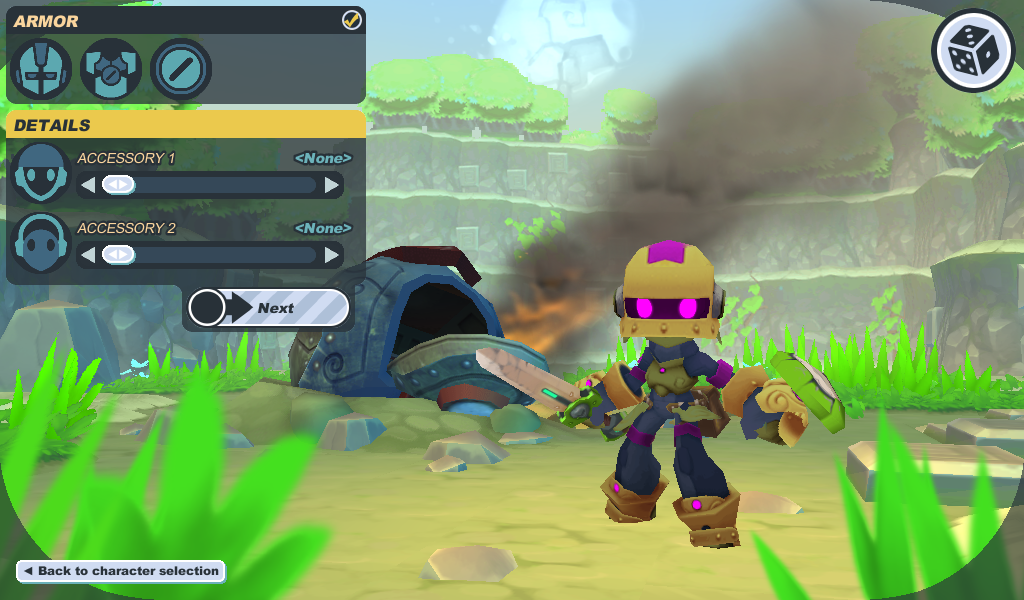 Step 2: Select up to two optional accessories. |
The Game Window
The game window consists of a few different parts. Most of the window is taken up by the world view. Here is possible to see the knight walking around (left mouse button, WASD Keys, OR Arrow Keys to move OR personalize movements and actions by hitting ESC and going to controls.) Left mouse button is used to access other information such as knight information, arsenal, mail, etc.
The bottom left corner of the screen includes:
The top right corner of the screen is the minimap. This provides access to the character, arsenal and crowns.
Once the knight exits the Crash Site, the bottom right corner of the Arsenal will show the energy the knight owns.
The bottom left corner of the screen displays the chat. Type ENTER or / to initiate chat.
While in the Clockworks, click ![]() below the mini-map or use the Q key to lock and unlock the HUD (heads-up display). This will prevent players from accidentally clicking open their character or arsenal while in the heat of battle.
below the mini-map or use the Q key to lock and unlock the HUD (heads-up display). This will prevent players from accidentally clicking open their character or arsenal while in the heat of battle.
Rescue Camp
All new knights begin at The Crash Site. This area gives them basic instruction in the game controls. Knights should proceed through this area to find the Rescue Camp, where they will be able to interact with other players, save the rescue camp, and learn more about Cradle. Once the knight is ready to move on, they can proceed to the final gate and cross the chasm to Haven. Knights will not be able to return to the Rescue Camp, but there are more adventures and items available in Haven.
Haven
Haven is the headquarters for the Spiral Knights while they are exploring Cradle.
- The Town Square contains an Auction House, an Advanced Training Hall, an alchemy machine, and a variety of Strangers to talk to.
- The Bazaar has a variety of Strangers selling equipment, an alchemy machine, a Spiral Quartermaster selling recipes for crafting, and a Token Trader taking tokens for materials.
- The Arcade is the location of the gates that knights use to enter and explore the Clockworks.
- The Garrison contains an entrance to The Lab, Guild Halls and the Hall of Heroes.
The Clockworks
The Clockworks consist of many levels grouped into three tiers that are divided by two Subtowns, Moorcroft Manor and Emberlight. Knights can enter a gate and explore the levels with a party of 1 to 4 knights.
While exploring the Clockworks, knights will find Crowns, Materials, Heat, Minerals, and other special items like Mecha Knight Kits, and Energy Gates.
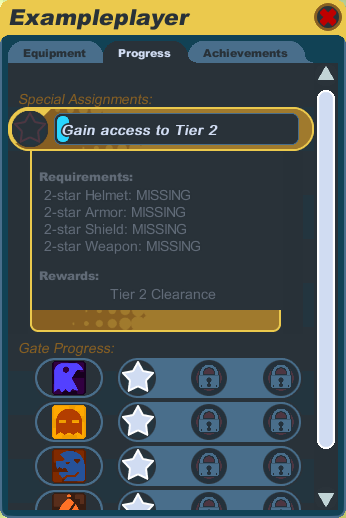
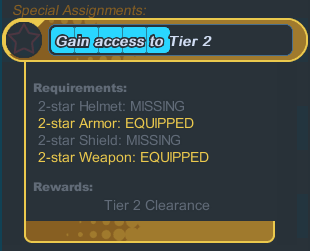
The entrance to each subtown is guarded by the Spiral Warden. To proceed to the next tier the player must equip a certain star level of equipment and speak to Barrus in the Hall of Heroes. Players can check their progress toward gaining access to the next tier through the P key and choosing the progress tab, or by speaking to the Spiral Warden.
Various Clockworks levels can also - and sometimes only - be accessed via the Missions interface, these missions take knights directly to the relevant depth of the Clockworks. The higher the rank of the mission, the deeper it is likely to be located within the clockworks.
Heat & Leveling Equipment
Heat is the resource that is used to level up equipment. It is acquired by collecting special consumables called embers. Embers are the small heat tokens that are found in The Clockworks by defeating monsters or exploring.
Upon successfully reaching the exit elevator of a gate level, the acquired heat is automatically distributed and applied to all of the equipment the knight are currently wearing that has not finished leveling. Once the knight has acquired enough Heat to satisfy the requirement, they can use the Forge to upgrade the equipment to the next level. Equipment can reach a maximum of level 10.
Leveling equipment makes it more powerful, is needed for some precursor items used in crafting, and sometimes adds bonuses to equipment. However, be aware that when a knight's equipment surpasses the current tier's equipment rating, its effectiveness is reduced.
Getting More Energy
Energy can be purchased through the Energy Depot for real life money or using crowns in-game. The Energy Depot can be accessed by clicking on the blue circle with the horizontal line, the energy symbol, in the lower right hand corner of the Arsenal, or by interacting with a Stranger with the same symbol on his mask.
The Purchase tab in the Energy Depot allows players to purchase energy with real money through various payment methods, including credit card and PayPal. Credit card payments can be completed in the game screen or in the billing page.
The Trade and Market tabs in the Energy Depot allow players to purchase energy with crowns or sell energy for crowns. The Trade tab allows one click purchase for the current best offer for buying or selling energy for crowns. The Market tab allows players to set their desired price for buying or selling energy and then wait to see if someone takes their offer.
Finding a Guild to Join
Guilds are associations of people with the same goal or objectives. In Spiral Knights, joining a guild gives access to a special guildhall where all members can go to meet. Guilds also have their own chat channel that can be used anywhere.
There is a forum section devoted to guilds looking for more members. It can be found here.
What to do with all the crowns and materials?
When a knight is ready to upgrade equipment, there are two choices: buying from a vendor, or crafting. Most vendors have a randomized list of items or recipes, so it is a good idea to check with the vendors on a regular basis. To craft items, a knight needs to know the recipe and have all the required materials. As well as the materials, crafting has a cost in crowns and requires Orbs of Alchemy.
See Also
- New Player Briefing - for some quick information about how the game works
- List of commonly used abbreviations
- Category:Terminology
Other links
- Deutscher Artikel: Der Anfang
- Artículo en español: Cómo empezar
- Article en français: Débuter
| |
|---|
| Starting Out | New Player Briefing | User interface | Useful Links |
| |
| |
| |
